Tag: vegetarian

  • Ginger-Infused Oatmeal

    Ginger-Infused Oatmeal

    How to Make Ginger-Infused Oatmeal

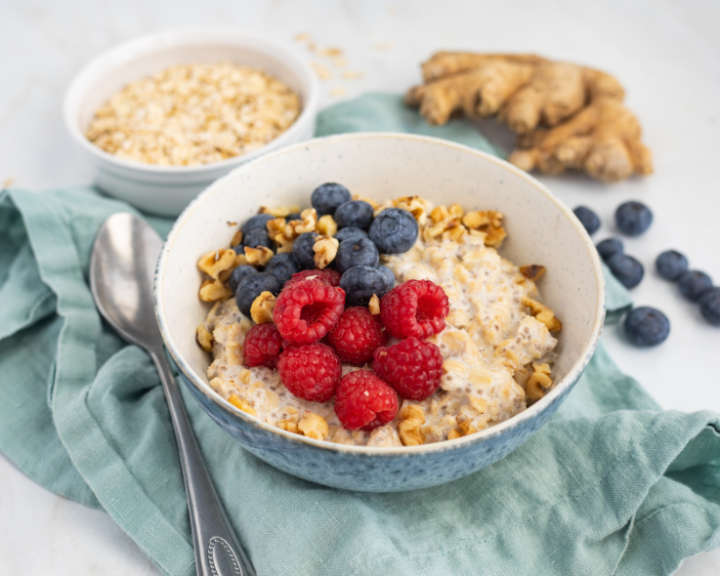
    Start your day with a satisfying Ginger-Infused Oatmeal, a delightful breakfast that’s diabetes-friendly and filling. Creamy oatmeal, gently infused with the warmth of ginger, offers a comforting and slightly spicy twist to your morning routine. It’s packed with chia seeds for an added boost of fiber and heat-healthy omega-3 fatty acids. Top it off with a vibrant medley of fresh berries that provide a burst of natural sweetness and antioxidants. Sprinkle with chopped walnuts for a satisfying crunch and an extra dose of heart-healthy goodness.


    5 min prep time


    15 min cook time


    4servings


    1/2 cup oatmeal + ¼ cup berries

    Print Recipe >

    Step-By-Step Instructions:

    1. In a medium saucepan, bring milk to a gentle simmer.

    2. Stir in the oats, brown sugar substitute, grated ginger, chia seeds, cinnamon, and vanilla.

    3. Cook the mixture over medium heat, stirring occasionally, until the oats are creamy and the liquid is absorbed (about 5–7 minutes).

    4. Serve the oatmeal in bowls, topped with fresh berries and walnuts.

    pinterestfacebooktwittermail

    Nutrition facts

    4 Servings


    • Serving Size

      1/2 cup oatmeal + ¼ cup berries


    • Amount per serving


      Calories


      180

    • % Daily value*

    • Total Fat
      5g

      6%

      • Saturated Fat
        0.5g

        3%
      • Trans Fats
        0g

    • Cholesterol
      5mg

      2%

    • Sodium
      50mg

      2%

    • Total Carbohydrate
      28g

      10%

      • Dietary Fiber
        5g

        18%
      • Total Sugars
        9g
      • Added Sugars
        0g

        0%

    • Protein
      8g

    • Potassium
      361mg

      8%

    Ingredients

    old-fashioned rolled oats
    1 cup

    skim milk
    2 cup

    brown sugar substitute
    2 tsp

    fresh ginger (grated)
    1 tbsp

    chia seeds
    1 tbsp

    ground cinnamon
    1/4 tsp

    vanilla extract
    1/4 tsp

    raspberries
    1/2 cup

    blueberries
    1/2 cup

    walnuts (chopped)
    2 tbsp

  • Curried Chickpea Stew with Roasted Vegetables

    Curried Chickpea Stew with Roasted Vegetables

    How to Make Curried Chickpea Stew with Roasted Vegetables

    Get ready to savor a cozy bowl of veggie-filled goodness with this diabetes-friendly vegan chickpea stew. Bursting with flavor and roasted veggies, it’s like a hug for your taste buds and your health.  


    20 min prep time


    30 min cook time


    4servings


    2 cups

    Print Recipe >

    Step-By-Step Instructions:

    1. Preheat the oven to 400 degrees F. Line a baking sheet with parchment paper. 

    2. In a large bowl, toss the sweet potato, red bell pepper, and cauliflower florets with 1/8 tsp salt, 1/4 tsp pepper, and 1 tsp of olive oil. 

    3. Spread the vegetables in a single layer on the prepared baking sheet. Roast in the preheated oven for 20–25 minutes until they are tender and slightly caramelized. 

    4. In a large pot or Dutch oven, heat remaining olive oil over medium heat. Add the diced onion and minced garlic, and sauté until they become fragrant and translucent. 

    5. Add the curry powder, turmeric, 1/4 tsp salt, and 1/4 tsp pepper to the pot. Stir well to coat the onions and garlic with the spices. 

    6. Pour in the diced tomatoes (with their juice), coconut milk, and vegetable broth. Stir to combine. Add the rinsed chickpeas to the pot and stir everything together. Bring the mixture to a boil. 

    7. Reduce the heat to low and let the stew simmer uncovered for about 15–20 minutes, allowing the flavors to meld together. Stir occasionally. 

    8. Remove the roasted vegetables from the oven and add them to the pot. Stir gently to incorporate them into the stew. Serve the curried chickpea stew in bowls, garnished with fresh cilantro. 

    pinterestfacebooktwittermail

    Nutrition facts

    4 Servings


    • Serving Size

      2 cups


    • Amount per serving


      Calories


      180

    • % Daily value*

    • Total Fat
      6g

      8%

      • Saturated Fat
        2g

        10%
      • Trans Fats
        0g

    • Cholesterol
      0mg

      0%

    • Sodium
      350mg

      15%

    • Total Carbohydrate
      27g

      10%

      • Dietary Fiber
        7g

        25%
      • Total Sugars
        11g
      • Added Sugars
        0g

        0%

    • Protein
      5g

    • Potassium
      549mg

      12%

    Ingredients

    sweet potatoes (peeled and diced, for the roasted veggies)
    1 cup

    red bell pepper (diced, for the roasted veggies)
    1 whole

    cauliflower florets (for the roasted veggies)
    1 cup

    olive oil (divided)
    2 tsp

    salt (divided)
    1/2 tsp

    black pepper (divided)
    1/2 tsp

    onion(s) (diced)
    1 small

    garlic (minced)
    2 clove

    curry powder
    2 tsp

    ground turmeric
    1/2 tsp

    canned diced tomatoes (no-salt-added)
    14 oz

    lite unsweetened coconut milk
    6 oz

    low sodium vegetable broth
    1 cup

    canned chickpeas (rinsed and drained)
    7 oz

    fresh cilantro (chopped, for garnish)
    1 bunch

  • Sautéed Thyme Mushrooms

    Sautéed Thyme Mushrooms

    How to Make Sautéed Thyme Mushrooms

    Elevate your diabetes-friendly dining with these delightful Sautéed Thyme Mushrooms. Bursting with flavor and seasoned to perfection, these mushrooms are a tasty addition to any meal. Experience a dish that’s both satisfying and supportive of your diabetes management goals.


    5 min prep time


    15 min cook time


    4servings


    approx. ¾ cup

    Print Recipe >

    Step-By-Step Instructions:

    1. Heat the olive oil in a large skillet over medium-high heat.
    2. Add the sliced mushrooms to the skillet and cook for about 6–8 minutes, stirring occasionally, until the mushrooms release their moisture and become golden brown.
    3. Add the minced garlic and fresh thyme leaves to the skillet. Sauté for another 1–2 minutes until the garlic is fragrant.
    4. Season the mushrooms with salt (optional) and black pepper, adjusting the amount to taste. If desired, drizzle the mushrooms with lemon juice for a tangy flavor.
    5. Continue cooking the mushrooms for an additional minute, stirring to evenly distribute the flavors.
    6. Remove from heat and transfer the sautéed thyme mushrooms to a serving dish.
    pinterestfacebooktwittermail

    Nutrition facts

    4 Servings


    • Serving Size

      approx. ¾ cup


    • Amount per serving


      Calories


      90

    • % Daily value*

    • Total Fat
      7g

      9%

      • Saturated Fat
        1g

        5%
      • Trans Fats
        0g

    • Cholesterol
      0mg

      0%

    • Sodium
      5mg

      <1%

    • Total Carbohydrate
      6g

      2%

      • Dietary Fiber
        1g

        4%
      • Total Sugars
        2g
      • Added Sugars
        0g

        0%

    • Protein
      3g

    • Potassium
      510mg

      11%

    Ingredients

    mushrooms (such as cremini or button mushrooms) (quartered)
    1 lbs

    olive oil
    2 tbsp

    garlic (minced)
    2 clove

    fresh thyme leaves
    1 tbsp

    salt and pepper to taste
    1

    lemon juice (optional, for a tangy twist)
    1 tbsp

  • Plum Muffins

    Plum Muffins

    How to Make Plum Muffins

    These plum muffins combine the goodness of juicy plums with diabetes-friendly ingredients, ensuring a satisfying treat that won’t derail your meal eating plan and lets you savor the sweet moments. without compromise.


    15 min prep time


    20 min cook time


    12servings


    1 muffin

    Print Recipe >

    Step-By-Step Instructions:

    1. Preheat the oven to 375 degrees F. Grease a muffin tin or line with paper liners.

    2. In a large bowl, combine flour, sugar substitute, baking powder, baking soda, cinnamon, and salt.

    3. In another bowl, mix applesauce, milk, eggs, oil, and vanilla.

    4. Add wet ingredients to dry ingredients and stir until just combined. Fold in chopped plums. Spoon batter into muffin cups, filling two-thirds full.

    5. Bake for 15–20 minutes or until a toothpick comes out clean. Allow to cool for 5 minutes in the pan, then transfer to a wire rack to cool completely.

    pinterestfacebooktwittermail

    Nutrition facts

    12 Servings


    • Serving Size

      1 muffin


    • Amount per serving


      Calories


      140

    • % Daily value*

    • Total Fat
      6g

      8%

      • Saturated Fat
        1g

        5%
      • Trans Fats
        0g

    • Cholesterol
      30mg

      10%

    • Sodium
      120mg

      5%

    • Total Carbohydrate
      23g

      8%

      • Dietary Fiber
        3g

        11%
      • Total Sugars
        3g
      • Added Sugars
        0g

        0%

    • Protein
      4g

    • Potassium
      131mg

      3%

    Ingredients

    whole wheat flour
    2 cup

    baking sugar substitute
    5 tbsp

    baking powder
    2 tsp

    baking soda
    1/2 tsp

    ground cinnamon
    1/2 tsp

    salt
    1/4 tsp

    unsweetened applesauce
    1/2 cup

    skim milk
    1/2 cup

    eggs (beaten)
    2 whole

    vegetable oil
    1/4 cup

    vanilla extract
    1 tsp

    plums (small diced)
    1 cup

  • Maple-Pumpkin Spice Oatmeal Cookies

    Maple-Pumpkin Spice Oatmeal Cookies

    How to Make Maple-Pumpkin Spice Oatmeal Cookies

    Enjoy all the flavors of fall with these hearty maple-pumpkin spice oatmeal cookies. Diabetes-friendly and made using natural sugars, these cookies will satisfy your pumpkin spice sweet tooth without derailing your diabetes management plan.


    10 min prep time


    25 min cook time


    14servings


    1 cookie

    Print Recipe >

    Step-By-Step Instructions:

    1. Preheat the oven to 350 degrees F. Line two baking sheets with parchment paper or use silicone baking mats.
    2. In a medium bowl, stir together the oats, flour, baking powder, salt, and pumpkin pie spice.
    3. Add the applesauce, dried apricots, maple syrup, butter, and oil to a blender. Cover and blend until well combined. Add the egg and vanilla extract and blend until puréed like a smoothie. Pour the batter into the dry mixture in the medium bowl and stir until well combined. Note: The batter will seem slightly loose (runny).
    4. Drop 7 cookies on each baking sheet, about 2 well-rounded measuring tablespoons each. Bake until browned on the bottom, about 25 minutes.
    5. Remove cookies from the oven and let cool completely on the baking sheets on racks. Store the soft-chew cookies in an airtight container at room temperature for up to 3 days or freeze for up to 1 month.
    pinterestfacebooktwittermail

    Nutrition facts

    14 Servings


    • Serving Size

      1 cookie


    • Amount per serving


      Calories


      120

    • % Daily value*

    • Total Fat
      6g

      8%

      • Saturated Fat
        2.5g

        13%
      • Trans Fats
        0.1g

    • Cholesterol
      20mg

      7%

    • Sodium
      150mg

      7%

    • Total Carbohydrate
      16g

      6%

      • Dietary Fiber
        2g

        7%
      • Total Sugars
        7g
      • Added Sugars
        3g

        6%

    • Protein
      2g

    • Potassium
      115mg

      2%

    Ingredients

    old-fashioned rolled oats
    1 1/4 cup

    all-purpose flour or whole-wheat pastry flour
    1/2 cup

    baking powder
    1 tsp

    sea salt
    3/4 tsp

    pumpkin pie spice or ground cinnamon
    3/4 tsp

    unsweetened applesauce
    1/2 cup

    dried apricots (about 7 or 8 pieces)
    2 oz

    pure maple syrup
    1/4 cup

    unsalted butter (room temperature)
    4 tbsp

    sunflower or avocado oil
    2 tbsp

    eggs
    1 large

    pure vanilla extract
    1 1/2 tsp

  • Grilled Strawberries on “Crème” with Balsamic Glaze

    Grilled Strawberries on “Crème” with Balsamic Glaze

    How to Make Grilled Strawberries on “Crème” with Balsamic Glaze

    This diabetes-friendly recipe for grilled strawberries on crème with balsamic glaze is sure to impress! Utilizing natural sweeteners like maple syrup or honey includes extra nutrients. The Greek yogurt adds some extra protein to help keep you feeling satisfied after eating this delicious dessert. This is also a great choice if you are looking for gluten-free or vegetarian sweet treat.


    10 min prep time


    5 min cook time


    2servings


    ½ plate (9 strawberry halves)

    Print Recipe >

    Step-By-Step Instructions:

    1. In a medium bowl, whisk together the yogurt, Neufchâtel, and honey until thick and creamy. Spread the crème onto a serving platter or board.
    2. Prepare and preheat a grill or grill pan. Brush the cut side of the strawberry halves with the oil and grill over direct medium-high heat, cut-side down, until rich grill marks form, about 4 minutes.
    3. Arrange the strawberries on the crème. Drizzle with the balsamic glaze, sprinkle with the almonds and fresh herbs, and serve.
    4. *Make your own balsamic reduction sauce: Add 1/4 cup balsamic vinegar to a small saucepan, bring to a boil over high heat, then reduce heat to medium and cook, stirring a couple times, until it can just coat the back of a spoon (to yield about 1 1/2 tablespoons), about 5 minutes. (Note: The balsamic reduction thickens slightly as it cools.)
    pinterestfacebooktwittermail

    Nutrition facts

    2 Servings


    • Serving Size

      ½ plate (9 strawberry halves)


    • Amount per serving


      Calories


      160

    • % Daily value*

    • Total Fat
      8g

      10%

      • Saturated Fat
        1.6g

        8%
      • Trans Fats
        0g

    • Cholesterol
      10mg

      3%

    • Sodium
      60mg

      3%

    • Total Carbohydrate
      15g

      5%

      • Dietary Fiber
        2g

        7%
      • Total Sugars
        10g
      • Added Sugars
        2g

        4%

    • Protein
      9g

    • Potassium
      270mg

      6%

    Ingredients

    Plain Nonfat Greek yogurt
    2/3 cup

    light cream cheese (at room temperature)
    1 tbsp

    honey
    1/2 tsp

    strawberries (stems removed, halved)
    9 large

    sunflower or avocado oil
    2 tsp

    balsamic glaze or balsamic reduction sauce*
    1 tbsp

    sliced almonds (pan-toasted or raw)
    2 tsp

    extra small fresh basil or mint leaves
    1 tbsp

  • Dark Chocolate Zucchini Bread Snack Squares

    Dark Chocolate Zucchini Bread Snack Squares

    How to Make Dark Chocolate Zucchini Bread Snack Squares

    If you’ve got a chocolate craving, try these naturally sweetened dark chocolate zucchini bread snack squares! Moist and rich, these brownie-like treats are a great dessert for people with diabetes. Plus, you can easily customize this recipe to your favorite flavors!

    Want to add a little crunch? Stir in chopped pistachios, chopped walnuts, or cacao nibs along with the zucchini.

    Note: Optional ingredients are not included in the nutritional analysis.


    15 min prep time


    40 min cook time


    15servings


    1 square

    Print Recipe >

    Step-By-Step Instructions:

    1. Preheat the oven to 350 degrees F. Brush a 9- by 13-inch baking pan with 1/2 teaspoon of the oil. Line just the bottom of the pan with parchment paper.
    2. In a medium mixing bowl, whisk together the flour, cocoa powder, baking powder, baking soda, and salt.
    3. In a large bowl, whisk together the mashed bananas, eggs, the remaining 1/4 cup oil, the vanilla, and orange zest until well combined. Add the dry mixture and stir until just combined. Add the zucchini and stir until evenly combined.
    4. Spread the batter evenly into the prepared pan. Bake until springy to the touch, about 35 to 38 minutes.
    5. Cool completely in the pan on a rack. Cut into 15 squares and serve at room temperature. Store in an airtight container in the refrigerator for up to 1 week or in the freezer for up to 3 months.
    pinterestfacebooktwittermail

    Nutrition facts

    15 Servings


    • Serving Size

      1 square


    • Amount per serving


      Calories


      110

    • % Daily value*

    • Total Fat
      5g

      6%

      • Saturated Fat
        0.9g

        5%
      • Trans Fats
        0g

    • Cholesterol
      25mg

      8%

    • Sodium
      150mg

      7%

    • Total Carbohydrate
      16g

      6%

      • Dietary Fiber
        3g

        11%
      • Total Sugars
        3g
      • Added Sugars
        0g

        0%

    • Protein
      3g

    • Potassium
      210mg

      4%

    Ingredients

    sunflower or avocado oil
    1/4 cup + 1/2 teaspoon

    whole wheat pastry flour or flour of choice
    1 1/2 cup

    unsweetened cocoa powder (packed)
    1/3 cup

    baking powder
    3/4 tsp

    baking soda
    1/2 tsp

    Sea Salt
    1/2 tsp

    mashed fully ripened bananas (about 3 medium bananas)
    1 1/2 cup

    eggs
    2 large

    pure vanilla extract
    1 1/2 tsp

    grated orange zest
    1 1/2 to 2

    zucchini (coarsely grated (do not drain))
    1 large

  • Peanut Butter Blondies with Cacao Nibs

    Peanut Butter Blondies with Cacao Nibs

    How to Make Peanut Butter Blondies with Cacao Nibs

    If you love peanut butter cups, you’ll love these diabetes-friendly peanut butter blondies with cacao nibs! These cakey bars use natural sweeteners to pump up the flavor and nutrients for this dessert. The blondie bars are rich with peanut butter flavor and are great for when you are craving a sweet treat that won’t disrupt your diabetes management plan.


    10 min prep time


    25 min cook time


    16servings


    1 blondies

    Print Recipe >

    Step-By-Step Instructions:

    1. Preheat the oven to 350 degrees F. Lightly brush the bottom and sides of an 8-inch square baking pan with 1/2 teaspoon of the oil. Line just the bottom with parchment paper. Alternatively, use a silicone baking pan.
    2. Add the remaining 3 tablespoons oil, the butter, and dates to a blender container. Cover and blend until just combined. Add the apple butter, egg, and vanilla and almond extracts and blend again until a smooth, pudding-like consistency forms, at least 1 minute on high speed.
    3. Transfer the batter to a medium mixing bowl. Add the peanut butter and salt and stir until combined. Add the flour and stir until combined. Add the cacao nibs and stir until evenly combined.
    4. Evenly spread the batter in the prepared pan. Bake until springy to the touch, about 25 minutes.
    5. Allow to cool in the pan on a rack. When cool, cut into 16 squares and serve. Or store in the refrigerator for up to 1 week or the freezer for up to 2 months.
    pinterestfacebooktwittermail

    Nutrition facts

    16 Servings


    • Serving Size

      1 blondies


    • Amount per serving


      Calories


      150

    • % Daily value*

    • Total Fat
      10g

      13%

      • Saturated Fat
        2.3g

        12%
      • Trans Fats
        0.1g

    • Cholesterol
      15mg

      5%

    • Sodium
      110mg

      5%

    • Total Carbohydrate
      15g

      5%

      • Dietary Fiber
        3g

        11%
      • Total Sugars
        8g
      • Added Sugars
        0g

        0%

    • Protein
      3g

    • Potassium
      170mg

      4%

    Ingredients

    sunflower or avocado oil (divided)
    3 tablespoons + 1/2 teaspoon

    unsalted butter (melted)
    2 tbsp

    pitted dates (about 1 cup)
    5 oz

    no-added-sugar apple butter (spread)
    2/3 cup

    eggs
    1 large

    vanilla extract
    1 1/2 tsp

    almond extract
    1/4 tsp

    no-added-salt, no-added-sugar peanut butter
    1/2 cup

    sea salt
    3/4 tsp

    whole-wheat pastry flour
    3/4 cup

    cacao nibs (or to taste)
    2 tbsp

  • Cocoa-Peppermint Power Pudding, Plant-Based

    Cocoa-Peppermint Power Pudding, Plant-Based

    How to Make Cocoa-Peppermint Power Pudding, Plant-Based

    Fresh mint is the star of the show in this naturally sweetened, vegan cocoa-peppermint power pudding recipe! Perfect for the holiday season or when you want a refreshing dessert, this recipe is diabetes-friendly and high in fiber thanks to the chickpeas. It’s also a great snack option for kids!


    4 hr prep time


    6servings


    ½ cup

    Print Recipe >

    Step-By-Step Instructions:

    1. Add the chickpeas with all the chickpea liquid (aquafaba), dates, cocoa powder, 6 of the peppermint leaves, the extracts, salt, and plant-based milk to a blender and purée on high speed until velvety smooth and warm, about 4 minutes.
    2. Spoon the pudding into small dessert dishes, juice glasses, or mini jars. Chill in the refrigerator for at least 4 hours or overnight. Garnish with the remaining 6 peppermint leaves to serve.
    pinterestfacebooktwittermail

    Nutrition facts

    6 Servings


    • Serving Size

      ½ cup


    • Amount per serving


      Calories


      140

    • % Daily value*

    • Total Fat
      2.5g

      3%

      • Saturated Fat
        0.6g

        3%
      • Trans Fats
        0g

    • Cholesterol
      0mg

      0%

    • Sodium
      250mg

      11%

    • Total Carbohydrate
      28g

      10%

      • Dietary Fiber
        7g

        25%
      • Total Sugars
        15g
      • Added Sugars
        0g

        0%

    • Protein
      5g

    • Potassium
      320mg

      7%

    Ingredients

    canned no-added-salt chickpeas (do not drain)
    15 oz

    pitted dates (about 15 dates—varies based on size)
    4 oz

    unsweetened cocoa powder (packed)
    1/3 cup

    fresh peppermint leaves (divided)
    12 leaves

    pure vanilla extract
    1 1/4 tsp

    peppermint extract
    1/4 tsp

    sea salt
    1/4 tsp

    unsweetened plant-based milk of choice
    1/3 cup

  • Cookie Dough Hummus

    Cookie Dough Hummus

    How to Make Cookie Dough Hummus

    If you’ve ever been tempted to eat raw cookie dough, then try satisfying that craving with this cookie dough hummus! It has all the flavor of cookie dough but without the excess calories and sugar. Like any dessert hummus, the base of cookie dough hummus is garbanzo beans (also called chickpeas), which are a good source of protein. The sweetness comes from Splenda® Brown Sugar Blend, which contains half the calories and sugar of regular brown sugar. 


    10 min prep time


    14servings


    2 tbsp

    Print Recipe >

    Step-By-Step Instructions:

    1. In a food processor, add all ingredients except chocolate chips. Process until mixture is smooth. Scrape down the sides of the food processor bowl and blend again. If mixture is too thick, thin it out with a splash of almond milk.

    2. Scoop mixture into serving bowl, and top with chocolate chips. Serve with fresh fruit or no sugar added cookies!

    pinterestfacebooktwittermail

    Nutrition facts

    14 Servings


    • Serving Size

      2 tbsp


    • Amount per serving


      Calories


      70

    • % Daily value*

    • Total Fat
      3.5g

      4%

      • Saturated Fat
        1.1g

        6%
      • Trans Fats
        0g

    • Cholesterol
      0mg

      0%

    • Sodium
      55mg

      2%

    • Total Carbohydrate
      9g

      3%

      • Dietary Fiber
        2g

        7%
      • Total Sugars
        3g
      • Added Sugars
        2g

        4%

    • Protein
      3g

    • Potassium
      110mg

      2%

    Ingredients

    chickpeas (garbanzo beans) (drained and rinsed well)
    1 (15-ounce)

    unsweetened cashew butter
    3 tbsp

    unsweetened almond milk
    1/4 cup

    low-calorie brown sugar substitute
    2 tbsp

    vanilla extract
    1 tsp

    almond extract
    1/4 tsp

    quick cooking oats
    1 tbsp

    no sugar added chocolate chips
    1/4 cup