Tag: quick & easy

  • Good Morning Power Parfait

    Good Morning Power Parfait

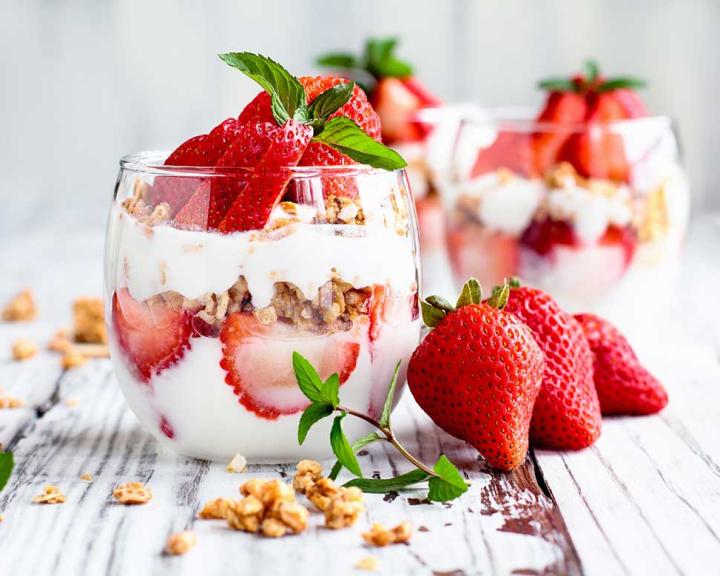
    How to Make Good Morning Power Parfait

    A great breakfast option, the cinnamon and grape nuts in this recipe set it apart from the ordinary fruit and yogurt parfait.


    5 min prep time


    4servings


    1 parfait, about 1 cup

    Print Recipe >

    Step-By-Step Instructions:

    1. Put the cinnamon, banana, and 1 cup of yogurt in a blender and blend until smooth. Divide between 4 wine or parfait glasses.

    2. Top each with ½ cup of sliced strawberries, ¼ cup of the remaining yogurt, and 1 tablespoon of the cereal. Garnish with a sprig of mint if desired.

    pinterestfacebooktwittermail

    Nutrition facts

    4 Servings


    • Serving Size

      1 parfait, about 1 cup


    • Amount per serving


      Calories


      150

    • % Daily value*

    • Total Fat
      1g

      1%

      • Saturated Fat
        0g

        0%
      • Trans Fats
        0g

    • Cholesterol
      5mg

      2%

    • Sodium
      80mg

      3%

    • Total Carbohydrate
      24g

      9%

      • Dietary Fiber
        4g

        14%
      • Total Sugars
        12g
      • Added Sugars
        0g

        0%

    • Protein
      14g

    • Potassium
      437mg

      9%

    Ingredients

    Plain Nonfat Greek yogurt
    2 cup

    ground cinnamon
    1 tsp

    banana(s)
    1 med

    strawberries (sliced)
    2 1/2 cup

    grape-nut-style cereal
    1/4 cup

    fresh mint (for garnish)
    2 sprig

  • Green Bell Pepper Enchiladas

    Green Bell Pepper Enchiladas

    How to Make Green Bell Pepper Enchiladas

    Spice up your mealtime with a delicious twist on a Mexican favorite—Green Bell Pepper Enchiladas! Whether you’re a fan of Tex-Mex cuisine or looking to add some excitement to your dinner table, these enchiladas are a diabetes-friendly delight.

    Cook’s tip: These can be made ahead and frozen for a quick meal later.


    15 min prep time


    30 min cook time


    8servings


    2 enchilada

    Print Recipe >

    Step-By-Step Instructions:

    1. Preheat oven to 350 degrees F.

    2. Spray a large skillet with cooking spray and heat over medium heat. Add green peppers, jalapeño, green onion, and garlic. Cook over medium heat for 4–5 minutes, until the peppers start to soften.

    3. Remove from heat and place in a bowl with the shredded chicken and mix. Set aside.

    4. Return skillet to the heat and add the olive oil. Whisk in the flour for about 1 minute until smooth.

    5. Slowly pour the chicken broth in, whisking until the sauce is thickened and smooth, about 3–4 minutes. Add the salt, coriander, and yogurt and whisk until smooth. Remove from heat.

    6. Pour a small amount of sauce in a 10 x 8 (or medium size) baking dish. Spread to coat the bottom of the pan. 

    7. Place tortillas on a flat surface and divide the chicken and pepper mix between them, placing the mix in the center of each. Roll tightly and place seam side down in the baking dish. Pour remaining sauce over the stuffed tortillas and sprinkle with the shredded cheese.

    8. Bake for 15–20 minutes, until the sauce is bubbling and the cheese has melted. 

    pinterestfacebooktwittermail

    Nutrition facts

    8 Servings


    • Serving Size

      2 enchilada


    • Amount per serving


      Calories


      210

    • % Daily value*

    • Total Fat
      9g

      12%

      • Saturated Fat
        2g

        10%
      • Trans Fats
        0g

    • Cholesterol
      35mg

      12%

    • Sodium
      190mg

      8%

    • Total Carbohydrate
      16g

      6%

      • Dietary Fiber
        1g

        4%
      • Total Sugars
        2g
      • Added Sugars
        0g

        0%

    • Protein
      17g

    • Potassium
      218mg

      5%

    Ingredients

    green bell pepper (diced)
    1 whole

    jalapeño pepper (minced)
    1 whole

    green onion (scallion) (sliced)
    1 whole

    garlic (minced)
    3 clove

    cooked chicken (shredded)
    2 cup

    olive oil
    3 tbsp

    all-purpose flour
    3 tbsp

    low sodium chicken broth
    2 cup

    Kosher Salt
    1/4 tsp

    ground coriander
    1/2 tsp

    Plain Nonfat Greek yogurt
    1/2 cup

    shredded Mexican cheese blend (reduced fat)
    1/4 cup

    corn tortillas
    8 small

  • California Date & Cashew Chicken Stir Fry

    California Date & Cashew Chicken Stir Fry

    How to Make California Date & Cashew Chicken Stir Fry

    This easy chicken stir fry pairs well with the sweetness from California Dates and a touch of heat from red pepper flakes. For a spicier dish, chop up a fresh chili pepper and add it with the scallions. Pair with a whole grain and you’ve got a complete meal full of lean protein, fiber, and complex carbohydrates that is sure to be a crowd pleaser. 


    15 min prep time


    15 min cook time


    4servings


    1 cup

    Print Recipe >

    Step-By-Step Instructions:

    1. In a wok or high-sided sauté pan over medium-high heat, add oil, ginger, garlic, and scallions and cook for about 2 minutes. 

    2. Add red pepper flakes and chicken and cook for about 4 minutes, stirring occasionally. Remove chicken from pan and set aside.

    3. Add bell pepper and broccoli to the pan and cook, stirring occasionally, 2–3 minutes. 

    4. Add chicken back to the pan as well as rice vinegar, soy sauce, and dates. Mix well throughout the pan. Reduce heat to medium-low and bring the liquid to a simmer and reduce until thicker or more syrupy. If a thinner sauce is desired, add 2–4 tablespoons of water. Allow to simmer for about 5 minutes. 

    5. Remove pan from heat. Mix in cilantro, basil, and lime juice. Garnish with toasted cashews.

    6. Optional: Serve with brown rice or another grain. 

    7. Note: You can swap out the bell pepper and/or broccoli for other vegetables. 

    pinterestfacebooktwittermail

    Nutrition facts

    4 Servings


    • Serving Size

      1 cup


    • Amount per serving


      Calories


      350

    • % Daily value*

    • Total Fat
      14g

      18%

      • Saturated Fat
        2g

        10%

    • Cholesterol
      50mg

      17%

    • Sodium
      420mg

      18%

    • Total Carbohydrate
      34g

      12%

      • Dietary Fiber
        5g

        18%
      • Total Sugars
        21g
      • Added Sugars
        0g

        0%

    • Protein
      26g

    Ingredients

    vegetable oil
    1 1/2 tbsp

    ginger (minced)
    2 tbsp

    garlic (minced)
    4 clove

    green onion (scallion) (white and light green parts chopped)
    3 stalks

    red pepper flakes
    1/4 – 1/2 tsp

    boneless, skinless chicken breasts (cut into 1-inch pieces)
    12 oz

    bell peppers (julienne)
    1 whole

    broccoli (cut into bite-sized pieces (~2 cups))
    1 small head

    rice vinegar
    1/3 cup

    lower sodium soy sauce
    2 tbsp

    California dates (pitted and thinly sliced)
    6 whole

    water (optional)
    2-4 tbsp

    cilantro (chopped)
    1 cup

    basil (chiffonade or chopped)
    1 cup

    lime (juiced)
    1 whole

    cashews (toasted)
    1/3 cup

  • Grilled Tilapia with Crunchy Corn Salsa & Arugula

    Grilled Tilapia with Crunchy Corn Salsa & Arugula

    How to Make Grilled Tilapia with Crunchy Corn Salsa & Arugula

    This grilled tilapia is a fresh and flavorful dish that fits in the Dietary Approaches to Stop Hypertension (DASH) Meal Pattern, meaning it’s a good choice for those who are mindful of their blood pressure. Tender tilapia fillets are grilled to perfection and served with a vibrant salsa made from crunchy corn, tomatoes, onions, and cilantro, all atop a bed of peppery arugula.  


    15 min prep time


    8 min cook time


    4servings


    4 oz tilapia, ¾ cup salsa, 1 cup arugula

    Print Recipe >

    Step-By-Step Instructions:

    1. In a large bowl, combine corn, red bell pepper, red onion, jalapeño, rice vinegar, olive oil, and cilantro. Toss well and set aside.

    2. Pat the tilapia fillets dry with a paper towel. Spray with cooking spray on both sides. Sprinkle evenly with cumin, smoked paprika, garlic powder, and black pepper.

    3. Preheat a grill or grill pan over medium-high heat. Spray the pan with oil. Grill the tilapia for 3–4 minutes per side, or until the fish flakes easily with a fork. Remove from heat and let rest for a minute.

    4. Divide the arugula among 4 plates. Place a grilled tilapia fillet on top of the arugula. Spoon the crunchy corn salsa over and around the fish.

    pinterestfacebooktwittermail

    Nutrition facts

    4 Servings


    • Serving Size

      4 oz tilapia, ¾ cup salsa, 1 cup arugula


    • Amount per serving


      Calories


      240

    • % Daily value*

    • Total Fat
      6g

      8%

      • Saturated Fat
        1g

        5%
      • Trans Fats
        0g

    • Cholesterol
      60mg

      20%

    • Sodium
      380mg

      17%

    • Total Carbohydrate
      22g

      8%

      • Dietary Fiber
        2g

        7%
      • Total Sugars
        12g
      • Added Sugars
        6g

        12%

    • Protein
      26g

    • Potassium
      689mg

      15%

    Ingredients

    fresh or frozen corn kernels (thawed if frozen)
    2 cup

    red bell pepper (diced)
    1 med

    red onion (finely diced)
    1/2 small

    jalapeño pepper (finely diced)
    1 small

    unseasoned rice vinegar
    2 tbsp

    olive oil
    1 tbsp

    fresh cilantro (chopped)
    1/4 cup

    tilapia (fresh or frozen, thawed)
    4 fillets (4–5 oz each)

    nonstick cooking spray
    1 whole

    ground cumin
    1 tsp

    smoked paprika
    1 tsp

    garlic powder
    1/4 tsp

    black pepper
    1/4 tsp

    baby arugula
    4 cup

  • Vegan Open-Face Sloppy Joes

    Vegan Open-Face Sloppy Joes

    How to Make Vegan Open-Face Sloppy Joes

    Delight in the rich and savory flavors of these Vegan Meal Pattern Open-Face Sloppy Joes, made with a hearty mixture of plant-based protein, tomatoes, and a blend of smoky spices. Topped on a whole wheat bun and garnished with fresh veggies, this dish is both comforting and packed with plant-based goodness. Perfect for a quick and satisfying meal any day of the week.


    10 min prep time


    15 min cook time


    4servings


    ½ bun and 1 cup of filling

    Print Recipe >

    Step-By-Step Instructions:

    1. Preheat a large skillet over medium heat. Add oil, onion, garlic, carrot, and bell pepper. Cook, stirring occasionally, until softened, 4–5 minutes.

    2. Add the plant-based ground and continue to cook, breaking it apart with a spatula, until crumbly and browned, 6–7 minutes.

    3. Add broth, tomato sauce, coconut aminos, chili powder, and smoked paprika to the skillet. Stir to combine until heated through and the sauce thickens, 2–3 minutes.

    4. Split the buns apart and divide between plates. Top with 1 cup of filling per half bun.

    pinterestfacebooktwittermail

    Nutrition facts

    4 Servings


    • Serving Size

      ½ bun and 1 cup of filling


    • Amount per serving


      Calories


      210

    • % Daily value*

    • Total Fat
      8g

      10%

      • Saturated Fat
        1g

        5%
      • Trans Fats
        0g

    • Cholesterol
      0mg

      0%

    • Sodium
      330mg

      14%

    • Total Carbohydrate
      28g

      10%

      • Dietary Fiber
        5g

        18%
      • Total Sugars
        8g
      • Added Sugars
        2g

        4%

    • Protein
      10g

    • Potassium
      359mg

      8%

    Ingredients

    olive oil
    1 tbsp

    yellow onion (diced)
    1/2 small

    garlic (minced)
    1 clove

    carrots (small diced)
    1 med

    green bell pepper (small diced)
    1/2 whole

    plant-based ground beef (lower saturated fat)
    12 oz

    low sodium vegetable broth
    1 cup

    tomato sauce (no salt added)
    8 oz

    coconut aminos
    1 tbsp

    chili powder
    1/2 tsp

    smoked paprika
    1/2 tsp

    whole wheat hamburger buns (split)
    2 whole

  • Open-Face Chickpea Salad Sandwich

    Open-Face Chickpea Salad Sandwich

    How to Make Open-Face Chickpea Salad Sandwich

    Enjoy the fresh and satisfying flavors of this Open-Face Chickpea Salad Sandwich, a delightful Vegan Meal Pattern option. A blend of chickpeas, crisp vegetables, and a zesty dressing is piled high on a slice of toasted bread, creating a colorful and nutritious meal that’s both light and filling. Perfect for a quick lunch or a light dinner.


    10 min prep time


    4servings


    1 slice bread, ⅔ cup chickpea filling

    Print Recipe >

    Step-By-Step Instructions:

    1. Drain and rinse the chickpeas. Transfer to a medium bowl.

    2. Add fresh dill, mayo, Dijon, vinegar, and spices to the bowl.

    3. Use a fork or potato masher to crush the chickpeas, making a semi-smooth spread.

    4. Toast the bread slices. Divide between plates and top with spring mix, tomato slices, and chickpea spread. Serve with a side of veggie sticks. 

    pinterestfacebooktwittermail

    Nutrition facts

    4 Servings


    • Serving Size

      1 slice bread, ⅔ cup chickpea filling


    • Amount per serving


      Calories


      350

    • % Daily value*

    • Total Fat
      8g

      10%

      • Saturated Fat
        0.5g

        3%
      • Trans Fats
        0g

    • Cholesterol
      5mg

      2%

    • Sodium
      380mg

      17%

    • Total Carbohydrate
      57g

      21%

      • Dietary Fiber
        15g

        54%
      • Total Sugars
        9g
      • Added Sugars
        2g

        4%

    • Protein
      17g

    • Potassium
      658mg

      14%

    Ingredients

    canned chickpeas (no salt added)
    30 oz

    fresh dill (chopped)
    1 tbsp

    low-fat vegan mayonnaise
    1/3 cup

    Dijon Mustard
    2 tsp

    Apple Cider Vinegar
    2 tsp

    onion powder
    1/4 tsp

    paprika
    1/4 tsp

    salt
    1/4 tsp

    black pepper
    1/4 tsp

    whole grain bread
    4 slice

    spring mix salad
    1/2 pkg (5 oz)

    tomato(es) (sliced)
    1 whole

    flat leaf parsley (chopped)
    1 tbsp

    carrots (peeled and cut into 2-inch sticks)
    2 large

    celery (trimmed and cut into 2-inch sticks)
    2 stalks

  • Tofu with Peanut Sauce, Broccolini & Quinoa

    Tofu with Peanut Sauce, Broccolini & Quinoa

    How to Make Tofu with Peanut Sauce, Broccolini & Quinoa

    Indulge in the delicious balance of flavors with this tofu recipe. Crispy tofu is smothered in a creamy peanut sauce and served alongside tender broccolini and fluffy quinoa. This Vegan Meal Pattern dish is not only nutritious, it’s incredibly satisfying.


    10 min prep time


    10 min cook time


    4servings


    ½ cup cooked quinoa, 1 cup tofu, ½ cup broccolini

    Print Recipe >

    Step-By-Step Instructions:

    1. Juice lime into a small bowl.

    2. Add ginger, peanut butter powder, water, soy sauce, and brown sugar to a bowl. Whisk to combine the sauce. 

    3. Preheat a large skillet over medium heat.

    4. While the skillet heats up, medium dice tofu. Place in a medium bowl, sprinkle with cornstarch, then gently toss to coat.

    5. Once the skillet is hot, add 2 tsp oil and swirl to coat the bottom. Add tofu and pan-fry, turning occasionally, until browned and crispy, 5–7 minutes. Transfer tofu to a bowl. 

    6. Return the skillet to medium heat. Add remaining oil and broccolini to the skillet. Cook, stirring frequently, until tender-crisp, 4–5 minutes.

    7. To serve, divide quinoa, tofu, and broccolini between bowls. Drizzle tofu with peanut sauce. 

    pinterestfacebooktwittermail

    Nutrition facts

    4 Servings


    • Serving Size

      ½ cup cooked quinoa, 1 cup tofu, ½ cup broccolini


    • Amount per serving


      Calories


      410

    • % Daily value*

    • Total Fat
      14g

      18%

      • Saturated Fat
        1.5g

        8%
      • Trans Fats
        0g

    • Cholesterol
      0mg

      0%

    • Sodium
      280mg

      12%

    • Total Carbohydrate
      46g

      17%

      • Dietary Fiber
        11g

        39%
      • Total Sugars
        6g
      • Added Sugars
        2g

        4%

    • Protein
      28g

    • Potassium
      565mg

      12%

    Ingredients

    lime
    1 whole

    fresh ginger (peeled and minced)
    1-inch piece

    powdered peanut butter
    1/4 cup

    water
    2 tbsp

    soy sauce
    1 tbsp

    brown sugar
    2 tsp

    extra firm tofu (drained and pressed)
    21 oz

    Cornstarch
    2 tsp

    olive oil
    1 tbsp

    broccolini
    2 bunch

    cooked quinoa
    2 cup

  • Creamy Coriander Chicken & Cauliflower Skillet

    Creamy Coriander Chicken & Cauliflower Skillet

    How to Make Creamy Coriander Chicken & Cauliflower Skillet

    This delicious Very-Low-Carb Meal Pattern cauliflower skillet will be a new family favorite. A creamy sauce packed with low-carb veggies and protein delivers high taste and nutrition!


    5 min prep time


    15 min cook time


    4servings


    2 cups of chicken and veggies

    Print Recipe >

    Step-By-Step Instructions:

    1. Preheat a small saucepan over medium-high heat. Once the pan is hot, add 1 Tbsp oil and flour. Cook, whisking constantly, until lightly golden, about 1 minute.

    2. Slowly whisk in broth and coriander. Bring to a boil, then reduce heat and simmer until thickened, 2–3 minutes. Remove sauce from heat and stir in the yogurt. Set aside.

    3. Preheat an oven-proof skillet over medium heat. Add remaining oil, chicken, cauliflower, mushrooms, and spices. Cook, stirring occasionally, until veggies have softened and chicken is cooked through, 6–7 minutes.

    4. Preheat the oven to broil on high. Position the rack in the upper third of the oven.

    5. When the chicken is done, add sauce to the skillet and stir to combine. 

    6. Top skillet with cheese and place in the oven. Broil until the cheese is melted and bubbly, 3–5 minutes. Serve garnished with cilantro.

    pinterestfacebooktwittermail

    Nutrition facts

    4 Servings


    • Serving Size

      2 cups of chicken and veggies


    • Amount per serving


      Calories


      280

    • % Daily value*

    • Total Fat
      10g

      13%

      • Saturated Fat
        1.5g

        8%
      • Trans Fats
        0g

    • Cholesterol
      85mg

      28%

    • Sodium
      330mg

      14%

    • Total Carbohydrate
      10g

      4%

      • Dietary Fiber
        3g

        11%
      • Total Sugars
        4g
      • Added Sugars
        0g

        0%

    • Protein
      37g

    • Potassium
      924mg

      20%

    Ingredients

    olive oil (divided)
    2 tbsp

    all-purpose flour
    1 tbsp

    no-salt-added chicken broth
    1 cup

    ground coriander
    1/2 tsp

    Plain Nonfat Greek yogurt
    1/4 cup

    chicken breasts (diced)
    16 oz

    cauliflower florets
    4 cup

    cremini (baby bella) mushrooms (thinly sliced)
    8 oz

    chili powder
    1 tbsp

    cumin
    1/4 tsp

    nonfat mozzarella cheese (shredded)
    3/4 cup

    fresh cilantro (chopped)
    1/4 cup

  • Crumbled Tofu Taco Lettuce Wraps

    Crumbled Tofu Taco Lettuce Wraps

    How to Make Crumbled Tofu Taco Lettuce Wraps

    Delight in the vibrant and flavorful Crumbled Tofu Taco Lettuce Wraps, a fresh twist on a classic that fits the Vegan Meal Pattern. Crumbled tofu is seasoned with zesty taco spices and wrapped in crisp lettuce leaves, topped with fresh veggies. It’s a light and tasty low-carb meal that’s perfect for any time of the day.


    7 min prep time


    12 min cook time


    4servings


    3 lettuce wraps, 3/4 cup filling

    Print Recipe >

    Step-By-Step Instructions:

    1. Zest and juice lime into a small bowl and set aside.

    2. Preheat a skillet over medium-high heat. Once the skillet is hot, add oil and swirl to coat the bottom. Add the onion and cook, stirring often, until soft and golden, 2–3 minutes.

    3. Crumble the tofu with your fingers into the skillet. Add lime mixture, bell pepper, chili powder, cumin, oregano, garlic powder, onion powder, salt, and pepper. Stir to combine. 

    4. Cook, stirring often, until tofu turns golden brown and veggies soften, 8–10 minutes.

    5. Separate the lettuce into leaves. Pile leaves in stacks of two per wrap onto plates. Fill each wrap with tofu, salsa, and cilantro.

    pinterestfacebooktwittermail

    Nutrition facts

    4 Servings


    • Serving Size

      3 lettuce wraps, 3/4 cup filling


    • Amount per serving


      Calories


      210

    • % Daily value*

    • Total Fat
      13g

      17%

      • Saturated Fat
        1.5g

        8%
      • Trans Fats
        0g

    • Cholesterol
      0mg

      0%

    • Sodium
      450mg

      20%

    • Total Carbohydrate
      10g

      4%

      • Dietary Fiber
        3g

        11%
      • Total Sugars
        4g
      • Added Sugars
        0g

        0%

    • Protein
      13g

    • Potassium
      226mg

      5%

    Ingredients

    lime
    1 whole

    yellow onion (diced)
    1/2 cup

    extra firm tofu (drained and pressed)
    14 oz

    red bell pepper (small diced)
    1 whole

    yellow bell pepper (small diced)
    1 small

    chili powder
    1 tbsp

    cumin
    1/2 tsp

    dried oregano
    1/2 tsp

    garlic powder
    1/2 tsp

    onion powder
    1/2 tsp

    Kosher Salt
    1/2 tsp

    black pepper
    1/4 tsp

    butter lettuce (leaves removed)
    1 head

    salsa
    1/2 cup

    fresh cilantro (chopped)
    1/4 cup

  • Sheet Pan Cheesy Mini Meatloaves with Bell Peppers & Onions

    Sheet Pan Cheesy Mini Meatloaves with Bell Peppers & Onions

    How to Make Sheet Pan Cheesy Mini Meatloaves with Bell Peppers & Onions

    Elevate your weeknight dinners with these Sheet Pan Cheesy Mini Meatloaves made with a colorful medley of bell peppers and onions. This Very-Low-Carbohydrate Meal Pattern recipe is not only easy to prepare, it’s packed with flavor and nutrients, making it a perfect choice for a healthy and satisfying dinner the whole family will enjoy.


    10 min prep time


    20 min cook time


    4servings


    3 meatloaves, ½ cup vegetables

    Print Recipe >

    Step-By-Step Instructions:

    1. Preheat the oven to 450 degrees F. Line a large baking sheet pan with aluminum foil.

    2. Place turkey, egg, breadcrumbs, half of the Italian seasoning, and black pepper in a medium bowl. Mix with your hands until the meatloaf mixture is well combined.

    3. Form the beef mixture into 12 short logs, approximately 3-inches long. Transfer to one half of the baking sheet.

    4. Spread the bell peppers and onion on the unused side of the baking sheet. Drizzle the vegetables with oil, sprinkle with the remaining seasoning, and toss to coat evenly. Arrange them in a single layer.

    5. Place the baking sheet in the oven and roast, stirring the vegetables midway, until the meatloaves are nearly cooked and the vegetables are tender when pierced with a fork, about 15–20 minutes.

    6. Take the baking sheet out of the oven when the meatloaves are almost done. Lay slices of cheese on top of each meatloaf. Return the sheet to the oven and bake until the meatloaves are fully cooked and the cheese has melted, about 2–3 more minutes.

    pinterestfacebooktwittermail

    Nutrition facts

    4 Servings


    • Serving Size

      3 meatloaves, ½ cup vegetables


    • Amount per serving


      Calories


      310

    • % Daily value*

    • Total Fat
      9g

      12%

      • Saturated Fat
        1.5g

        8%
      • Trans Fats
        0g

    • Cholesterol
      110mg

      37%

    • Sodium
      400mg

      17%

    • Total Carbohydrate
      15g

      5%

      • Dietary Fiber
        2g

        7%
      • Total Sugars
        4g
      • Added Sugars
        0g

        0%

    • Protein
      43g

    • Potassium
      561mg

      12%

    Ingredients

    fat-free ground turkey
    1 lbs

    eggs
    1 whole

    panko bread crumbs
    1/2 cup

    Italian seasoning (divided)
    2 tsp

    black pepper
    1/2 tsp

    green bell pepper (sliced)
    2 whole

    red onion (sliced)
    1 med

    olive oil
    2 tbsp

    block fat free mozzarella cheese (cut into 12 slices)
    6 oz