Tag: lunch

  • Grilled Veggie Wrap

    Grilled Veggie Wrap

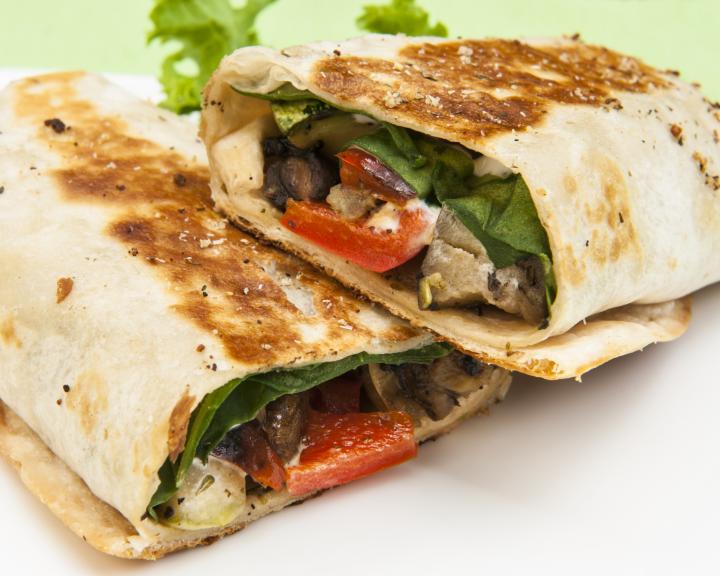
    How to Make Grilled Veggie Wrap

    To make this recipe even quicker, visit your local deli and pick up some pre-grilled veggies!


    15 min prep time


    4servings


    1 wrap

    Print Recipe >

    Step-By-Step Instructions:

    1. Preheat an indoor or outdoor grill.

    2. In a large bowl, whisk together olive oil, balsamic vinegar and ground black pepper.

    3. Add sliced zucchini, squash and bell pepper to marinade and let sit for 5 minutes.

    4. Grill the vegetables about 2-3 minutes on both sides.

    5. Lay out the tortilla and spread with 2 Tbsp. hummus, then add two fresh basil leaves and top with 2 slices of zucchini, 2 slices of yellow squash and 1 slice bell pepper.

    6. Fold in the two sides of the tortilla and roll like a burrito. You can serve these immediately or wrap tightly in plastic and refrigerate.

    pinterestfacebooktwittermail

    Nutrition facts

    4 Servings


    • Serving Size

      1 wrap


    • Amount per serving


      Calories


      110

    • % Daily value*

    • Total Fat
      7g

      9%

      • Saturated Fat
        1g

        5%
      • Trans Fats
        0g

    • Cholesterol
      0mg

      0%

    • Sodium
      120mg

      5%

    • Total Carbohydrate
      11g

      4%

      • Dietary Fiber
        2g

        7%
      • Total Sugars
        5g
      • Added Sugars
        0g

        0%

    • Protein
      4g

    • Potassium
      382mg

      8%

    Ingredients

    olive oil
    1 tbsp

    balsamic vinegar
    2 tbsp

    black pepper
    1/4 tsp

    medium zucchini (sliced lengthwise into 8 slices)
    1

    medium yellow squash (sliced lengthwise into 8 slices)
    1

    red bell pepper (sliced into 4 slices)
    1

    large whole wheat tortillas (low carb, about 10 inch diameter)
    4

    hummus
    1/2 cup

    fresh basil leaves
    8

  • Vegetarian Breakfast Burrito Bowl

    Vegetarian Breakfast Burrito Bowl

    How to Make Vegetarian Breakfast Burrito Bowl

    This colorful and veggie-filled breakfast burrito bowl offers a twist on the classic by using whole grain quinoa instead of white rice as the base. This recipe can be used for breakfast, lunch, or dinner because it is an excellent source of fiber, a good source of protein, and includes non-starchy vegetables. 


    10 min prep time


    5 min cook time


    4servings


    1 bowl

    Print Recipe >

    Step-By-Step Instructions:

    1. Heat olive oil in a non-stick skillet over medium heat. Add spinach and sauté until wilted (about 2 minutes).  

    2. Whisk eggs with cumin and paprika, then pour into the skillet with spinach. Scramble until cooked through.  

    3. Assemble the bowl. Divide cooked quinoa, black beans, tomatoes, avocado, and scrambled eggs among 4 bowls. 

    4. Drizzle with lime juice.

    pinterestfacebooktwittermail

    Nutrition facts

    4 Servings


    • Serving Size

      1 bowl


    • Amount per serving


      Calories


      220

    • % Daily value*

    • Total Fat
      8g

      10%

      • Saturated Fat
        1g

        5%
      • Trans Fats
        0g

    • Cholesterol
      0mg

      0%

    • Sodium
      140mg

      6%

    • Total Carbohydrate
      26g

      9%

      • Dietary Fiber
        6g

        21%
      • Total Sugars
        3g
      • Added Sugars
        0g

        0%

    • Protein
      13g

    • Potassium
      795mg

      17%

    Ingredients

    quinoa (cooked without salt or fat)
    1 cup

    egg substitute
    1 cup

    black beans (rinsed and drained)
    1 cup

    cherry tomatoes (halved)
    1 cup

    avocado (diced, optional: use half for reduced fat)
    1 med

    baby spinach (chopped)
    1 cup

    olive oil
    1 tsp

    ground cumin
    1/2 tsp

    smoked paprika
    1/2 tsp

    Juice of lime
    1 whole

  • California Date, Pear, & Mozzarella Pizza

    California Date, Pear, & Mozzarella Pizza

    How to Make California Date, Pear, & Mozzarella Pizza

    This California Date, Pear, and Mozzarella Pizza is a unique and delicious entree with no added sugar. Using a cauliflower pizza crust, this recipe keeps things light while delivering indulgent flavors. Topped with mozzarella, caramelized California Dates, and sweet sliced pears, it’s a perfect blend of savory and sweet, making it ideal for entertaining or a quick weeknight meal. Plus, it’s a vegetarian-friendly entree too.


    10 min prep time


    25 min cook time


    5servings


    1 slice

    Print Recipe >

    Step-By-Step Instructions:

    1. Preheat your oven according to the instructions on the cauliflower pizza crust package

    2. Place the pizza crust on a baking sheet and evenly distribute the mozzarella cheese over the top.

    3. Layer the sliced pears and chopped California Dates over the cheese, and season with a pinch of sea salt and black pepper.

    4. Bake according to the instructions on the pizza packing, or until the cheese is melted and the crust is golden brown. We baked the pizza for 12 minutes. 

      Tip: Broil for 1-2 minutes at the end to get the cheese a bit more browned and bubbling and to caramelize the California Dates.

    5. Remove from the oven and sprinkle with fresh sage. Tip: Quickly pan-fry your sage for even more of a savory flavor. 

    6. Cut into 5 even slices and serve warm.

    pinterestfacebooktwittermail

    Nutrition facts

    5 Servings


    • Serving Size

      1 slice


    • Amount per serving


      Calories


      200

    • % Daily value*

    • Total Fat
      8g

      10%

      • Saturated Fat
        2g

        10%
      • Trans Fats
        0g

    • Cholesterol
      15mg

      5%

    • Sodium
      190mg

      8%

    • Total Carbohydrate
      28g

      10%

      • Dietary Fiber
        2g

        7%
      • Total Sugars
        11g
      • Added Sugars
        0g

        0%

    • Protein
      5g

    • Potassium
      121mg

      3%

    Ingredients

    cauliflower pizza crust (11 ounce)
    1 whole

    mozzarella cheese (low fat)
    2 oz

    pesto sauce
    2 tbsp

    pear (thinly sliced)
    1/2 med

    California Medjool dates (pitted and chopped)
    3 whole

    fresh sage
    4 leaves

    sea salt
    1/8 tsp

    black pepper
    1/8 tsp

  • Creamy Chicken Apple Salad

    Creamy Chicken Apple Salad

    How to Make Creamy Chicken Apple Salad

    This salad is a low-carb, power-food dynamo. Easy to prepare and packed full of good nutrition—protein from chicken, fiber from the apple, and healthy fat from the walnuts—this is a quick diabetes-friendly recipe that’s perfect for lunches and making ahead. Full of flavor and crunch—you won’t believe how easy it is! If there’s extra chicken, whip up a Chicken Caesar Salad Lunch Wrap to go with it and you’ve got a balanced meal.


    15 min prep time


    8servings


    1/2 cup

    Print Recipe >

    Step-By-Step Instructions:

    1. In a medium bowl, combine the chicken, celery, green onions, apple, and walnuts

    2. In a small bowl, whisk together the mayonnaise, yogurt, lemon juice and pepper. Pour over the chicken mixture and gently stir to coat.

    3. Serve salad over your choice of lettuce leaves, bread or crackers.

    pinterestfacebooktwittermail

    Nutrition facts

    8 Servings


    • Serving Size

      1/2 cup


    • Amount per serving


      Calories


      100

    • % Daily value*

    • Total Fat
      5g

      6%

      • Saturated Fat
        1g

        5%
      • Trans Fats
        0g

    • Cholesterol
      30mg

      10%

    • Sodium
      190mg

      8%

    • Total Carbohydrate
      5g

      2%

      • Dietary Fiber
        1g

        4%
      • Total Sugars
        3g
      • Added Sugars
        0g

        0%

    • Protein
      11g

    • Potassium
      172mg

      4%

    Ingredients

    cooked chicken breast (chopped)
    2 cup

    celery (diced)
    2 stalks

    green onions (chopped)
    2

    medium Jonagold apple (finely diced)
    1

    walnuts (chopped)
    3 tbsp

    light mayonnaise
    1/4 cup

    yogurt (plain, fat-free)
    1/4 cup

    lemon (juiced)
    1/2

    black pepper
    1/8 tsp

  • Easy Turkey Chili

    Easy Turkey Chili

    How to Make Easy Turkey Chili

    This may be the world’s easiest one-pot chili, and like any good chili, it’s very versatile. You can eat it on it’s own, serve it atop a baked sweet potato, or spread some across whole grain tortilla chips with a sprinkle of cheese, shredded lettuce, and guacamole for a healthy take on nachos. If you want to bulk up the recipe and pack in fiber, add some cooked beans or a cooked grain (brown rice, quinoa, or whatever you might have in the pantry all work great). And feel free to experiment with hot sauce, additional spices, or chopped peppers to make it your own!

    Watch How to Make Turkey Chili

    Powered by Homemade, brought to you by Alignment Health Plans


    10 min prep time


    25 min cook time


    4servings


    1 1/4 cup

    Print Recipe >

    Step-By-Step Instructions:

    1. Add cooking spray to a stock pot over high heat. Add the turkey and sauté until just cooked through, about 7-8 minutes.

    2. Add the remaining ingredients and bring to a boil. Reduce to a simmer for 15 minutes.

    3. Serve hot or cool to room temperature, then store in an airtight container in the refrigerator for up to one week or package in freezer bags in one cup increments for up to 3 months.

    pinterestfacebooktwittermail

    Nutrition facts

    4 Servings


    • Serving Size

      1 1/4 cup


    • Amount per serving


      Calories


      170

    • % Daily value*

    • Total Fat
      2g

      3%

      • Saturated Fat
        0g

        0%
      • Trans Fats
        0g

    • Cholesterol
      55mg

      18%

    • Sodium
      430mg

      19%

    • Total Carbohydrate
      11g

      4%

      • Dietary Fiber
        3g

        11%
      • Total Sugars
        5g
      • Added Sugars
        0g

        0%

    • Protein
      28g

    • Potassium
      658mg

      14%

    Ingredients

    black pepper
    1/2 tsp

    salt
    1/2 tsp

    cumin
    1 tsp

    chili powder
    1 tbsp

    no-salt-added diced tomatoes
    1 14.5-ounce can

    yellow onion (peeled and diced)
    1 small

    bell pepper, any color (diced)
    1

    lean ground turkey
    1 lbs

    nonstick cooking spray
    1

  • Easy Perfectly Poached Chicken Breast

    Easy Perfectly Poached Chicken Breast

    How to Make Easy Perfectly Poached Chicken Breast

    Don’t let poaching chicken breasts scare you, this easy recipe makes flavorful chicken so tender it’s easy to shred. Poached chicken has a variety of uses in diabetes-friendly cooking, like shredded chicken tacos or adding some protein to a salad. The uses are endless!


    5 min prep time


    20 min cook time


    4servings


    1 4-ounce chicken breast

    Print Recipe >

    Step-By-Step Instructions:

    1. In a large pot, combine chicken broth, onion, carrots, celery, garlic, bay leaf, salt, and black pepper. 

    2. Bring the broth to a simmer over medium heat. 

    3. Add the chicken breasts to the pot, ensuring they are submerged in the broth. 

    4. Reduce the heat to low, cover the pot, and simmer for 15–20 minutes or until the chicken reaches an internal temperature of 165 degrees F. 

    5. Once cooked, remove the poached chicken breasts from the pot and let them rest for a few minutes. 

    6. Slice the chicken breasts or shred them using two forks. 

    pinterestfacebooktwittermail

    Nutrition facts

    4 Servings


    • Serving Size

      1 4-ounce chicken breast


    • Amount per serving


      Calories


      180

    • % Daily value*

    • Total Fat
      3g

      4%

      • Saturated Fat
        0.5g

        3%
      • Trans Fats
        0g

    • Cholesterol
      85mg

      28%

    • Sodium
      370mg

      16%

    • Total Carbohydrate
      9g

      3%

      • Dietary Fiber
        2g

        7%
      • Total Sugars
        5g
      • Added Sugars
        1g

        2%

    • Protein
      28g

    • Potassium
      484mg

      10%

    Ingredients

    boneless, skinless chicken breasts (4 oz each)
    4 whole

    low sodium chicken broth
    4 cup

    yellow onion (cut into quarters)
    1 med

    carrots (chopped)
    2 med

    celery (chopped)
    2 stalks

    garlic (smashed)
    3 clove

    bay leaves
    1 leaves

    Kosher Salt
    1/2 tsp

    black pepper
    1/2 tsp

  • Spinach Feta Turkey Burgers

    Spinach Feta Turkey Burgers

    How to Make Spinach Feta Turkey Burgers

    These Spinach Feta Burgers are a healthier alternative to regular beef patties. Serve on lettuce leaves for a low-carb meal or a whole grain bun if your eating pattern allows. The delicious burgers are sure to be a hit with the whole family!  


    10 min prep time


    10 min cook time


    4servings


    1 burger

    Print Recipe >

    Step-By-Step Instructions:

    1. Squeeze excess water from the thawed spinach. 

    2. In a large bowl, mix together the drained spinach, ground turkey, red onion, garlic, beaten egg, breadcrumbs, feta, and pepper. 

    3. Form into 4 equal patties.

    4. Heat olive oil in a large skillet over medium heat.  Cook patties 4-5 minutes per side until cooked through and deep golden brown. 

    pinterestfacebooktwittermail

    Nutrition facts

    4 Servings


    • Serving Size

      1 burger


    • Amount per serving


      Calories


      150

    • % Daily value*

    • Total Fat
      5g

      6%

      • Saturated Fat
        1g

        5%
      • Trans Fats
        0g

    • Cholesterol
      70mg

      23%

    • Sodium
      160mg

      7%

    • Total Carbohydrate
      8g

      3%

      • Dietary Fiber
        3g

        11%
      • Total Sugars
        1g
      • Added Sugars
        0g

        0%

    • Protein
      19g

    • Potassium
      508mg

      11%

    Ingredients

    frozen spinach (thawed)
    12 oz

    lean ground turkey
    8 oz

    red onion (finely chopped)
    1/4 cup

    garlic (minced)
    2 clove

    eggs (beaten)
    1 whole

    whole wheat bread crumbs
    2 tbsp

    black pepper
    1/4 tsp

    reduced-fat feta cheese (crumbled)
    2 tbsp

    olive oil (for frying)
    1 tbsp

  • Chile Lime Shrimp with Poblano Sauce

    Chile Lime Shrimp with Poblano Sauce

    How to Make Chile Lime Shrimp with Poblano Sauce

    Chile Lime Shrimp with Poblano Sauce is a flavorful and zesty dish that combines the heat of chiles, the tanginess of lime, and the smokiness of poblano peppers.


    30 min prep time


    20 min cook time


    6servings


    1/4 pound shrimp

    Print Recipe >

    Step-By-Step Instructions:

    1. Line a sheet pan with parchment paper and preheat the broiler on high. Broil the poblano pepper until slightly blackened, for about 5 minutes, turning a couple of times. Place in a bowl and cover with plastic wrap to steam for 5 minutes.   

    2. Once it’s cool enough to touch, peel off the skin. Remove the stem and slice the pepper open to remove the seeds and roughly chop the pepper. 

    3. Toss the shrimp with ½ tablespoon olive oil, 1 garlic clove, peppers, and pepper.  Let it marinate for 15-30 minutes

    4. While the shrimp is marinating, finish the sauce. Blend the poblano pepper, Greek yogurt, 2 grated garlic cloves, cumin, kosher salt, and pepper in a food processor until smooth. 

    5. Heat the remaining ½ tablespoon of olive oil in a skillet. Once the pan is hot, sear the shrimp for 2 minutes on each side until just cooked through. 

    6. Serve with the poblano sauce. 

    pinterestfacebooktwittermail

    Nutrition facts

    6 Servings


    • Serving Size

      1/4 pound shrimp


    • Amount per serving


      Calories


      90

    • % Daily value*

    • Total Fat
      3g

      4%

      • Saturated Fat
        0.5g

        3%
      • Trans Fats
        0g

    • Cholesterol
      95mg

      32%

    • Sodium
      470mg

      20%

    • Total Carbohydrate
      2g

      <1%

      • Dietary Fiber
        0g

        0%
      • Total Sugars
        1g

    • Protein
      12g

    • Potassium
      123mg

      3%

    Ingredients

    poblano chile pepper
    1 whole

    garlic (divided use)
    3 clove

    Plain Nonfat Greek yogurt
    1/2 cup

    ground cumin
    1 tsp

    Kosher Salt
    1/8 tsp

    shrimp (peeled to just the tail and deveined)
    1 lbs

    olive oil
    1 tbsp

    serrano pepper (sliced)
    1 whole

    black pepper
    1/4 tsp

  • Easy Perfectly Cooked Lentils

    Easy Perfectly Cooked Lentils

    How to Make Easy Perfectly Cooked Lentils

    If you’ve never cooked lentils, now is the time to give it a try with this easy Perfectly Cooked Lentils recipe. As a legume, lentils are packed with plant-based protein and will get you satisfied and powered through your day. We show you how to cook lentils in a healthy and diabetes-friendly way.

    Add in your favorite non-starchy veggies like onions and bell peppers for a deliciously satisfying meal. 


    5 min prep time


    20 min cook time


    4servings


    1/2 cup

    Print Recipe >

    Step-By-Step Instructions:

    1.  Rinse the lentils under cold water in a fine-mesh sieve or colander. 

    2. In a medium saucepan, combine the rinsed lentils, vegetable broth, and bay leaf (if using). 

    3. Bring the mixture to a boil over high heat. 

    4. Reduce the heat to low, cover the saucepan with a lid, and let the lentils simmer for 20–25 minutes or until they are tender but still hold their shape. 

    5. Once cooked, remove the saucepan from the heat and discard the bay leaf. 

    6. Drain any excess liquid if necessary. 

    pinterestfacebooktwittermail

    Nutrition facts

    4 Servings


    • Serving Size

      1/2 cup


    • Amount per serving


      Calories


      190

    • % Daily value*

    • Total Fat
      0g

      0%

      • Saturated Fat
        0g

        0%
      • Trans Fats
        0g

    • Cholesterol
      0mg

      0%

    • Sodium
      100mg

      4%

    • Total Carbohydrate
      36g

      13%

      • Dietary Fiber
        10g

        36%
      • Total Sugars
        1g
      • Added Sugars
        0g

        0%

    • Protein
      11g

    • Potassium
      550mg

      12%

    Ingredients

    lentils (green or brown)
    1 cup

    low sodium vegetable broth
    3 cup

    bay leaves (optional)
    1 leaves

  • Air-Fryer Salmon Bowls with Yum Yum Sauce

    Air-Fryer Salmon Bowls with Yum Yum Sauce

    How to Make Air-Fryer Salmon Bowls with Yum Yum Sauce

    This dish offers a delightful combination of flaky salmon, fluffy rice, and crisp asparagus, all drizzled with a sweet and savory sauce. The salmon is marinated in a light, flavorful mixture with Splenda U.S. Grown Stevia providing a touch of sweetness, balanced by the warmth of fresh ginger and a tang of pomegranate juice. The Yum Yum Sauce is a creamy and flavorful complement with the base of the bowl built on brown rice or a rice and quinoa mix for added protein and texture.

    Add sesame seeds or sliced avocado for an extra pop of flavor.


    15 min prep time


    12 min cook time


    2servings


    1 bowl (3 oz salmon, 1/4 cup rice, 4 oz asparagus, 2 ½ tbsp sauce)

    Print Recipe >

    Step-By-Step Instructions:

    1. To make the salmon: Add 1 tsp Splenda Stevia Sweetener, 1/2 tsp ginger, and pomegranate juice to a sealable bag. Add salmon filets, zipping the bag tightly, and gently massage around to make sure all the flavor combines with the salmon filets. Set aside to marinate for 10 minutes.

    2. Spray the air fryer with non-stick spray and carefully add salmon filets. Cook salmon 400 degrees F for 7–9 minutes, depending on thickness (be careful not to overcook!).

    3. To make the yum yum sauce: Stir together 2 tsp sweetener, 1/2 tsp ginger, and all sauce ingredients in a small bowl. Test the sauce to see if it needs any more ginger, garlic, or Splenda Stevia Sweetener and adjust accordingly.

    4. Add a tablespoon of water at a time to thin out the sauce until it is a drizzling consistency. Set aside to let the flavors combine completely.

    5. To assemble the bowl: Spray the inside of the air fryer with non-stick cooking spray. Add asparagus and give them a coating of non-stick cooking spray. Sprinkle with a little salt and pepper if desired. Cook in the air fryer at 400 degrees F for 4–5 minutes.

    6. Divide rice between two bowls. Top each with a 3-ounce salmon filet, then lay 4 ounces of the cooked asparagus to the side of the bowl. Sprinkle on green onions. Add sesame seeds and chunks of avocado if desired. Drizzle on yum yum sauce. Enjoy immediately.

    pinterestfacebooktwittermail

    Nutrition facts

    2 Servings


    • Serving Size

      1 bowl (3 oz salmon, 1/4 cup rice, 4 oz asparagus, 2 ½ tbsp sauce)


    • Amount per serving


      Calories


      350

    • % Daily value*

    • Total Fat
      17g

      22%

    • Cholesterol
      50mg

      17%

    • Sodium
      140mg

      6%

    • Total Carbohydrate
      29g

      11%

      • Dietary Fiber
        4g

        14%
      • Total Sugars
        4g
      • Added Sugars
        0g

        0%

    • Protein
      22g

    Ingredients

    Splenda® Stevia Sweetener (divided use)
    3 tsp

    fresh ginger (grated, divided use)
    1 tsp

    pomegranate juice (for the salmon)
    2 tbsp

    salmon filets (3 ounces each)
    2 whole

    light mayonnaise (for the sauce)
    3 tbsp

    lower sodium soy sauce (for the sauce)
    1/2 tsp

    rice wine vinegar (for the sauce)
    1/2 tbsp

    garlic (grated, for the sauce)
    1/2 tsp

    paprika (for the sauce)
    1/4 tsp

    asparagus (washed, trimmed, and dried)
    8 oz

    cooked brown rice
    1/2 cup

    green onion (scallion) (sliced)
    1/4 cup