Tag: latin american

  • Budget-Friendly Chicken Tostadas

    Budget-Friendly Chicken Tostadas

    How to Make Budget-Friendly Chicken Tostadas

    These chicken tostadas are a delicious dish that won’t break the bank. Save time by buying a rotisserie chicken, which you can often find on sale at a warehouse club.


    10 min prep time


    4servings


    1 tostada

    Print Recipe >

    Step-By-Step Instructions:

    1. Preheat the oven to 400 degrees F. In a small bowl, mix together the chicken, salsa, and pinto beans.
    2. Place the tostada shells on a baking sheet. Top each tostada shell with a heaping 1/2 cup of chicken-bean mixture and 1 Tbsp. cheese. Bake for 5 minutes or until the cheese is melted.
    3. Remove the tostadas from the oven and top each tostada with a spoonful of mashed avocado and 1/4 cup lettuce.
    pinterestfacebooktwittermail

    Nutrition facts

    4 Servings


    • Serving Size

      1 tostada


    • Amount per serving


      Calories


      310

    • % Daily value*

    • Total Fat
      10g

      13%

      • Saturated Fat
        2.6g

        13%
      • Trans Fats
        0g

    • Cholesterol
      65mg

      22%

    • Sodium
      270mg

      12%

    • Total Carbohydrate
      26g

      9%

      • Dietary Fiber
        6g

        21%
      • Total Sugars
        1g

    • Protein
      29g

    • Potassium
      550mg

      12%

    Ingredients

    shredded cooked chicken
    2 cup

    salsa
    3 tbsp

    canned pinto beans (rinsed and drained)
    1 cup

    reduced-fat, shredded cheddar cheese
    4 tbsp

    tostada shells
    4

    avocado (mashed)
    1/2

    lettuce (shredded)
    1 cup

  • Baked Egg with Avocado, Tomato, and Citrus Salad

    Baked Egg with Avocado, Tomato, and Citrus Salad

    How to Make Baked Egg with Avocado, Tomato, and Citrus Salad

    This is a protein-packed quick breakfast recipe that will hit both sweet and savory flavors.


    2servings


    1 egg and ½ salad

    Print Recipe >

    Step-By-Step Instructions:

    1. Preheat oven to 400°F.
    2. Crack each egg into a separate bowl without breaking the yolks. Set aside.
    3. Preheat small ovenproof pan and add 1 Tsp. canola oil. Add eggs, and immediately transfer pan to the oven. Cook for about 2-5 minutes, or until eggs reach desired doneness.
    4. In a small bowl add remaining canola oil, lime juice, salt and pepper, and whisk ingredients together to create the dressing. Add avocado, tomato, red onion and cilantro to the dressing and toss.
    5. Remove eggs from oven. Plate salad ingredients first and top with the eggs. Serve.
    pinterestfacebooktwittermail

    Nutrition facts

    2 Servings


    • Serving Size

      1 egg and ½ salad


    • Amount per serving


      Calories


      190

    • % Daily value*

    • Total Fat
      8g

      10%

      • Saturated Fat
        2.5g

        13%

    • Cholesterol
      185mg

      62%

    • Sodium
      80mg

      3%

    • Total Carbohydrate
      11g

      4%

      • Dietary Fiber
        4g

        14%
      • Total Sugars
        4g

    • Protein
      8g

    • Potassium
      500mg

      11%

    Ingredients

    eggs
    2

    canola oil (divided)
    2 tsp

    lime juice
    1 oz

    Kosher Salt
    1 tsp

    black pepper (cracked)
    1/2 tsp

    Hass avocado (cubed)
    2 oz

    large tomato (thinly sliced)
    1

    red onion (peeled and thinly sliced)
    2 oz

    cilantro (finely chopped)
    1/4 cup

  • Baked Chicken Empanadas

    Baked Chicken Empanadas

    How to Make Baked Chicken Empanadas

    Chicken empanadas are fun to make and a great no-fork-needed appetizer. Baking these tasty treats gives a crispy crust with less fat and the Manzanilla olives add a delicious nutty flavor.


    45 min prep time


    20 min cook time


    16servings


    1 empanada

    Print Recipe >

    Step-By-Step Instructions:

    1. Add the chicken breasts and chicken broth to a large sauce pan over high heat. Bring to boiling, then reduce heat and simmer for 15 to 20 minutes, until the chicken is cooked through. Remove the pan from the heat and let the chicken cool to the touch in the broth (about 20 minutes).

    2. Shred the chicken into small pieces and mix in 2 Tbsp. of the chicken broth from the pan; set aside.

    3. Add the oil to a sauté pan over medium heat. Add the onion, paprika, cumin, chili powder, and 1/2 cup of the chicken broth. Reduce the heat to low and cook for 10 to 15 minutes, until onions are soft and clear, and the liquid is evaporated. Stir in the chicken to yield 2 cups of filling.

    4. Preheat the oven to 400 degrees F. Coat a large baking sheet with cooking spray.

    5. Separate the whole wheat pizza dough into 16 golf-ball size pieces, and roll each one into a smooth ball.

    6. Using a rolling pin, roll each ball of dough into a 6-inch-diameter circle.

    7. Spoon 2 Tbsp. of the filling into the middle of the circle and press 1 olive into the middle of the filling. Lightly brush with water the bottom edge of the dough along one half of the circle. Fold the top half of the dough over the filling to form a semi-circle, and press edges firmly together. Crimp the edges with a fork to seal in the filling. Place the empanadas on a baking sheet.

    8. Lightly beat the egg with the 1 Tbsp. water and brush a thin layer of the mixture over the top surface of each empanada.

    9. Bake the empanadas for 20 minutes, until lightly browned.

    pinterestfacebooktwittermail

    Nutrition facts

    16 Servings


    • Serving Size

      1 empanada


    • Amount per serving


      Calories


      100

    • % Daily value*

    • Total Fat
      2.5g

      3%

      • Saturated Fat
        0g

        0%

    • Cholesterol
      20mg

      7%

    • Sodium
      300mg

      13%

    • Total Carbohydrate
      14g

      5%

      • Dietary Fiber
        0g

        0%
      • Total Sugars
        1g

    • Protein
      6g

    • Potassium
      123mg

      3%

    Ingredients

    chicken breasts (boneless, skinless)
    8 oz

    low sodium chicken broth (fat-free, low-sodium)
    4 cup

    vegetable oil
    1 tbsp

    medium yellow onion (finely diced)
    1

    paprika
    1 tbsp

    cumin
    1 tsp

    chili powder
    1 tsp

    nonstick cooking spray
    1

    premade whole wheat pizza dough (thawed if frozen)
    1 lbs

    green Spanish olives ((such as Manzanilla), pitted)
    16

    eggs
    1

    water
    1 tbsp

  • Top 20 Recipes of 2018

    Top 20 Recipes of 2018

    As we move into the new year and thoughts turn to healthy resolutions and diabetes meal planning, the Diabetes Food Hub team looked back at the first year of the site and reviewed the most popular recipes as determined by, you, our visitors. Favorites ranged from a low-carb chicken and mushroom superstar to breakfast frittatas just begging for a personal spin. Altogether, they make a fantastic round up of meals designed to help you be the best you in 2019 and beyond. Click on the slideshow below to see the top crowd pleasers of 2018.

    The Top 20 Diabetes Food Hub Recipes of 2018

  • Meal Prep: 3 for 1 Chicken

    Meal Prep: 3 for 1 Chicken

    Everybody likes getting more for less! How about getting more meals from less recipes? With some strategic meal planning and prepping, you can create several days’ worth of meals with just a few recipes and one trip to the grocery store. You can even prepare all of the recipes at once and store meals in single serve containers in the fridge for grab-and-go meals all week.

    Diabetes Food Hub can be a great tool for meal prepping! Click here to learn how to use our recipes, meal planner, and grocery list generator to make planning, shopping, and preparing healthy meals a snap! Additionally, we’ll be rolling out a series of meal prepping articles over the next few weeks to show how a little planning can make your meal planning life a lot easier .

    First up—chicken, which is a meal preppers dream come true. You can cook one whole chicken on Sunday and use it in recipes throughout the week—toss it in a salad or sandwich for lunch, then shred it, and add it to tacos, soup, or pasta for dinner. Added bonus: Once you’ve removed all the meat, you can toss the bones in a stock pot with vegetable scraps, herbs, and spices for a homemade chicken stock!

     Here are 3 recipes to make with 1 chicken:


    Image
    119-diabetic-cilantro-lime-chicken-budget-friendly_090618_1021x779.jpg

    1. Main Recipe: Cook Sunday Night

    Budget-Friendly Cilantro Lime Roasted Chicken

    Try something a little different with this sweet and tangy roasted chicken! You can roast the chicken whole, or cut the whole raw chicken into 8 pieces (2 breasts, 2 thighs, 2 drumsticks, and 2 wings). You can ask the butcher at your grocery store to cut it into pieces for you, or buy a whole chicken that is already cut into pieces. Eat some of the chicken for dinner Sunday night with rice and a salad, or save it all for other recipes.


    Image
    Recid_106_Brown_Rice_and_Pinto_Bean_Bowl_with_Chicken_and_Pico_de_Gallo_PNCImages_MG_4808-Edit-(ZF-5661-35964-1-012)02272018.jpg

    2. Follow-Up Recipe: Lunch Prep

    Brown Rice and Pinto Bean Bowl with Chicken and Pico de Gallo

    This recipe makes 6 bowls, perfect for packaging and storing for lunch all week. Save enough of the Cilantro Lime Roasted Chicken to make 2 cups of shredded chicken for these bowls. If you are feeling ambitious, you can start with dry pinto beans, and save the rest for other meals. Canned pinto beans work just fine as well. Either way, you’ve just prepared a week’s worth of lunches in a snap.


    Image
    908-diabetic-chicken-pepper-lettuce-cup_Designed-For-One_DFMarApr19_020519_2959761669.jpg

    3. Follow-Up Recipe: Weeknight Dinner

    Chicken and Roasted Red Pepper Long Leaf Wrap

    Here’s a quick weeknight meal for one! Since you are starting with leftover Cilantro Lime Roasted Chicken, you can skip the first step, meaning this recipe will come together in less than 10 minutes. If you have leftover pinto beans from the Brown Rice and Pinto Bean Bowls, you can use those instead of garbanzo beans in this recipe.


    Add these recipes, and any other recipes you would like to cook this week, to your Meal Planner, then click “Generate Grocery List.” You can add, edit, or delete items on the list as needed.

    Don’t forget about food safety!

    Leftovers can be stored in the refrigerator for about 3-4 days or in the freezer for 3-4 months. Be sure to date anything that you store in the fridge or freezer. When reheating leftovers, make sure they reach 165 degrees F. Find more food safety tips here.

    Want more meal prep ideas?

    Check out the other articles in this series:

    Image
    Meal Prep: DIY Salad Bar


    Meal Prep: DIY Salad Bar


    Image
    Meal Prep: Breakfast on the Go

    Meal Prep: Breakfast on the Go


    Meal Prep: 3 for 1 Beef

    Image
    Meal Prep: Fall Harvest


    Image
    Meal Prep: 3-for-1 Beef


  • Tasty Tips for Traveling

    Tasty Tips for Traveling

    Your bags are packed and you’re heading out for a well-deserved vacation. But what about meals and snacks? Whether you’re traveling by car, air or rail, when you’re managing your diabetes, a little planning can make your time on the go a lot less stressful and a lot more fun!

    With all of the details to keep track of when planning a trip, meals can end up being a last-minute challenge with limited healthy choices. As a result, it’s easy to get out of your routine, including those habits that help you manage your diabetes day to day. But with a few tips in mind, you can keep up with that healthy routine as if you were right at home.

    On the Road or By Plane

    As you travel to your vacation destination, your normal routine gets interrupted, and you may be bombarded with a number of snack stands and fast food restaurants tempting you with unhealthy options. Here are a few solutions to common problems you may encounter:

    Problem: A long ride ahead of you that interrupts your regular schedule.
    Solution: Think about exactly how long your trip will be. Will it conflict with the time you usually eat lunch? Dinner? Mid-day snacks? If so, plan on packing the right amount of food and snacks for those times. This way your meals are just about ready to go and your schedule stays on course.

    Problem: Overeating! You become so focused on the road, you don’t realize that you’ve already reached the bottom of your snack bag. Even if you have packed healthy options like unsalted mixed nuts, or fresh fruits, overeating some of these healthy foods can lead to higher blood sugar.
    Solution: Bring your single-serving containers. Portion snacks into single serving sizes and divide up your food based on the number of meals and snacks you will need while you’re traveling. Think of it as packing a lunch bag, rather than one large bag of snacks.

    Problem: When traveling by air, you might find yourself with a layover or two, and the airport’s many food temptations can be a challenge.
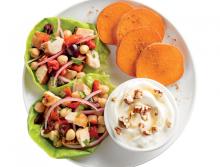
    Solution: Think about packing some foods that don’t need refrigeration. These can be your own bag of trail mix with unsalted nuts, cheese and crackers, or some uncut fresh fruit like an apple or pear. Even carrots and celery hold up pretty well. If you have to buy something at the airport, find healthier options by reading nutrition labels and watching your portion sizes.

    Maintaining healthy habits on vacation doesn’t have to take away from your experience

    Problem: The Transportation Security Administration (TSA) doesn’t allow some food or drinks past the security check points.
    Solution: Many people are confused about this rule. Actually, while TSA does not allow liquids to pass security, they do allow many different types of food as long as they are packed into appropriate containers. So once again, bring those single-serving containers. You can also bring an empty water bottle and fill it at a drinking fountain once you are through security. This will save you money on bottled water and reduce the temptation to buy a sugary drink.

    You’ve Reached Your Destination

    Now that you’ve reached your vacation spot, it’s time once again to think of how to stay on track with meal timing and healthy choices. Sampling local foods while traveling is a big part of the experience for most people. In planning your meals, think about which local dishes are a priority. What dishes are a “must-have” versus dishes that are simply “nice to have”? Make a list and prioritize your dishes, then stick to it.

    Like America, other countries are now increasing portion sizes at their restaurants while lowering prices, making it easy to overeat. When you can, try sharing meals with family or friends you’re traveling with. If you’re going solo, think about packing half of your dish for an extra meal the next day, or opt for something smaller like an appetizer, side, or salad.

    You can also buy fresh produce and other healthy snacks when you arrive. Live like a local! Check out a nearby grocery store or market and pick out some snacks to keep in your hotel or on hand as you explore. Find out what produce is in season in the area, and maybe even try something new.

    Maintaining healthy habits on vacation doesn’t have to take away from your experience. With a little planning, you can stay healthy, have fun, and return home with healthy habits intact. 

  • DIY Spice Blends

    DIY Spice Blends

    Looking to cut back on sodium? Make your own spice blends to add more flavor to your dishes, cut back on salt, and give your heart-healthy, diabetes-friendly recipes a personal touch.

    Why Make Your Own Spice Blend?

    Looking to cut back on sodium? Make your own spice blends to add more flavor to your dishes, cut back on salt, and give your heart-healthy, diabetes-friendly recipes a personal touch. 

    When following a heart-healthy meal plan often one of the hardest things to tackle is lowering the amount of sodium in your diet—eating less salt. This is a challenge since salt can add a lot of flavor to your dishes, but there are many other ways to create flavorful dishes with little or no salt. One way to do this is to create your very own spice blends. 

    To start, look in your pantry or spice cabinet and see what you have. Some chefs recommend keeping the following spices as staples in your kitchen: 

    • Garlic powder
    • Onion powder 
    • Basil 
    • Oregano 
    • Rosemary
    • Thyme 
    • Bay leaves 
    • Dill weed 
    • Paprika 
    • Cayenne 
    • Allspice 
    • Thyme 
    • Chili powder 
    • Curry 
    • Cumin 
    • Crushed red pepper
    • Cinnamon 

    Many of these spices can be used on their own to add flavor, but when used in combination, you create whole new flavors. 

    Make Your Own Spice Blend Combinations

    The amount of spice used in each blend varies, but the advantage of making your own blend is that you can make it just how you like it. Play around with the amounts, you can even add, remove, or substitute the spices. Once you have found a good blend that works for you and your taste, you can make a larger amount to store in an airtight container and use it for other recipes later. 

    Italian Blend 

    • Basil 
    • Oregano 
    • Thyme 
    • Rosemary 

    Dry Rub* 

    • Onion powder 
    • Garlic powder 
    • Black pepper 
    • Paprika 
    • Chili powder 

    *For more of a kick add in some cayenne 

    Jamaican Jerk 

    • Onion powder 
    • Garlic powder 
    • Ginger 
    • Paprika 
    • Cayenne 
    • Chili powder 
    • Cinnamon 
    • Allspice 
    • Thyme 
    • Parsley 

    Moroccan 

    • Ginger 
    • Cumin 
    • Black pepper 
    • Coriander 
    • Cayenne 
    • Allspice 

    Tex-Mex 

    • Cumin 
    • Garlic 
    • Chili powder 
    • Black pepper 
    • Crushed red pepper to taste 

    Curry Blend 

    • Turmeric 
    • Cardamom 
    • Coriander 
    • Cumin 
    • Cayenne or chili powder 
    • Dry mustard 
    • Ginger