Tag: kid friendly

  • Strawberry Stuffed French Toast

    Strawberry Stuffed French Toast

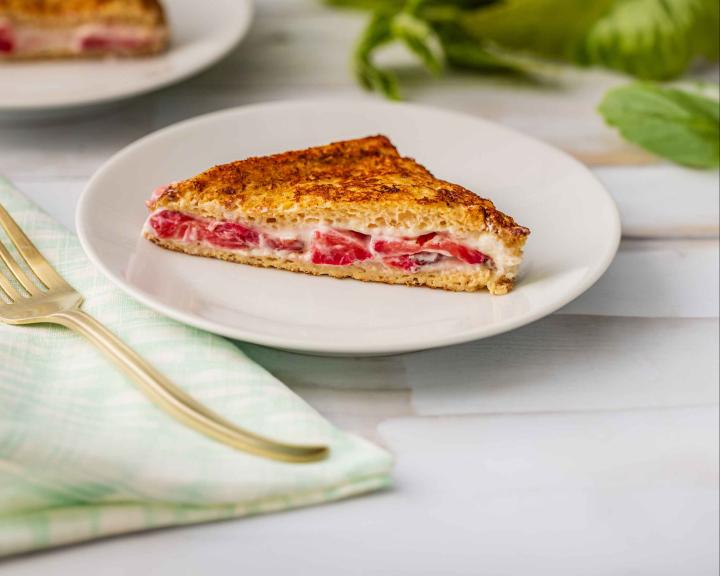
    How to Make Strawberry Stuffed French Toast

    Start your morning right with one slice of decadent Strawberry Stuffed French Toast! Bursting with fresh strawberries and a touch of sweet, this recipe is perfect for a satisfying yet mindful breakfast. This recipe is more than just delicious, it’s a symphony of textures and flavors. The soft bread yields to the cream cheese filling, bursting with pops of juicy strawberries. Each bite is a perfect balance of sweet and tart, with a hint of warm cinnamon.


    10 min prep time


    20 min cook time


    12servings


    ½ sandwich

    Print Recipe >

    Step-By-Step Instructions:

    1. For the strawberries:
      In a small bowl, add strawberries, 1/4 cup sweetener, and lemon juice. Stir together and set aside for 10 minutes.

    2. For the filling:
      Add cream cheese and 1/2 cup sweetener to a bowl. Beat together until fluffy.

    3. For the French toast: 
      In another bowl, whisk eggs, milk, vanilla extract, 1/4 cup sweetener, cinnamon, and salt.

    4. To assemble, spread a thin layer of the cream cheese mixture on a slice of bread, keeping about 1/2 inch away from the edge. Add a layer of strawberry slices on top of the cream cheese. Take another piece of bread and spread cream cheese on it. Place it on the strawberries, cream cheese side down. Repeat for the rest, making 6 total strawberry-cream cheese sandwiches.

    5. Spray a nonstick skillet with butter-flavored cooking spray, and heat to medium. Dip one sandwich into egg mixture and turn evenly to coat. Remove and shake off the excess custard mixture, then transfer to the hot skillet.

    6. Cook 3-4 minutes per side, or until golden brown and crispy. Spray skillet again and repeat for the rest of the French toast sandwiches.

    7. Slice each diagonally and serve immediately! If desired, top with a sugar-free maple syrup and more fresh strawberries. Enjoy!

    pinterestfacebooktwittermail

    Nutrition facts

    12 Servings


    • Serving Size

      ½ sandwich


    • Amount per serving


      Calories


      120

    • % Daily value*

    • Total Fat
      6g

      8%

      • Saturated Fat
        1.5g

        8%
      • Trans Fats
        0g

    • Cholesterol
      55mg

      18%

    • Sodium
      240mg

      10%

    • Total Carbohydrate
      15g

      5%

      • Dietary Fiber
        8g

        29%
      • Total Sugars
        4g
      • Added Sugars
        0g

        0%

    • Protein
      10g

    • Potassium
      142mg

      3%

    Ingredients

    Splenda® Granulated Sweetener (divided use)
    1 cup

    Fresh Strawberries (sliced)
    16 oz

    lemon (juiced)
    1/2 med

    light cream cheese (softened)
    5 oz

    eggs
    3 large

    skim milk
    1 cup

    pure vanilla extract
    2 tsp

    ground cinnamon
    1 tsp

    Kosher Salt
    1/4 tsp

    low carb bread
    12 slice

  • Grilled ”Honey” BBQ Chicken

    Grilled ”Honey” BBQ Chicken

    How to Make Grilled ”Honey” BBQ Chicken

    This recipe delivers all the sweet, smoky goodness of classic BBQ, but sweetened with a delicious homemade sauce bursting with savory spices and a touch of “honey” sweetness thanks to Splenda® Multi-Use Syrup. Enjoy the taste you love without the added sugar. Ready to sizzle? Try the recipe now and impress your taste buds (and health goals)!

    Cooking notes:

    • To get moist and juicy chicken, try to turn it as few times as possible. Most importantly, do not to overcook!
    • Only apply BBQ sauce after chicken is partially cooked. Otherwise, the sauce could burn if cooked for too long.
    • Brush sauce liberally to get well-coated chicken breast.


    15 min prep time


    15 min cook time


    6servings


    1 chicken breast

    Print Recipe >

    Step-By-Step Instructions:

    1. For the “Honey” BBQ Sauce, add all ingredients to a saucepan and stir together. Bring to a boil, then reduce heat to low. Simmer for 10 minutes, until sauce becomes thickened. Pour into a bowl to use for brushing on the chicken while it is grilling. Reserve a few tablespoons to drizzle on chicken after it’s been cooked.

    2. For the chicken, prepare the grill by brushing grates clean, spraying with a grill-safe nonstick cooking spray (or brush them carefully with a little oil), and heat grill to 400-450°F.

    3. Place chicken on a platter and drizzle with olive oil, then sprinkle kosher salt and freshly ground black pepper on both sides.

    4. Place each chicken breast on the hot grill, close the top and let cook for about 5 minutes, until they easily release from the grill grates. Then flip chicken, cooking about 5 more minutes on the other side. Brush chicken liberally with the BBQ sauce every couple of minutes. Flip chicken once again, brushing the opposite side with the sauce liberally as well.

    5. Cook until the chicken breasts register an internal temperature of 160°F (they will reach the appropriate 165°F during carry-over cooking time). Be sure not to overcook so you have tender, juicy chicken. Remove from grill, add to platter and cover with foil. Let chicken rest 5 minutes to redistribute juices. Serve with reserved BBQ sauce and enjoy.

    pinterestfacebooktwittermail

    Nutrition facts

    6 Servings


    • Serving Size

      1 chicken breast


    • Amount per serving


      Calories


      230

    • % Daily value*

    • Total Fat
      7g

      9%

      • Saturated Fat
        1.5g

        8%

    • Cholesterol
      125mg

      42%

    • Sodium
      500mg

      22%

    • Total Carbohydrate
      18g

      7%

      • Dietary Fiber
        0g

        0%
      • Total Sugars
        0g
      • Added Sugars
        0g

        0%

    • Protein
      38g

    Ingredients

    Splenda® Multi-Use Syrup (For the “Honey” BBQ Sauce)
    1/4

    no sugar added ketchup (For the “Honey” BBQ Sauce)
    1/2 cup

    Raw Apple Cider Vinegar (For the “Honey” BBQ Sauce)
    1 tbsp

    Worcestershire sauce (For the “Honey” BBQ Sauce)
    1 tsp

    liquid smoke (For the “Honey” BBQ Sauce)
    1 tsp

    smoked paprika (For the “Honey” BBQ Sauce)
    1 tsp

    garlic (grated, for the “Honey” BBQ Sauce)
    1 clove

    onion powder (For the “Honey” BBQ Sauce)
    1 tsp

    kosher or sea salt (For the “Honey” BBQ Sauce)
    1/4

    boneless, skinless chicken breasts (5-6 ounces each)
    6 whole

    olive oil
    1 tbsp

    Kosher Salt
    1/2 tsp

    black pepper (to taste)
    1

  • Mint Chocolate Chip Cookies

    Mint Chocolate Chip Cookies

    How to Make Mint Chocolate Chip Cookies

    These decadent Mint Chocolate Chip Cookies are bursting with fresh, cool mint flavor and rich, melty chocolate chips. Best of all, there is 0 grams of added sugar in this amazing recipe! Enjoy the best tasting Stevia for sweetening beverages and baking. Cook, bake, and sprinkle Splenda® Stevia anywhere you would use sugar!


    10 min prep time


    20 min cook time


    39servings


    1 cookie

    Print Recipe >

    Step-By-Step Instructions:

    1. Preheat oven to 375°F and prepare two large baking sheets with parchment paper.

    2. In a small bowl, mix together flour, baking soda, and baking powder and set aside.

    3. In a large bowl with an electric mixture, beat vegetable oil spread until light and fluffy. Slowly add Splenda Stevia Sweetener and beat until fluffy. Add egg and beat until incorporated and then add Greek yogurt, pudding mix, mint extract and green food coloring and mix well.

    4. Scrape down the sides of the bowl as needed with a spatula. On slow speed, add the flour mixture into the pudding mixture and mix until well combined, but do not over-mix. Fold in the chocolate chips.

    5. Using a 2-tablespoon cookie scoop, drop spoonfuls onto prepared baking sheet, 2 inches apart. Press down slightly as the cookies do not spread very much while baking (should be about ½” thick).

    6. Bake for 10 minutes or until just slightly browned on the edges. Cool on rack for 1 minute and then move to a wire cooling rack. Enjoy!

    pinterestfacebooktwittermail

    Nutrition facts

    39 Servings


    • Serving Size

      1 cookie


    • Amount per serving


      Calories


      50

    • % Daily value*

    • Total Fat
      1.5g

      2%

      • Saturated Fat
        0g

        0%

    • Cholesterol
      5mg

      2%

    • Sodium
      90mg

      4%

    • Total Carbohydrate
      10g

      4%

      • Dietary Fiber
        0g

        0%
      • Total Sugars
        0g
      • Added Sugars
        0g

        0%

    • Protein
      1g

    Ingredients

    all-purpose flour
    2 cup

    baking soda
    1/2 tsp

    baking powder
    1/2 tsp

    vegetable oil spread
    1 cup

    Splenda® Stevia Sweetener Jar
    1/2 cup

    eggs (room temperature)
    1 whole

    Plain Nonfat Greek yogurt (room temperature)
    1/2 cup

    sugar-free instant vanilla pudding mix (1-ounce box (28g))
    1 oz

    peppermint extract
    1 1/2 tsp

    green food coloring
    1 tsp

    stevia-sweetened or sugar-free chocolate chips
    1 cup

  • Raspberry Swirl Frozen Yogurt Bark

    Raspberry Swirl Frozen Yogurt Bark

    How to Make Raspberry Swirl Frozen Yogurt Bark

    Raspberry Swirl Frozen Yogurt Bark: Dive into this light dessert and say goodbye to excess sugar and calories! Enjoy the raspberry swirl complimented by tangy Greek yogurt, fresh blueberries, and a crunch of coconut flakes. Each serving is only 70 calories with 8 grams of protein!


    10 min prep time


    4 hr cook time


    6servings


    1 slice (4×4 inch square)

    Print Recipe >

    Step-By-Step Instructions:

    1. Cover a freezer-safe tray with parchment paper.

    2. In a bowl, stir together yogurt, vanilla, and ¼ cup of Splenda Multi-Use Syrup until evenly combined. Scoop yogurt onto the freezer-safe tray, and carefully spread it out to ¼-inch thickness with a spatula.

    3. In a small bowl, add raspberries with 2 tablespoons of Splenda Multi-Use Syrup and mash with the back of a fork. (If using frozen raspberries, microwave until softened.) Mixture should become jam-like. Dollop the raspberry mixture around the yogurt. Using the back of a spoon, create pretty swirls of raspberry red around the yogurt.

    4. Sprinkle fresh blueberries and coconut on top. Freeze at least 4hours, or overnight.

    5. Remove Yogurt Bark from freezer. Gently break bark into smaller hand-held sized pieces. Enjoy immediately or store in the freezer and use within 1 week.

    pinterestfacebooktwittermail

    Nutrition facts

    6 Servings


    • Serving Size

      1 slice (4×4 inch square)


    • Amount per serving


      Calories


      70

    • % Daily value*

    • Total Fat
      1g

      1%

      • Saturated Fat
        1g

        5%
      • Trans Fats
        0g

    • Cholesterol
      5mg

      2%

    • Sodium
      30mg

      1%

    • Total Carbohydrate
      19g

      7%

      • Dietary Fiber
        1g

        4%
      • Total Sugars
        4g
      • Added Sugars
        0g

        0%

    • Protein
      8g

    • Potassium
      140mg

      3%

    Ingredients

    Plain Nonfat Greek yogurt
    2 cup

    pure vanilla extract
    1 tsp

    Splenda® Multi-Use Syrup (divided)
    1/3 cup

    fresh or frozen raspberries
    1/2 cup

    Fresh Blueberries
    1/2 cup

    unsweetened coconut flakes
    1 tbsp

  • Parmesan Tofu with Butternut Squash Noodles

    Parmesan Tofu with Butternut Squash Noodles

    How to Make Parmesan Tofu with Butternut Squash Noodles

    Try out our Parmesan Tofu with Butternut Squash Noodles—a diabetes-friendly dish that combines the savory crunch of parmesan-coated tofu with the wholesome, goodness of butternut squash noodles. Make it with Roasted Green Beans in Champagne Vinaigrette for a beautifully colorful meal.  

    This dish can easily be made vegan by substituting dairy-free cheese and eggless mayo alternatives.


    15 min prep time


    30 min cook time


    4servings


    7 oz tofu & ~2 cups noodles

    Print Recipe >

    Step-By-Step Instructions:

    1. Preheat the oven to 350 degrees F. Line a baking sheet with aluminum foil.

    2. Slice each tofu block in half along the long side. Place on the baking sheet and drizzle with 1 tsp oil. Bake for 15 minutes, flip, then bake for another 15 minutes.

    3. Meanwhile, peel the tough skin from the squash. Use a julienne peeler to cut noodles from the squash.

    4. Preheat a large skillet over medium heat. Add 1 tsp oil, squash, and ¼ tsp Italian seasoning. Cook, stirring occasionally, until squash noodles are tender, 7–8 minutes. Remove from heat, cover, and set aside. 

    5. Combine the Parmesan, mayo, 1/4 tsp Italian seasoning, onion powder, and garlic powder in a small bowl.

    6. After the tofu has baked for 30 minutes, remove from the oven. Set the oven to broil on high and move an oven rack to the top shelf, underneath the broiler.

    7. Spread the cheese mixture over the tops of the tofu. Return to the oven and broil until the topping is bubbly and beginning to brown, 1–2 minutes.

    8. Serve on a bed of squash noodles with a handful of fresh basil.

    pinterestfacebooktwittermail

    Nutrition facts

    4 Servings


    • Serving Size

      7 oz tofu & ~2 cups noodles


    • Amount per serving


      Calories


      350

    • % Daily value*

    • Total Fat
      16g

      21%

      • Saturated Fat
        2g

        10%
      • Trans Fats
        0g

    • Cholesterol
      5mg

      2%

    • Sodium
      250mg

      11%

    • Total Carbohydrate
      28g

      10%

      • Dietary Fiber
        3g

        11%
      • Total Sugars
        3g
      • Added Sugars
        0g

        0%

    • Protein
      27g

    • Potassium
      624mg

      13%

    Ingredients

    extra firm tofu (drained and pressed for at least 30 minutes)
    28 oz

    olive oil (divided)
    2 tsp

    butternut squash
    1 med

    Italian seasoning (divided)
    1/2 tsp

    reduced fat Parmesan cheese (grated)
    1 oz

    light mayonnaise
    1/4 cup

    onion powder
    1/4 tsp

    garlic powder
    1/4 tsp

    fresh basil (leaves julienned)
    1 cup

  • Low Carb Chicken and Zucchini Casserole

    Low Carb Chicken and Zucchini Casserole

    How to Make Low Carb Chicken and Zucchini Casserole

    This delicious Low-Carb Chicken and Zucchini Casserole combines cooked chicken, fresh zucchini, and a luscious creaminess. With rich and satisfying flavors, it’s an easy choice for a weeknight family dinner. This diabetes-friendly recipe will fulfill your craving for cheesy goodness without compromising on your blood glucose (blood sugar) management plan.


    10 min prep time


    50 min cook time


    6servings


    1 ½ cups

    Print Recipe >

    Step-By-Step Instructions:

    1. Preheat your oven to 375 degrees F (190 degrees C).

    2. Grease a 9×13 baking dish with cooking spray or butter. Arrange a layer of sliced zucchinis at the bottom of the dish, slightly overlapping. Sprinkle a portion of the sliced onions over the zucchinis. Sprinkle a bit of the grated cheese over the onions. Repeat the layers until all zucchinis, onions, and half of the cheese are used. 

    3. Sprinkle the cooked chicken evenly over the layered zucchinis and cheese. 

    4. In a small saucepan, add olive oil over medium heat. Stir in the half and half, coriander, salt, and pepper. Heat the mixture until it’s warmed through. 

    5. Pour the cream mixture evenly over the layered zucchinis, onions, cheese, and chicken. Sprinkle the remaining cheese on top. 

    6. Cover the baking dish with aluminum foil and bake in the preheated oven for 30 minutes. 

    7. Remove the foil and continue baking for an additional 15–20 minutes, or until the zucchinis are tender, the chicken is heated through, and the cheese is melted and golden. Let the casserole rest for a few minutes before serving. 

    pinterestfacebooktwittermail

    Nutrition facts

    6 Servings


    • Serving Size

      1 ½ cups


    • Amount per serving


      Calories


      140

    • % Daily value*

    • Total Fat
      5g

      6%

      • Saturated Fat
        2g

        10%
      • Trans Fats
        0g

    • Cholesterol
      35mg

      12%

    • Sodium
      360mg

      16%

    • Total Carbohydrate
      10g

      4%

      • Dietary Fiber
        2g

        7%
      • Total Sugars
        5g
      • Added Sugars
        1g

        2%

    • Protein
      15g

    • Potassium
      602mg

      13%

    Ingredients

    Butter Flavored Cooking Spray (for greasing the baking dish)
    1 whole

    zucchini (thinly sliced)
    4 med

    onion(s) (thinly sliced)
    1 small

    reduced fat mozzarella cheese (grated)
    3/4 cup

    boneless, skinless chicken breasts (cooked and shredded)
    8 oz

    fat-free half-and-half
    1 cup

    ground coriander
    1/2 tsp

    salt
    1/2 tsp

    black pepper
    1/4 tsp

    olive oil
    2 tsp

  • Spiced Dutch Baby with Pumpkin Butter

    Spiced Dutch Baby with Pumpkin Butter

    How to Make Spiced Dutch Baby with Pumpkin Butter

    The batter for this large, crepe-like pancake comes together in just about five minutes. Simmer pumpkin butter on the stove while the pancake cooks, filling the kitchen with the sweet, spicy aroma of fall. Serve the Dutch baby tableside, cutting wedges right out of the cast iron and topping them with warm pumpkin butter, walnuts, and a fine dusting of powdered sugar.

    This cooking class is brought to you by SweetLeaf and powered by Homemade.


    20 min prep time


    50 min cook time


    8servings


    1 slice & 1 tbsp. pumpkin butter

    Print Recipe >

    Step-By-Step Instructions:

    1. Make the pumpkin butter:
      A. In a small saucepan combine the pumpkin purée, apple cider, 1/2 tsp cinnamon, 1/4 tsp salt, and apple cider vinegar. Heat over medium while stirring often.
      B. Once the mixture is bubbling, lower the heat to medium-low and cook, stirring frequently and scraping down the sides until the mixture has darkened in color and the canned pumpkin flavor has cooked off, about 30 minutes.
      C. Remove the pumpkin butter from heat and stir in the pumpkin spice sweet drops. The pumpkin butter can be made ahead of time and will keep in the fridge for 7–10 days.

    2. Preheat the oven to 425 degrees F. Place a 10” cast iron pan in the preheating oven.

    3. In a small bowl mix the whole wheat flour, coconut sugar, nutmeg, cardamom, cinnamon, and salt.

    4. Put the eggs into a blender and blend on low for a minute, until smooth and frothy. Add the milk and one tablespoon of the butter and blend until combined.

    5. Add the flour mixture and blend on low until just combined. If you don’t have a blender, the batter may be mixed by hand.

    6. Place the remaining tablespoon of butter in the preheated cast iron pan. Swirl the butter around until it has completely melted and coated the pan. Pour the batter into the pan, return the pan to the oven, and bake for 20 minutes.

    7. Remove the pancake from the oven, slice into wedges, and serve immediately. Top each slice with a spoonful of the pumpkin butter, a scoop of the walnuts, and a light dusting of powdered sugar, if desired.

    pinterestfacebooktwittermail

    Nutrition facts

    8 Servings


    • Serving Size

      1 slice & 1 tbsp. pumpkin butter


    • Amount per serving


      Calories


      140

    • % Daily value*

    • Total Fat
      9g

      12%

      • Saturated Fat
        2.5g

        13%
      • Trans Fats
        0.1g

    • Cholesterol
      75mg

      25%

    • Sodium
      140mg

      6%

    • Total Carbohydrate
      11g

      4%

      • Dietary Fiber
        2g

        7%
      • Total Sugars
        3g
      • Added Sugars
        1g

        2%

    • Protein
      5g

    • Potassium
      170mg

      4%

    Ingredients

    pumpkin puree (15 ounces)
    1 can

    apple cider
    1/2 cup

    ground cinnamon (divided use)
    1 1/2 tsp

    salt (divided use)
    1/2 tsp

    Apple Cider Vinegar
    1 tsp

    pumpkin spice flavored stevia drops
    30 drops

    eggs (at room temperature)
    3 large

    skim milk (at room temperature)
    1/2 cup

    whole wheat flour
    1/2 cup

    coconut sugar
    1 tbsp

    freshly grated nutmeg
    1/4 tsp

    ground cardamom
    1/4 tsp

    unsalted butter
    2 tbsp

    chopped toasted walnuts (for serving)
    1/2 cup

    powdered sugar (for serving)
    1 tsp

  • Plum Muffins

    Plum Muffins

    How to Make Plum Muffins

    These plum muffins combine the goodness of juicy plums with diabetes-friendly ingredients, ensuring a satisfying treat that won’t derail your meal eating plan and lets you savor the sweet moments. without compromise.


    15 min prep time


    20 min cook time


    12servings


    1 muffin

    Print Recipe >

    Step-By-Step Instructions:

    1. Preheat the oven to 375 degrees F. Grease a muffin tin or line with paper liners.

    2. In a large bowl, combine flour, sugar substitute, baking powder, baking soda, cinnamon, and salt.

    3. In another bowl, mix applesauce, milk, eggs, oil, and vanilla.

    4. Add wet ingredients to dry ingredients and stir until just combined. Fold in chopped plums. Spoon batter into muffin cups, filling two-thirds full.

    5. Bake for 15–20 minutes or until a toothpick comes out clean. Allow to cool for 5 minutes in the pan, then transfer to a wire rack to cool completely.

    pinterestfacebooktwittermail

    Nutrition facts

    12 Servings


    • Serving Size

      1 muffin


    • Amount per serving


      Calories


      140

    • % Daily value*

    • Total Fat
      6g

      8%

      • Saturated Fat
        1g

        5%
      • Trans Fats
        0g

    • Cholesterol
      30mg

      10%

    • Sodium
      120mg

      5%

    • Total Carbohydrate
      23g

      8%

      • Dietary Fiber
        3g

        11%
      • Total Sugars
        3g
      • Added Sugars
        0g

        0%

    • Protein
      4g

    • Potassium
      131mg

      3%

    Ingredients

    whole wheat flour
    2 cup

    baking sugar substitute
    5 tbsp

    baking powder
    2 tsp

    baking soda
    1/2 tsp

    ground cinnamon
    1/2 tsp

    salt
    1/4 tsp

    unsweetened applesauce
    1/2 cup

    skim milk
    1/2 cup

    eggs (beaten)
    2 whole

    vegetable oil
    1/4 cup

    vanilla extract
    1 tsp

    plums (small diced)
    1 cup

  • Grilled Chicken with Peaches and Zucchini Skewers

    Grilled Chicken with Peaches and Zucchini Skewers

    How to Make Grilled Chicken with Peaches and Zucchini Skewers

    Elevate your diabetes-friendly dining with our savory grilled chicken skewers featuring succulent peaches and zucchini. Indulge in a delectable blend of lean protein and low-glycemic fruits and veggies that’s perfect for outdoor gatherings and weeknight meals.


    1 hr and 5 min prep time


    15 min cook time


    4servings


    1 skewer (3 oz cooked chicken breast, ½ peach, ½ zucchini)

    Print Recipe >

    Step-By-Step Instructions:

    1. In a bowl, whisk together soy sauce, olive oil, honey, garlic, and ginger. 

    2. Place chicken, peaches, and zucchini in a large resealable bag or shallow dish and pour the marinade over them. Seal and refrigerate for at least 1 hour, up to overnight. 

    3. Preheat the grill (or indoor grill pan) to medium-high heat. Thread chicken, peaches, and zucchini onto skewers. Discard leftover marinade. 

    4. Grill for 10–15 minutes, turning occasionally, until chicken is cooked through and peaches are tender. 

    pinterestfacebooktwittermail

    Nutrition facts

    4 Servings


    • Serving Size

      1 skewer (3 oz cooked chicken breast, ½ peach, ½ zucchini)


    • Amount per serving


      Calories


      260

    • % Daily value*

    • Total Fat
      10g

      13%

      • Saturated Fat
        1.5g

        8%
      • Trans Fats
        0g

    • Cholesterol
      85mg

      28%

    • Sodium
      330mg

      14%

    • Total Carbohydrate
      13g

      5%

      • Dietary Fiber
        2g

        7%
      • Total Sugars
        11g
      • Added Sugars
        0g

        0%

    • Protein
      27g

    • Potassium
      782mg

      17%

    Ingredients

    lower sodium soy sauce
    1/4 cup

    olive oil
    2 tbsp

    garlic (minced)
    1 clove

    fresh ginger (grated)
    1 tsp

    boneless, skinless chicken breasts (cut into chunks)
    1 lbs

    zucchini (cut into ½ inch rounds)
    2 med

    wooden or metal skewers
    4 whole

    peaches (cut into ½ inch pieces)
    2 whole

  • Maple-Pumpkin Spice Oatmeal Cookies

    Maple-Pumpkin Spice Oatmeal Cookies

    How to Make Maple-Pumpkin Spice Oatmeal Cookies

    Enjoy all the flavors of fall with these hearty maple-pumpkin spice oatmeal cookies. Diabetes-friendly and made using natural sugars, these cookies will satisfy your pumpkin spice sweet tooth without derailing your diabetes management plan.


    10 min prep time


    25 min cook time


    14servings


    1 cookie

    Print Recipe >

    Step-By-Step Instructions:

    1. Preheat the oven to 350 degrees F. Line two baking sheets with parchment paper or use silicone baking mats.
    2. In a medium bowl, stir together the oats, flour, baking powder, salt, and pumpkin pie spice.
    3. Add the applesauce, dried apricots, maple syrup, butter, and oil to a blender. Cover and blend until well combined. Add the egg and vanilla extract and blend until puréed like a smoothie. Pour the batter into the dry mixture in the medium bowl and stir until well combined. Note: The batter will seem slightly loose (runny).
    4. Drop 7 cookies on each baking sheet, about 2 well-rounded measuring tablespoons each. Bake until browned on the bottom, about 25 minutes.
    5. Remove cookies from the oven and let cool completely on the baking sheets on racks. Store the soft-chew cookies in an airtight container at room temperature for up to 3 days or freeze for up to 1 month.
    pinterestfacebooktwittermail

    Nutrition facts

    14 Servings


    • Serving Size

      1 cookie


    • Amount per serving


      Calories


      120

    • % Daily value*

    • Total Fat
      6g

      8%

      • Saturated Fat
        2.5g

        13%
      • Trans Fats
        0.1g

    • Cholesterol
      20mg

      7%

    • Sodium
      150mg

      7%

    • Total Carbohydrate
      16g

      6%

      • Dietary Fiber
        2g

        7%
      • Total Sugars
        7g
      • Added Sugars
        3g

        6%

    • Protein
      2g

    • Potassium
      115mg

      2%

    Ingredients

    old-fashioned rolled oats
    1 1/4 cup

    all-purpose flour or whole-wheat pastry flour
    1/2 cup

    baking powder
    1 tsp

    sea salt
    3/4 tsp

    pumpkin pie spice or ground cinnamon
    3/4 tsp

    unsweetened applesauce
    1/2 cup

    dried apricots (about 7 or 8 pieces)
    2 oz

    pure maple syrup
    1/4 cup

    unsalted butter (room temperature)
    4 tbsp

    sunflower or avocado oil
    2 tbsp

    eggs
    1 large

    pure vanilla extract
    1 1/2 tsp