Tag: holidays & entertaining

  • Artichokes with Garlic and Oil (Carciofi All’Aglio E Olio)

    Artichokes with Garlic and Oil (Carciofi All’Aglio E Olio)

    How to Make Artichokes with Garlic and Oil (Carciofi All’Aglio E Olio)

    Amy Riolo’s Note: In addition to their creamy texture and buttery flavor, artichokes contain healthful antioxidants. If you’ve never worked with fresh artichokes before, don’t be intimidated. The steps to prepare them are simple, and after cooking them once, you’ll be a pro. When baby artichokes are in season, try using those—they cook in only half the time. When fresh artichokes are not in season, substitute canned, reduced-sodium artichoke hearts or frozen hearts.


    This recipe from The Italian Diabetes Cookbook, by Amy Riolo. To purchase this cookbook directly from the ADA, click here.


    15 min prep time


    35 min cook time


    4servings


    1 artichoke (or 2 baby artichokes)

    Print Recipe >

    Step-By-Step Instructions:

    1. Soak the artichokes in water to clean; drain and repeat until water is clear. Peel away the outside leaves of the bottom half of the artichokes. Cut off the top quarter of the artichoke (at this point the artichoke should look like a flower, and the tough, dark leaves should all be removed, leaving only lighter-colored, tenderer leaves). If tough, dark green leaves remain, peel those as well. Add juice of 1 lemon to a bowl full of cold water, and place cleaned artichokes inside to avoid discoloration.
    2. Bring a large pot of water to a boil, and add cleaned artichokes. Bring back to a boil on high heat. Reduce heat to medium-low and simmer artichokes 25–30 minutes, or until tender. Drain artichokes well, pat dry with a paper towel, and set aside.
    3. In a large skillet, heat olive oil over medium heat. Add garlic and sauté until garlic begins to release its aroma, approximately 1 minute. Add artichokes, turn to coat in oil, and season with salt, pepper, and crushed red chile flakes. Sprinkle with parsley and serve warm.
    pinterestfacebooktwittermail

    Nutrition facts

    4 Servings


    • Serving Size

      1 artichoke (or 2 baby artichokes)


    • Amount per serving


      Calories


      150

    • % Daily value*

    • Total Fat
      10g

      13%

      • Saturated Fat
        1.4g

        7%
      • Trans Fats
        0g

    • Cholesterol
      0mg

      0%

    • Sodium
      210mg

      9%

    • Total Carbohydrate
      14g

      5%

      • Dietary Fiber
        6g

        21%
      • Total Sugars
        2g

    • Protein
      4g

    • Potassium
      420mg

      9%

    Ingredients

    fresh baby artichokes
    12

    lemons, juiced, divided
    2

    Extra Virgin Olive Oil
    3 tbsp

    garlic, minced
    4 clove

    unrefined sea salt
    1/4 tsp

    freshly ground black pepper
    1/8 tsp

    crushed red chile flakes
    1 pinch

    finely chopped fresh flat-leaf parsley
    1 tsp

  • Apple Pandowdy

    Apple Pandowdy

    How to Make Apple Pandowdy

    Author Robyn Webb: “This dessert is perfect for the fall. I love apple desserts because they are a great way to get to know seasonal apple varieties. I really enjoy going to farmers’ markets and asking vendors which apples they like to use in different desserts. Use a mix of different types of apples in apple desserts so that you can get different flavor notes and different textures. For this fragrant pandowdy, I used half Golden Delicious and half Honey Crisps. Granny Smith, Pink Lady, Jonathan, or Northern Spy varieties also work well here.”

    Buy the American Diabetes Association Diabetes Comfort Food Cookbook here.


    10 min prep time


    40 min cook time


    14servings


    1/2 cup

    Print Recipe >

    Step-By-Step Instructions:

    1. Preheat the oven to 400°F. Peel and core apples, and slice into 1/4-inch thick slices. In a large bowl, combine apple slices, lemon juice, brown sugar, 1/4 cup stevia, 1/4 cup flour, and cinnamon. Toss well. Transfer to a 2 1/2-quart baking pan.
    2. In a medium bowl, combine 11/4 cups flour with the sugar, stevia, baking powder, and salt. Make a well in the center and add the egg, butter, vanilla, and milk. Quickly incorporate the liquid ingredients into the dry, just until blended.
    3. Spoon the dough into free-form biscuits over the apples. Bake for 35–40 minutes until the topping is golden and the fruit is bubbly.
    pinterestfacebooktwittermail

    Nutrition facts

    14 Servings


    • Serving Size

      1/2 cup


    • Amount per serving


      Calories


      130

    • % Daily value*

    • Total Fat
      1.5g

      2%

      • Saturated Fat
        0.7g

        4%
      • Trans Fats
        0g

    • Cholesterol
      15mg

      5%

    • Sodium
      85mg

      4%

    • Total Carbohydrate
      28g

      10%

      • Dietary Fiber
        2g

        7%
      • Total Sugars
        15g

    • Protein
      2g

    Ingredients

    Granny Smith or other tart apple (firm)
    3 lbs

    lemon juice (fresh)
    2 tbsp

    brown sugar (packed)
    1/3 cup

    stevia
    1/4 cup

    all-purpose flour (divided)
    1 1/2 cup

    ground cinnamon (ground)
    1 tsp

    sugar
    1 1/3 tbsp

    stevia
    1 tbsp

    baking powder
    1 tsp

    salt
    1/4 tsp

    eggs
    1

    butter (melted)
    1 tbsp

    vanilla extract
    1 tsp

    milk (fat-free)
    1/3 cup

  • Apple and Gorgonzola Cheese Salad

    Apple and Gorgonzola Cheese Salad

    How to Make Apple and Gorgonzola Cheese Salad

    This crowd pleaser includes sweet fall apples that balance out the pungent flavor of Gorgonzola cheese. Pair the salad with roasted chicken, turkey or pork tenderloin.


    15 min prep time


    8servings


    about 1 1/4 cups

    Print Recipe >

    Step-By-Step Instructions:

    1. Coat the apples with the lemon juice and set aside. Place the carrot slices and mixed greens on a platter. Top with the onion and set aside.
    2. Whisk together the orange and lemon juices, honey and mustard. Slowly add the oil in a thin stream, whisking constantly.
    3. Add the apples to the salad. Top with walnuts and cheese. Drizzle on the vinaigrette.
    pinterestfacebooktwittermail

    Nutrition facts

    8 Servings


    • Serving Size

      about 1 1/4 cups


    • Amount per serving


      Calories


      150

    • % Daily value*

    • Total Fat
      10g

      13%

      • Saturated Fat
        1.5g

        8%

    • Cholesterol
      0mg

      0%

    • Sodium
      95mg

      4%

    • Total Carbohydrate
      14g

      5%

      • Dietary Fiber
        3g

        11%
      • Total Sugars
        10g

    • Protein
      2g

    Ingredients

    large Braeburn apples (thinly sliced)
    2

    fresh lemon juice
    2 tbsp

    large carrot (peeled and thinly sliced)
    1

    mixed salad greens
    8 cup

    small red onion (thinly sliced)
    1

    fresh orange juice
    2 tbsp

    honey
    1 tbsp

    fresh lemon juice
    2 tbsp

    Dijon Mustard
    2 tsp

    walnut oil
    1/4 cup

    toasted walnut pieces
    1/4 cup

    Gorgonzola cheese (crumbled)
    3 tbsp

  • Wild Rice with Cranberries and Almonds

    Wild Rice with Cranberries and Almonds

    How to Make Wild Rice with Cranberries and Almonds

    Wild rice takes longer to cook than other rice but it has a lower glycemic index of 45 compared to white rice with a glycemic index of 70. This rice is a great holiday side dish too and is crowd-appropriate, making 11 servings.


    10 min prep time


    1 hr 15 min cook time


    11servings


    about 1/2 cup

    Print Recipe >

    Step-By-Step Instructions:

    1. Heat the oil in a large pot over medium heat. Add the onion and cook for 3 to 4 minutes.
    2. Add the water and chicken broth to the pan and bring to a boil.
    3. Add the rice; cover and cook according to package directions; usually about 50-60 minutes.
    4. Remove the lid and add in the toasted almonds and cranberries; use a fork to mix together.
    pinterestfacebooktwittermail

    Nutrition facts

    11 Servings


    • Serving Size

      about 1/2 cup


    • Amount per serving


      Calories


      120

    • % Daily value*

    • Total Fat
      3.5g

      4%

      • Saturated Fat
        0.3g

        2%

    • Cholesterol
      0mg

      0%

    • Sodium
      50mg

      2%

    • Total Carbohydrate
      20g

      7%

      • Dietary Fiber
        2g

        7%
      • Total Sugars
        4g

    • Protein
      4g

    • Potassium
      140mg

      3%

    Ingredients

    olive oil
    1 tbsp

    small onion (diced)
    1

    water
    3 1/2 cup

    low sodium chicken broth (fat-free, reduced sodium)
    1 cup

    wild rice
    8 oz

    slivered almonds (toasted)
    1/3 cup

    cranberries (dried)
    1/3 cup

  • Egg and Veggie Casserole

    Egg and Veggie Casserole

    How to Make Egg and Veggie Casserole

    This is a great dish to serve to company. It serves 8 as a main dish, or more if you cut it into small cubes and use it as an appetizer. You could also bake in a muffin pan to make a perfectly portioned, grab-and-go breakfast.


    55 min cook time


    8servings


    1 slice

    Print Recipe >

    Step-By-Step Instructions:

    1. Preheat oven to 350°F.
    2. Prep a large casserole dish with nonstick cooking spray.
    3. Heat olive oil in heavy frying pan and add garlic and onion. Cook until onion is soft, stirring constantly.
    4. Add the zucchini and sauté for another 1–2 minutes.
    5. Add the chopped tomatoes and the spinach leaves, cooking for 2 minutes, then add the basil, parsley, and rosemary. Continue cooking until the herbs and spinach are wilted.
    6. Combine egg whites, cooked vegetables, and the cheese in a bowl. Add salt and pepper if desired.
    7. Pour the mixture into the casserole and bake for 40–45 minutes, or until the frittata is set. Let cool, then cut into 8 equal sized slices.
    pinterestfacebooktwittermail

    Nutrition facts

    8 Servings


    • Serving Size

      1 slice


    • Amount per serving


      Calories


      120

    • % Daily value*

    • Total Fat
      6g

      8%

      • Saturated Fat
        2g

        10%

    • Cholesterol
      5mg

      2%

    • Sodium
      185mg

      8%

    • Total Carbohydrate
      7g

      3%

      • Dietary Fiber
        2g

        7%
      • Total Sugars
        4g

    • Protein
      10g

    • Potassium
      460mg

      10%

    Ingredients

    Nonstick cooking spray
    1

    olive oil
    2 tbsp

    small onion (diced)
    1

    garlic (minced)
    2 clove

    medium zucchini (sliced very thin)
    1

    large tomatoes (ripe, seeded and chopped)
    4

    spinach leaves (chopped)
    1 cup

    fresh basil (chopped)
    1/2 cup

    fresh parsley (chopped)
    1/2 cup

    fresh rosemary (chopped)
    1 sprig

    egg whites
    12

    fresh mozzarella (cut into cubes)
    4 oz

    ground pepper, to taste (fresh )
    1

    Dash kosher salt
    1

  • Shrimp Paella with Cauliflower Rice

    Shrimp Paella with Cauliflower Rice

    How to Make Shrimp Paella with Cauliflower Rice

    This shrimp paella is full of flavor from sausage, bell peppers, turmeric and paprika. Using riced cauliflower makes this a lower carb alternative to a traditional Spanish paella.


    10 min prep time


    20 min cook time


    6servings


    1 cup

    Print Recipe >

    Step-By-Step Instructions:

    1. Add cooking spray to a large skillet over medium-high heat. Add sausage, onion, bell pepper and garlic. Sauté until onions are starting to caramelize, about 8 minutes.
    2. Stir in turmeric and paprika. Add the broth, cauliflower rice, salt and pepper. Bring to boil then reduce heat to low, cover and simmer about 5 minutes.
    3. Add the shrimp to the pan, then cover and cook until shrimp are just opaque in center, about 6 minutes.
    pinterestfacebooktwittermail

    Nutrition facts

    6 Servings


    • Serving Size

      1 cup


    • Amount per serving


      Calories


      130

    • % Daily value*

    • Total Fat
      2g

      3%

      • Saturated Fat
        0.6g

        3%
      • Trans Fats
        0g

    • Cholesterol
      80mg

      27%

    • Sodium
      410mg

      18%

    • Total Carbohydrate
      13g

      5%

      • Dietary Fiber
        4g

        14%
      • Total Sugars
        6g

    • Protein
      16g

    • Potassium
      740mg

      16%

    Ingredients

    Nonstick cooking spray
    1

    large onion (diced)
    1

    red bell pepper (seeded and diced)
    1

    fully cooked adouille or chorizo chicken sausage (diced)
    1 (3-oz) link

    garlic (minced)
    2 clove

    turmeric
    1/2 tsp

    paprika
    1/2 tsp

    low sodium chicken broth
    3 cup

    salt
    1/2 tsp

    fresh or frozen cauliflower rice
    6 cup

    black pepper (ground )
    1/2 tsp

    raw shrimp (peeled and deveined)
    12 oz

  • Roast Beef with Creamy Horseradish Sauce

    Roast Beef with Creamy Horseradish Sauce

    How to Make Roast Beef with Creamy Horseradish Sauce

    Lean meats like this roast beef can make a great holiday entrée that the whole family will love.


    10 min prep time


    1 hr 10 min cook time


    14servings


    3 ounces meat and 3 Tbsp. sauce

    Print Recipe >

    Step-By-Step Instructions:

    1. Preheat the oven to 400 degrees F. Combine the black pepper, salt, and garlic, and rub all over the roast. Place the meat in a large roasting pan. Roast the meat for about 20 minutes. 

    2. Reduce the heat to 325 degrees F and bake for about 50 additional minutes or until a meat thermometer inserted in the roast registers 140 degrees F for medium rare. Cook longer if desired. 

    3. Remove the roast from the oven. Cover loosely with foil and let stand for 15-20 minutes. Cut the meat across the grain into thin slices. 

    4. To make the horseradish sauce, combine the horseradish, sour cream, and mustard. Serve with sliced beef. 

    pinterestfacebooktwittermail

    Nutrition facts

    14 Servings


    • Serving Size

      3 ounces meat and 3 Tbsp. sauce


    • Amount per serving


      Calories


      170

    • % Daily value*

    • Total Fat
      5g

      6%

      • Saturated Fat
        2g

        10%
      • Trans Fats
        0g

    • Cholesterol
      60mg

      20%

    • Sodium
      470mg

      20%

    • Total Carbohydrate
      4g

      1%

      • Dietary Fiber
        0g

        0%
      • Total Sugars
        3g
      • Added Sugars
        0g

        0%

    • Protein
      22g

    • Potassium
      271mg

      6%

    Ingredients

    beef roast, bottom round, lean, ⅛” trim, boneless (all excess fat removed; leave at room temperature for 15 minutes before roasting)
    3 lbs

    black pepper
    1 1/2 tbsp

    Kosher Salt
    2 tsp

    garlic (finely minced)
    5 clove

    horseradish (peeled, grated fresh, or prepared horseradish)
    1/2 cup

    nonfat sour cream
    2 cup

    coarse Dijon mustard
    1/4 cup

  • Black Bean Hummus

    Black Bean Hummus

    How to Make Black Bean Hummus

    Why stop at chickpeas? Sub in black beans and add some cumin for a zesty new take on hummus. Serve with fresh vegetables sticks for dipping.


    0 min cook time


    8servings


    2 Tbsp.

    Print Recipe >

    Step-By-Step Instructions:

    1. Place all ingredients in a food processor and blend until smooth. Add more water if consistency is too thick.
    pinterestfacebooktwittermail

    Nutrition facts

    8 Servings


    • Serving Size

      2 Tbsp.


    • Amount per serving


      Calories


      70

    • % Daily value*

    • Total Fat
      3g

      4%

      • Saturated Fat
        0.4g

        2%

    • Cholesterol
      0mg

      0%

    • Sodium
      40mg

      2%

    • Total Carbohydrate
      8g

      3%

      • Dietary Fiber
        3g

        11%
      • Total Sugars
        1g

    • Protein
      3g

    • Potassium
      120mg

      3%

    Ingredients

    olive oil
    1 tbsp

    black pepper
    1/8 tsp

    tahini
    1 tbsp

    cumin
    1/2 tsp

    low sodium canned black beans (rinsed and drained)
    1 (15.5-oz) can

    garlic powder
    1/4 tsp

    water
    2 tbsp

  • Bacon-Wrapped Shrimp

    Bacon-Wrapped Shrimp

    How to Make Bacon-Wrapped Shrimp

    Don’t be surprised when these appetizers are devoured at your next party. This classic take on shrimp proves that sometimes the simplest recipes are crowd pleasers!

    This recipe comes from The Diabetes Cookbook.


    10 min prep time


    6 min cook time


    10servings


    2 shrimp

    Print Recipe >

    Step-By-Step Instructions:

    1. Preheat broiler.
    2. Cut each bacon slice crosswise into three pieces. Wrap one piece around each shrimp. Place on baking sheet and broil 2-3 minutes per side, flipping once.
    3. Serve shrimp on lettuce leaves.
    pinterestfacebooktwittermail

    Nutrition facts

    10 Servings


    • Serving Size

      2 shrimp


    • Amount per serving


      Calories


      90

    • % Daily value*

    • Total Fat
      6g

      8%

      • Saturated Fat
        2.2g

        11%
      • Trans Fats
        0g

    • Cholesterol
      50mg

      17%

    • Sodium
      130mg

      6%

    • Total Carbohydrate
      0g

      0%

      • Dietary Fiber
        0g

        0%
      • Total Sugars
        0g
      • Added Sugars
        0g

        0%

    • Protein
      7g

    • Potassium
      95mg

      2%

    Ingredients

    bacon
    7 slice

    raw jumbo shrimp (peeled and deveined)
    20

    romaine lettuce
    4 leaves

  • Your Diabetes-Friendly Holiday Toolkit

    Your Diabetes-Friendly Holiday Toolkit

    Stumped on what to cook for Thanksgiving? We’ve got you covered! This all-in-one handbook has everything you need to prepare a diabetes-friendly Thanksgiving feast on a budget, including recipes, a grocery list, a game-plan, tips for building a healthier Thanksgiving plate, and ideas for leftovers. Our healthier Thanksgiving has one-third the calories, carbs, and fat of a traditional Thanksgiving meal, and at less than $10 a serving, it’s easy on your budget, too.

    THE MENU

    Our menu includes healthier versions of Thanksgiving classics. All of the recipes have been modified to make ten servings—perfect for a crowd, or a small family gathering with plenty of leftovers. 

    Herb Roasted Turkey

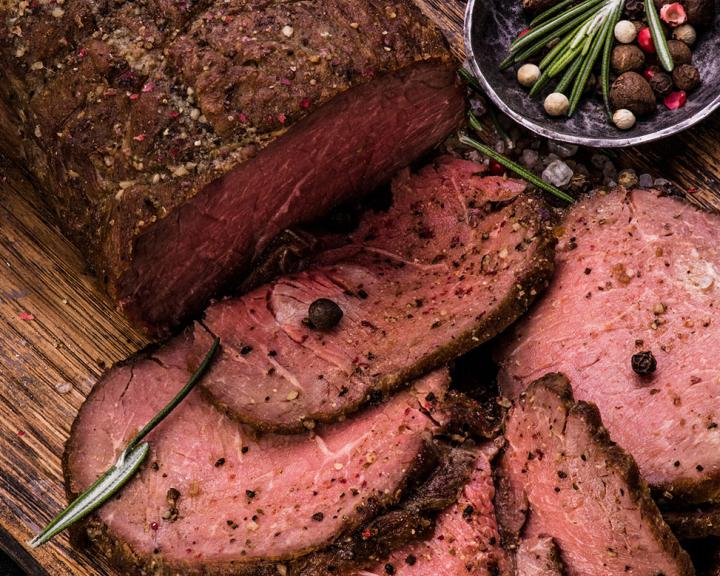
    Save time (and calories!) by roasting only the turkey breast instead of a whole turkey. The breast meat has less fat than the dark meat, which cuts down on saturated fat. 

    Herbed Bread Stuffing

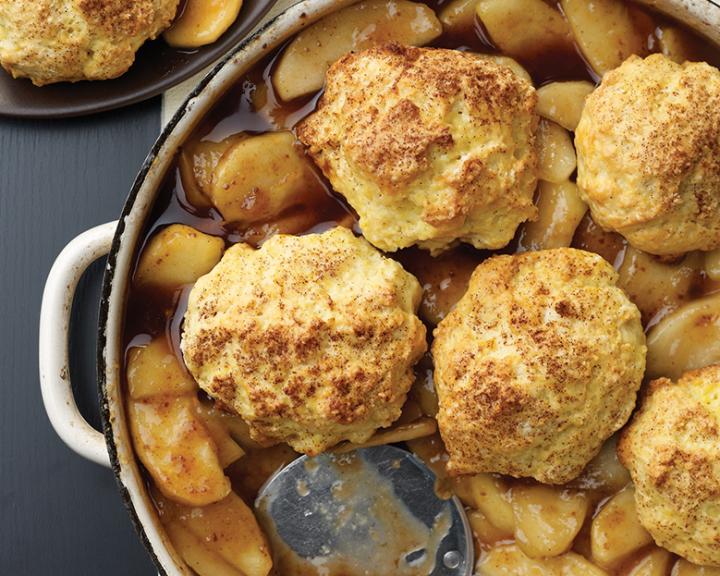
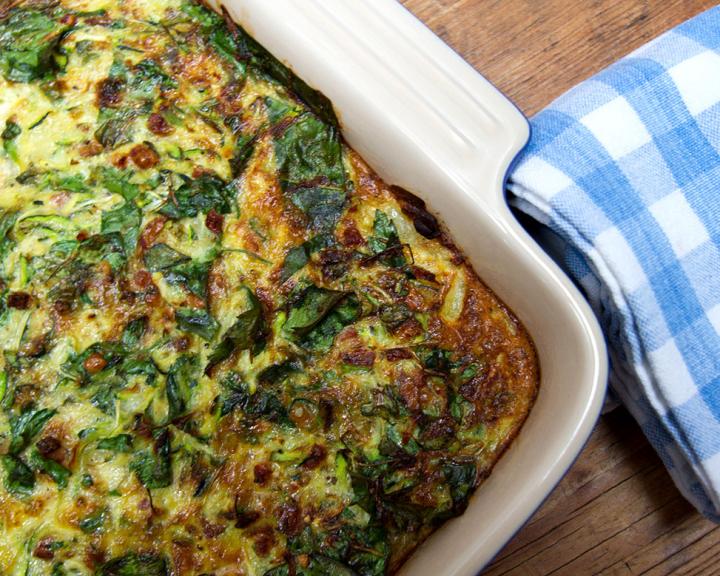
    No need to cut out stuffing for your holiday meal. Enjoy this bread stuffing and still keep your carbohydrate count down. The vegetables, fresh herbs, and apple add flavor and help fill out the serving. 

    Better Mashed Potatoes

    Mashed potatoes are a Thanksgiving staple. The potato is the star of this comfort food side dish, but a nonstarchy vegetable plays a surprising supporting role. The result is light, luscious, and diabetes-friendly.

    Green Beans with Cranberries and Hazelnuts

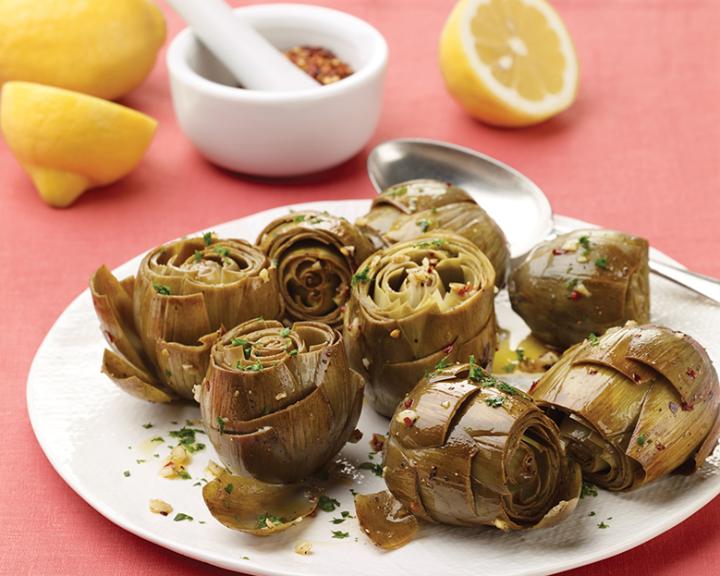
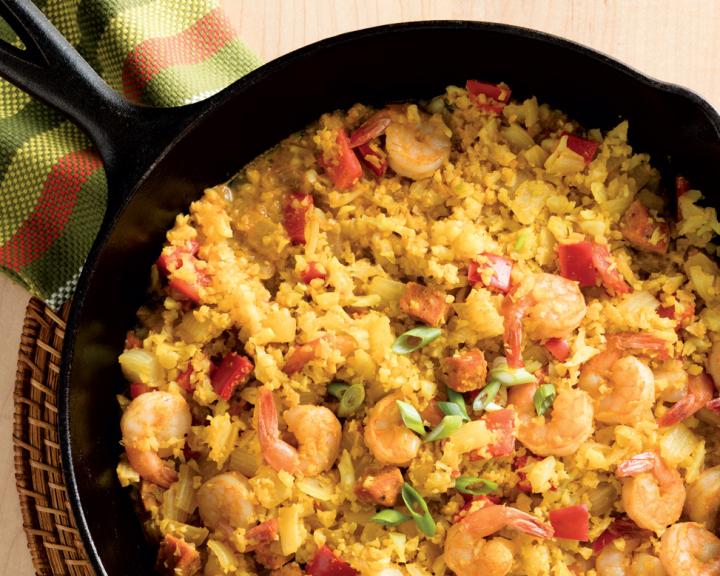
    Here’s a lighter take on a traditional creamy green bean casserole. This recipe has only 4 grams of carbohydrates per serving. The hazelnuts give a crunchy texture and the dried cranberries add a colorful touch.
     

    Image
    Thanksgiving Winter Salad with Champagne Vinaigrette

    Winter Salad with Champagne Vinaigrette

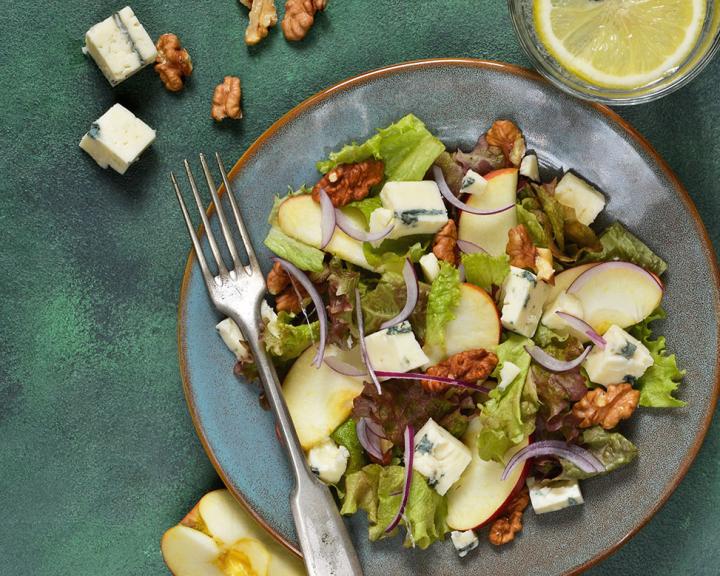
    Blue cheese, pomegranates, and hazelnuts add interesting flavor and crunch to this salad, making it deliciously easy to add more vegetables to your holiday plate. Adding a salad to your Thanksgiving menu makes it easier to fill half your plate with nonstarchy vegetables. 

    Image
    Mini tart.png

    Mini-Pumpkin Tarts

    No one will ever know this simple treat is diabetes-friendly! You can serve these mini tarts and impress your guests with this low-carb dessert. But don’t let these low-calorie treats fool you, they still pack in tons of pumpkin flavor. 

    THE GROCERY LIST

    This list contains not only all of the ingredients needed, but also the amounts you will need for the recipe. That way, if you already have some of the ingredients on hand, you’ll be able to tell if you have enough or need to buy more. This is especially helpful for spices and bottled sauces.
     
    In addition, the shopping list is organized according to supermarket department. With large supermarkets, it can be annoying to realize that you forgot something in the dairy department when you’re in the produce section. This list should help, and may even cut down the amount of time you spend in the market.

    Download the grocery list

    The cost for this meal is $8.90 per person. The estimated prices of ingredients are based on national food store prices and will vary according to area. This number will give you an idea of what the meal will cost. Also, keep an eye out for sales!

    Join Diabetes Food Hub for free to unlock our meal planner and grocery list tools!

    THE GAME PLAN

    Preparing a Thanksgiving feast may seem stressful, but there’s plenty you can do before the big day to set yourself up for success. Making dishes ahead of time helps spread the work over more than just one day, and can free up precious stove and oven space. Here is a step-by-step game plan:

    Weekend before Thanksgiving

    • Set the table: If you have the space, set your table. You won’t have to think about it during the week while preparing the rest of the meal.
    • Serving platters and utensils: Set out serving platters along with serving utensils. I even place a note on each platter describing what food goes on that platter. Note: This will include the baking dishes for the Herbed Bread Stuffing and Better Mashed Potatoes that will be made in advance (see below). On the day, you won’t have to stop and look for the right platters and if friends or family are helping, they will know where everything should go.

    Monday 

    • Shop for all ingredients.
    • If using a frozen turkey, leave it in the fridge to thaw.

    Tuesday

    • Arrange flowers or table decorations.

    Wednesday

    • Make Herbed Roasted Stuffing, cool, wrap well, and refrigerate.
    • Make Better Mashed Potatoes, cool, wrap well, and refrigerate.

    Thursday
    3 hours before serving

    • Remove Herbed Bread Stuffing and Better Mashed Potatoes from refrigerator to come to room temperature before warming. Note: If stuffing looks dry, add a little chicken broth. 
    • Line mini muffin pan with baking cups and cookie. Mix ingredients for Mini-Pumpkin Tarts in a bowl and set aside. 

    2 1/2-hours before serving 

    • Prepare and roast Herb-Roasted Turkey
    • Fill Mini-Pumpkin Tarts and place in oven, 30 minutes. Remove and set on counter to cool. Store in refrigerator until ready to serve after the main course. If you have only one oven, place these on the shelf below the turkey.

    2 hours before serving

    • While turkey is in the oven, make vinaigrette for Winter Salad and set aside.
    • Arrange Winter Salad greens on a serving platter or bowl. Sprinkle with pomegranate seeds, blue cheese, and pistachios, and set aside.
    • Make sauce for Green Beans (hazelnuts, cranberries, olive oil) and set aside.

    30 minutes before serving

    • Place Herbed Bread Stuffing and Better Mashed Potatoes in 350 oven to warm through. The turkey should be ready by then. If not, and you have only one oven, place these on a shelf below the turkey.
    • Warm them for about 30 minutes. Hint: to tell if these dishes are warmed through, stick the point of a knife into the middle of the dish and remove the knife. The metal should be warm to the touch.

    20 minutes before serving 

    • Sprinkle the dressing on the Winter Salad.
    • Make Green Beans and top with the sauce 
    • Carve the turkey and place on serving platter. 

    After main course

    • Top each Mini-Pumpkin Tart with a teaspoon of whipped topping and serve.

    NUTRITION INFORMATION

    By choosing healthier recipes, loading up on nonstarchy vegetables, and keeping portion sizes in check, our Thanksgiving plate has about one-third of the calories, carbs, and fat of a traditional Thanksgiving meal!

           Our Diabetes-Friendly Meal           vs.        Traditional Thanksgiving Meal*

    *Traditional Thanksgiving meal consisting of turkey w/ gravy, mashed potatoes, green bean casserole, stuffing, sweet potato casserole, cranberry sauce, dinner roll, pumpkin pie

    To build a healthier Thanksgiving plate, use the plate method:

    1. Start with a reasonably sized plate (about 9 inches) to keep your portion sizes in check. Mentally divide the plate in half, and fill one half with nonstarchy vegetables like greens beans, salad, brussels sprouts, broccoli, cauliflower, etc. 
    2. Divide the other half into two quarters. Fill one quarter with lean protein foods such as turkey or ham (or beans, lentils, and meat substitutes if you’re having a plant-based Thanksgiving).
    3. The last quarter is for carbohydrate-rich foods. This includes stuffing, mashed potatoes, sweet potatoes, rolls, acorn or butternut squash, and sweets like pumpkin pie. Limiting your carb selections to this one section of your plate is an easy way to keep your total carbs for the meal in check. 

    Related: Tips for Surviving You First Holiday Season with Diabetes

    THE DAY AFTER

    Even with the smaller breast cut in our turkey recipe, there’s going to be plenty left over. Try these recipes to get more mileage out of your Thanksgiving centerpiece.

    Turkey & Barley Soup

    Warm up with this hearty, broth-based soup. You can even make your own turkey stock from the turkey bones for an rich flavored soup.

    Crunchy Coleslaw Turkey Sandwich

    Try this light sandwich instead of the traditional leftover turkey sandwich.