Tag: gluten-free

  • Arugula & Prosciutto Pizza with Zucchini Crust

    Arugula & Prosciutto Pizza with Zucchini Crust

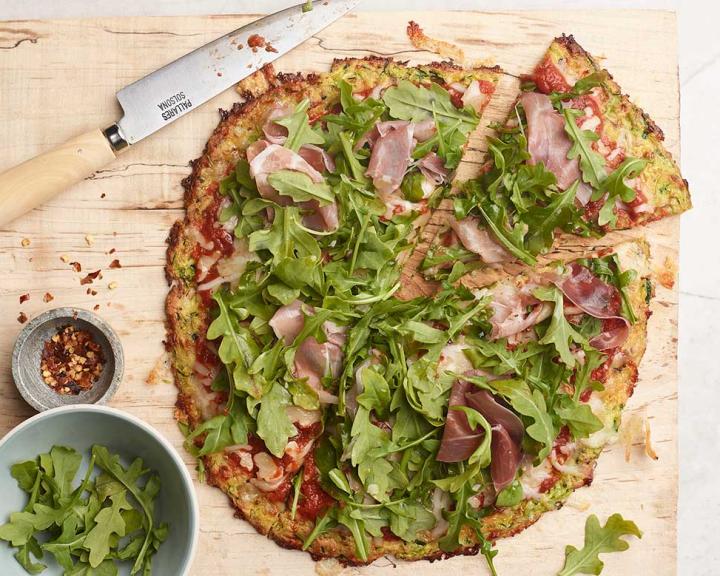
    How to Make Arugula & Prosciutto Pizza with Zucchini Crust

    Low carb pizza? Yes, please! The star of this pie is the zucchini crust—you could use it as the base for any number of pizza or flatbread creations. In this recipe, we top it with a simple tomato sauce, savory prosciutto, and fresh arugula.


    20 min prep time


    12 min cook time


    6servings


    1 slice

    Print Recipe >

    Step-By-Step Instructions:

    1. Preheat your oven to 500 degrees F. Line a baking sheet with parchment paper and spray with cooking spray.
    2. Line a large plate or cutting board with four layers of paper towels or a clean dish towel. Put the grated zucchini on top and sprinkle with salt. Let sit for 5-10 minutes.
    3. Meanwhile, stir together the crushed tomatoes, oregano, garlic powder, and basil. Set aside.
    4. Once the zucchini has sat for at least 5 minutes, cover with another layer of towels and squeeze out as much moisture as you can. Add the drained zucchini to a large bowl with the almond flour, egg, cheese, rosemary, and black pepper. Mix well.
    5. Place the zucchini dough in the middle of the prepared baking sheet. Press into a rectangle or circle about 1/4-inch thick. Bake the crust for 12 minutes, until it is lightly browned and the edges are crispy.
    6. Remove from the oven, and immediately spread the tomato sauce on the crust while it is still hot. Top with prosciutto slices and arugula, then cut into 6 equal slices.
    pinterestfacebooktwittermail

    Nutrition facts

    6 Servings


    • Serving Size

      1 slice


    • Amount per serving


      Calories


      100

    • % Daily value*

    • Total Fat
      6g

      8%

      • Saturated Fat
        1.7g

        9%
      • Trans Fats
        0g

    • Cholesterol
      40mg

      13%

    • Sodium
      250mg

      11%

    • Total Carbohydrate
      6g

      2%

      • Dietary Fiber
        2g

        7%
      • Total Sugars
        3g
      • Added Sugars
        0g

        0%

    • Protein
      7g

    • Potassium
      290mg

      6%

    Ingredients

    nonstick cooking spray
    1

    grated zucchini
    2 cup

    salt
    1/4 tsp

    crushed tomatoes
    3/4 cup

    dried oregano
    1 tsp

    garlic powder
    1/2 tsp

    dried basil
    1/2 tsp

    almond flour
    1/3 cup

    reduced-fat shredded mozzarella cheese
    1/2 cup

    large egg
    1

    dried rosemary
    1/4 tsp

    black pepper
    1/4 tsp

    thinly sliced prosciutto
    1 oz

    arugula
    1 cup

  • Low Carb Apple Spice Muffins

    Low Carb Apple Spice Muffins

    How to Make Low Carb Apple Spice Muffins

    These low carb muffins are made with coconut and almond flours instead of wheat flour (which makes them gluten-free, too), and they are sweetened with erythritol, a low-calorie sugar alcohol. The result is scrumptious muffins with only 9 grams of carbohydrate and no added sugar! These are perfect for meal prepping or a grab-and-go breakfast. They are also freeze well for longer storage—just thaw at room temperature or toast them in the oven for a warm treat!


    8 min prep time


    25 min cook time


    12servings


    1 muffin

    Print Recipe >

    Step-By-Step Instructions:

    1. Preheat your oven to 350 degrees F. Spray a muffin tin with cooking spray.
    2. In a medium bowl, combine the almond flour, coconut flour, erythritol, baking powder, cinnamon, nutmeg, cloves, salt. In another medium bowl, combine the oil, eggs, and almond milk.
    3. Pour the wet ingredients into the dry ingredients and mix. Add the apple and stir.
    4. Fill the muffin tins. Bake for 20-25 minutes or until a fork or toothpick comes out clean.
    5. To freeze: let the muffins cool completely, then remove them from the muffin pan. Arrange them in a single layer on a sheet pan and freeze for at least 2 hours. Once they are frozen solid, store them together in a freezer-safe ziptop bag. Or, wrap each muffin well in aluminum foil to store individually.
    pinterestfacebooktwittermail

    Nutrition facts

    12 Servings


    • Serving Size

      1 muffin


    • Amount per serving


      Calories


      190

    • % Daily value*

    • Total Fat
      16g

      21%

      • Saturated Fat
        2.2g

        11%
      • Trans Fats
        0g

    • Cholesterol
      60mg

      20%

    • Sodium
      115mg

      5%

    • Total Carbohydrate
      9g

      3%

      • Dietary Fiber
        4g

        14%
      • Total Sugars
        3g
      • Added Sugars
        0g

        0%

    • Protein
      7g

    • Potassium
      180mg

      4%

    Ingredients

    avocado oil cooking spray
    1

    almond flour
    2 cup

    coconut flour
    1/2 cup

    erythritol or other sugar substitute
    1/2 cup

    baking powder
    1 tsp

    ground cinnamon
    2 tsp

    ground nutmeg
    1/2 tsp

    ground cloves
    1/4 tsp

    avocado oil
    1/4 cup

    large eggs
    4

    unsweetened vanilla almond milk
    1/2 cup

    small apple (peeled, cored, and finely diced)
    1

  • Cinnamon Apple Chips with Peanut Butter Yogurt Dip

    Cinnamon Apple Chips with Peanut Butter Yogurt Dip

    How to Make Cinnamon Apple Chips with Peanut Butter Yogurt Dip

    Get ready for a delicious refresh for a snack idea – try these Cinnamon Apple Chips with a creamy Peanut Butter Yogurt Dip! Each serving includes 5g protein, 3g of fiber, and healthy fats to help keep you full in between meals. And it is made with  Splenda® Granulated Sweetener ― so that means it has no added sugars. Keep this healthy snack on-hand for something the whole family will love!


    15 min prep time


    1 hr 40 min cook time


    6servings


    2-3 apple slices and 2 tbsp dip

    Print Recipe >

    Step-By-Step Instructions:

    1. Preheat oven to 225°F, and line 2 baking sheets with parchment paper.

    2. Slice apples ⅛” thin, using a knife, a v-slicer, or the slicing attachment of a food processor. Then arrange slices on prepared baking sheets and sprinkle evenly with 2 tbsp Splenda Sweetener and 1 tsp ground cinnamon. Bake for 1 hour and 20 minutes. Flip the chips onto the other side and bake for 20 minutes more.

    3. Turn oven off and leave apple chips inside for another hour, with the door closed. Chips should be mostly dry to the touch but will continue to dry out as they cool.

    4. While chips cool, make peanut butter yogurt dip by combining Greek yogurt, peanut butter, remaining 1 tbsp Splenda Sweetener, and remaining 1/4 tsp ground cinnamon in a small bowl. Whisk until combined.

    pinterestfacebooktwittermail

    Nutrition facts

    6 Servings


    • Serving Size

      2-3 apple slices and 2 tbsp dip


    • Amount per serving


      Calories


      130

    • % Daily value*

    • Total Fat
      7g

      9%

      • Saturated Fat
        1.5g

        8%
      • Trans Fats
        0g

    • Cholesterol
      0mg

      0%

    • Sodium
      70mg

      3%

    • Total Carbohydrate
      13g

      5%

      • Dietary Fiber
        3g

        11%
      • Total Sugars
        8g
      • Added Sugars
        0g

        0%

    • Protein
      5g

    • Potassium
      175mg

      4%

    Ingredients

    medium apples
    2

    Splenda® Granulated Sweetener (divided use)
    3 tbsp

    ground cinnamon (divided use)
    1 1/4 tsp

    Plain Nonfat Greek yogurt
    1/2 cup

    peanut butter
    1/3 cup

  • 4-Ingredient Peanut Butter Cookies

    4-Ingredient Peanut Butter Cookies

    How to Make 4-Ingredient Peanut Butter Cookies

    These flourless peanut butter cookies are deliciously soft, thick, and chewy; are loaded with flavor; and are low in carbohydrates! You can make these using just one bowl and only four simple ingredients. Splenda® Granulated Sweetener is used instead of sugar so you can enjoy a sweet treat with less calories and carbs.


    20 min prep time


    10 min cook time


    20servings


    1 cookie

    Print Recipe >

    Step-By-Step Instructions:

    1. Preheat oven to 350°F. In a large bowl, mix together peanut butter, Splenda sweetener, egg, and vanilla extract. Chill mixture in the fridge for at least 10 minutes.

    2. Portion mixture into 1 tablespoon balls and place on an ungreased sheet pan. Press lightly with the tines of a fork to create a crosshatch pattern and flatten each cookie slightly.

    3. Bake for 8 minutes. Let cool on sheet pan at least 5 minutes before transferring to a wire rack to finish cooling.

    pinterestfacebooktwittermail

    Nutrition facts

    20 Servings


    • Serving Size

      1 cookie


    • Amount per serving


      Calories


      90

    • % Daily value*

    • Total Fat
      7g

      9%

      • Saturated Fat
        1.5g

        8%
      • Trans Fats
        0g

    • Cholesterol
      10mg

      3%

    • Sodium
      60mg

      3%

    • Total Carbohydrate
      4g

      1%

      • Dietary Fiber
        1g

        4%
      • Total Sugars
        1g
      • Added Sugars
        1g

        2%

    • Protein
      3g

    • Potassium
      76mg

      2%

    Ingredients

    peanut butter
    1 cup

    Splenda® Granulated Sweetener
    1 cup

    large egg (beaten)
    1

    vanilla extract
    1 tsp

  • Baked Salmon with Ginger-Citrus Sauce

    Baked Salmon with Ginger-Citrus Sauce

    How to Make Baked Salmon with Ginger-Citrus Sauce

    A slightly sweet orange ginger glazed salmon is the centerpiece of this delicious and healthy meal. Use orange juice with 50% less sugar and Splenda® Granulated Sweetener to create an irresistible glaze with less added sugars, carbohydrates and calories. Serve with traditional stir fry vegetables such as broccoli, carrots and sugar-snap peas for a lovely, satisfying meal.


    20 min prep time


    10 min cook time


    2servings


    1 salmon (4-oz) fillet, 1 oz sauce, and 3/4 cup vegetables

    Print Recipe >

    Step-By-Step Instructions:

    1. Preheat oven to 450°F.

    2. Prepare the sauce: In a saucepan, combine orange juice, Splenda Sweetener, and sliced ginger. Bring to a rolling boil over medium-high heat. Boil 10–12 minutes or until orange juice has reduced to about 2 tablespoons. Remove from heat; discard ginger slices.

    3. In a bowl, whisk together half-and-half, cornstarch, and salt until smooth.

    4. Whisk butter, 1 tablespoon at a time, into orange juice until melted. Whisk in half-and-half mixture. Return saucepan to medium-high and heat until boiling.

    5. Remove sauce from heat; transfer to a blender and carefully blend for about 30 seconds until light and smooth.

    6. Prepare the salmon and vegetables: Place vegetables in an 8” x 8” baking dish; lay salmon fillets on top of the vegetables. Bake for 10–15 minutes or until salmon flakes easily when tested with a small knife and vegetables are heated through.

    7. Transfer vegetables and salmon to serving plates; pour sauce over salmon. Serve with steamed rice, if desired.

    pinterestfacebooktwittermail

    Nutrition facts

    2 Servings


    • Serving Size

      1 salmon (4-oz) fillet, 1 oz sauce, and 3/4 cup vegetables


    • Amount per serving


      Calories


      290

    • % Daily value*

    • Total Fat
      15g

      19%

      • Saturated Fat
        4g

        20%
      • Trans Fats
        0g

    • Cholesterol
      70mg

      23%

    • Sodium
      490mg

      21%

    • Total Carbohydrate
      16g

      6%

      • Dietary Fiber
        2g

        7%
      • Total Sugars
        8g
      • Added Sugars
        0g

        0%

    • Protein
      24g

    • Potassium
      760mg

      16%

    Ingredients

    50% reduced sugar orange juice
    1 cup

    Splenda® Granulated Sweetener
    1/4 cup

    fresh ginger (peeled and sliced)
    1 (2 1/2-inch) piece

    fat-free half-and-half
    2 tbsp

    Cornstarch
    1/4 tsp

    salt
    1/4 tsp

    light butter with canola
    2 tbsp

    frozen stir-fry vegetables
    2 cup

    salmon (cut into two (4-oz) portions)
    8 oz

  • Homemade Instant Soup Jars

    Homemade Instant Soup Jars

    How to Make Homemade Instant Soup Jars

    Instant soups are a convenient and inexpensive meal, but they are loaded with sodium. This homemade version is easy to prepare ahead of time (make a few at a time for easy meal prepping) so you can enjoy the same convenience, but a much healthier version! This recipe calls for coconut aminos, which is a lower sodium (only 90 mg per tsp!), gluten-free substitute for soy sauce. If you’re trying to cut back on sodium, coconut aminos are a great alternative to soy sauce to keep in your pantry. To make the hard-boiled egg for this recipe, try our favorite method here.


    10 min prep time


    5 min cook time


    1serving


    1 soup jar with 1 hard boiled egg

    Print Recipe >

    Step-By-Step Instructions:

    1. Layer rice, frozen vegetables, cabbage, and carrot in a 16 oz glass jar with lid.
    2. In a small bowl mix coconut aminos, sesame oil, ginger, garlic powder and red pepper flakes. Pour over rice and vegetables. Top with a lid and refrigerate.
    3. Remove jar from refrigerator at least 15 minutes before you are ready to eat.
    4. Pour 5 ounces boiling water into the jar, close the lid and shake to combine. Let ingredients steep in unopened jar for 2 minutes.
    5. Peel and slice the hard-boiled egg, and add to the soup. Pour contents from jar into a bowl, or enjoy straight from the jar!
    pinterestfacebooktwittermail

    Nutrition facts

    1 Serving


    • Serving Size

      1 soup jar with 1 hard boiled egg


    • Amount per serving


      Calories


      270

    • % Daily value*

    • Total Fat
      11g

      14%

      • Saturated Fat
        2.5g

        13%
      • Trans Fats
        0g

    • Cholesterol
      190mg

      63%

    • Sodium
      190mg

      8%

    • Total Carbohydrate
      32g

      12%

      • Dietary Fiber
        4.6g

        16%
      • Total Sugars
        4g
      • Added Sugars
        0g

        0%

    • Protein
      10g

    • Potassium
      360mg

      8%

    Ingredients

    frozen chopped veggie mix, such as broccoli, cauliflower, and carrots
    1/2 cup

    cooked brown rice
    1/2 cup

    shredded cabbage
    1/2 cup

    shredded carrot
    1 tbsp

    coconut aminos
    1 tsp

    sesame oil
    1 tsp

    fresh grated ginger
    1/2 tsp

    garlic powder
    1/2 tsp

    crushed red pepper flakes (optional)
    1 pinch

    hard-boiled egg
    1

  • Roasted Cabbage Steaks

    Roasted Cabbage Steaks

    How to Make Roasted Cabbage Steaks

    Cabbage is a budget-friendly, versatile vegetable. In this recipe, a whole head of cabbage is sliced into thick “steaks” and roasted for a hearty side dish or vegetarian entree. These would also be great cooked on the grill. You could make a simple sauce of Greek yogurt and dill to top the steaks.


    5 min prep time


    1 hr cook time


    6servings


    1 cabbage steak

    Print Recipe >

    Step-By-Step Instructions:

    1. Preheat oven to 350° F. Cut cabbage head into six 1″ thick slices.

    2. Arrange cabbage slices on a baking sheet and drizzle with olive oil. Sprinkle seasoning blend and dill weed over cabbage. Cover with aluminum foil.

    3. Bake for 45 minutes. Remove foil and let cabbage steaks brown in oven for 15 minutes longer.

    pinterestfacebooktwittermail

    Nutrition facts

    6 Servings


    • Serving Size

      1 cabbage steak


    • Amount per serving


      Calories


      80

    • % Daily value*

    • Total Fat
      4.5g

      6%

      • Saturated Fat
        0.5g

        3%
      • Trans Fats
        0g

    • Cholesterol
      0mg

      0%

    • Sodium
      25mg

      1%

    • Total Carbohydrate
      8g

      3%

      • Dietary Fiber
        4g

        14%
      • Total Sugars
        5g
      • Added Sugars
        0g

        0%

    • Protein
      2g

    • Potassium
      270mg

      6%

    Ingredients

    fresh dill (chopped)
    1 tbsp

    salt-free all-purpose seasoning blend, such as Ms. Dash
    1 tbsp

    black pepper
    1/2 tsp

    olive oil
    2 tbsp

    green cabbage
    1 head

  • Quick & Easy Cheese Dip

    Quick & Easy Cheese Dip

    How to Make Quick & Easy Cheese Dip

    This super simple dip can be stirred together to maintain the cottage cheese texture, or blended for a smooth and creamy dip. It’s perfect for making ahead of time—the flavors meld and get stronger during storage, so you can prepare it ahead of time and store in the fridge for up to 5 days. Serve with fresh raw veggies or whole wheat crackers as an appetizer or snack.


    10 min prep time


    12servings


    3 tbsp

    Print Recipe >

    Step-By-Step Instructions:

    1. Mix all ingredients together in a medium bowl. Serve immediately, or cover and refrigerate until chilled. OPTIONAL: For a creamier dip, blend everything together in a food processor or blender.
    pinterestfacebooktwittermail

    Nutrition facts

    12 Servings


    • Serving Size

      3 tbsp


    • Amount per serving


      Calories


      80

    • % Daily value*

    • Total Fat
      5g

      6%

      • Saturated Fat
        3g

        15%
      • Trans Fats
        0g

    • Cholesterol
      20mg

      7%

    • Sodium
      140mg

      6%

    • Total Carbohydrate
      3g

      1%

      • Dietary Fiber
        0g

        0%
      • Total Sugars
        2g
      • Added Sugars
        0g

        0%

    • Protein
      4g

    • Potassium
      80mg

      2%

    Ingredients

    crumbled blue cheese
    1/3 cup

    garlic powder
    1/2 tsp

    fresh or dried dill
    1 tsp

    hot sauce
    2 tsp

    green onions (chopped)
    3

    sour cream
    1 cup

    cottage cheese
    1 1/2 cup

  • Sheet Pan Chicken, Green Beans & Potatoes

    Sheet Pan Chicken, Green Beans & Potatoes

    How to Make Sheet Pan Chicken, Green Beans & Potatoes

    This budget-friendly family meal is made with just 6 ingredients and a sheet pan for minimal clean up. Perfect for busy weeknights when you need to get dinner on the table in less than 30 minutes. You could use any fresh or frozen vegetables. Italian dressing mix is a great “shortcut” seasoning, but you could use other seasonings you have on hand.

    This recipe includes a step for “leaching” the potatoes—a process that reduces the potassium. This is useful for people managing kidney disease or otherwise on a potassium-restricted diet. If you do not need to limit potassium, you can skip this step. If not leached, the potassium content is 765 mg per serving.


    10 min prep time


    30 min cook time


    4servings


    1/4 recipe

    Print Recipe >

    Step-By-Step Instructions:

    1. Preheat oven to 400˚ F. Chop the potatoes into bite sized pieces. See helpful hints for instructions on potassium reduction if needed. Toss potatoes in 1 teaspoon olive oil.

    2. Spray a 9 x13-inch sheet pan with cooking spray. Place the raw chicken strips down 1/3 of the pan. Place the potatoes down another 1/3 of the pan. Finally, lay the frozen green beans down the last 1/3 of the pan.

    3. Drizzle 2 tablespoons of olive oil over the entire pan of chicken, potatoes and green beans. Sprinkle Italian dressing dry mix over the entire pan.

    4. Bake for 20 to 30 minutes. Check chicken for doneness after 20 minutes.

    pinterestfacebooktwittermail

    Nutrition facts

    4 Servings


    • Serving Size

      1/4 recipe


    • Amount per serving


      Calories


      270

    • % Daily value*

    • Total Fat
      12g

      15%

      • Saturated Fat
        1.5g

        8%
      • Trans Fats
        0.5g

    • Cholesterol
      70mg

      23%

    • Sodium
      310mg

      13%

    • Total Carbohydrate
      19g

      7%

      • Dietary Fiber
        2g

        7%
      • Total Sugars
        2g
      • Added Sugars
        0g

        0%

    • Protein
      25g

    • Potassium
      542mg

      12%

    Ingredients

    red potatoes (chopped into bite-sized pieces)
    2 med

    olive oil (plus 1 tsp)
    2 tbsp

    chicken tenderloins
    16 oz

    frozen cut green beans
    10 oz

    Italian dressing mix
    1 tbsp

  • Roasted Red Pepper Tomato Sauce

    Roasted Red Pepper Tomato Sauce

    How to Make Roasted Red Pepper Tomato Sauce

    Tomatoes are high in potassium, meaning tomato sauce is usually off limits for someone managing kidney disease on a low potassium diet. This kidney-friendly sauce replaces half the tomatoes with roasted red peppers for a lower potassium sauce that can be used on pasta, pizza, or as a replacement for tomato sauce in recipes. And, it tastes great! You can use store bought roasted red peppers (look for the lowest sodium option) or roast red bell peppers at home. You can easily double or triple this recipe to make a larger batch and freeze some for later.


    10 min prep time


    4servings


    1/4 cup

    Print Recipe >

    Step-By-Step Instructions:

    1. Place peppers and garlic in food processor or blender and process until smooth. Add tomato sauce, olive oil and Italian seasonings. Process until well blended. Ready to use on pizza, pasta or as a replacement for tomato sauce in recipes. May be refrigerated up to 3 days or frozen until ready to use.

    pinterestfacebooktwittermail

    Nutrition facts

    4 Servings


    • Serving Size

      1/4 cup


    • Amount per serving


      Calories


      70

    • % Daily value*

    • Total Fat
      7g

      9%

      • Saturated Fat
        1g

        5%
      • Trans Fats
        0g

    • Cholesterol
      0mg

      0%

    • Sodium
      40mg

      2%

    • Total Carbohydrate
      4g

      1%

      • Dietary Fiber
        1g

        4%
      • Total Sugars
        1g
      • Added Sugars
        0g

        0%

    • Protein
      1g

    • Potassium
      132mg

      3%

    Ingredients

    crushed red pepper flakes
    1/4 tsp, or to taste

    Italian seasoning
    1 tsp

    low sodium tomato sauce
    1/2 cup

    garlic
    1 clove

    roasted red peppers (drained)
    1/2 cup