Tag: french

  • Meal Prep: DIY Salad Bar

    Meal Prep: DIY Salad Bar

    Everybody likes getting more for less! How about getting more meals from less recipes? With some strategic meal planning and prepping, you can create several days’ worth of meals with just a few recipes and one trip to the grocery store. You can even prepare all of the recipes at once and store meals in single serve containers in the fridge for grab-and-go meals all week.

    Diabetes Food Hub can be a great tool for meal prepping! Click here to learn how to use our recipes, meal planner, and grocery list generator to make planning, shopping, and preparing healthy meals a snap! Additionally, we’ll be rolling out a series of meal prepping articles over the next few weeks to show how a little planning can make your meal planning life a lot easier.

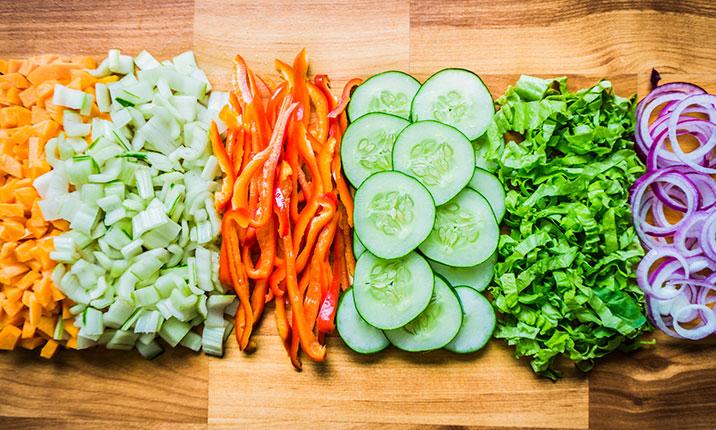
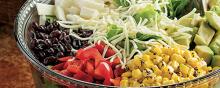
    This week we are going green—LEAFY greens! We’ll help you build your own “salad bar” at home so you can create custom salads all week long. Best of all, the whole family can get involved! Everyone can choose a couple of their favorite ingredients to add to the grocery list. On prep day, kids can help with washing fresh produce, mixing salad dressing, and storing all of the salad bar ingredients. Kids will love building their own salads, and you’ll love getting them excited about vegetables!

    Check out this article for tips on building the perfect salad!

    How to prep your salad bar

    Image
    salad-containers.jpg

    1. Wash your greens. For heads of lettuce like iceberg or romaine, remove damaged or wilted outer leaves, cut out the core, and chop the rest. Rinse chopped lettuce and loose greens in a colander or bowl of water. Drain and dry the greens as well as you can before storing by using a salad spinner or patting them dry with paper towels. Store greens in a large container or bag. To keep them crisp, add a damp paper towel to the container, and re-wet as needed during the week. NOTE: Even bagged greens should be washed!

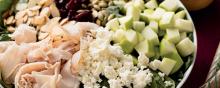
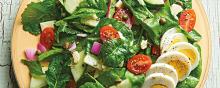
    2. Wash fresh fruits and vegetables and chop into bite size pieces. 

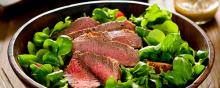
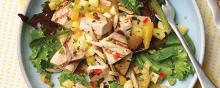
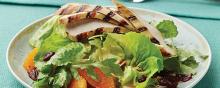
    3. Prep your proteins. For chicken or steak, bake or grill cuts of meat, then cut into slices or cubes. If you are using fish, you can either use canned fish or bake fillets of fresh or frozen fish. Leave the fillets whole or break apart with a fork and store. For hard boiled eggs, it’s best to leave them whole (with or without their shell) and slice or chop just before adding it to the salad.

    • 4. Cook your grains. If you like quinoa, wild rice, brown rice, or other grains in your salad, cook it up! You can then store in a container in the fridge and add cold later in the week, or heat up in the microwave to add a little warmth to a cold salad.
    •  
    • 5. Prep your flavor boosters. Chop nuts if you like smaller pieces; grate, shred, or crumble your cheese to save time later; other add ins just need to be stored in easily accessible containers.

    6. Make and portion your dressing. Try a couple variations to shake things up! Portion out dressing into small containers that you can toss into your salad bowl. Remember, dressings are made of mostly fat, so they can add a lot of calories to a healthy salad. Using small containers can help control you portions, plus your greens will stay crisper if you keep the dressing on the side, or add it to your salad right before you eat it.

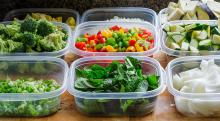
    7. Store all of your salad components in separate, resealable containers or bags. Some things like nuts and dried fruit do not need to be stored in the fridge. 

    8. Build your salad. You can prepare your lunch salad the night before or in the morning. For a meal-sized salad, start with 1-2 handfuls of leafy greens. Sprinkle on 1/2 to 1 cup of chopped veggies and fruit. Add 3-4 ounces of protein (about the size of the palm of your hand). Add about 1/4 cup of grains, then finish it off with a couple tablespoons of “flavor boosters” like nuts, dried fruit, cheese, or olives. You can pack everything in a large bowl with the dressing on the side, or build a mason jar salad! For a mason jar salad, build everything in reverse: start with dressing on the bottom, then add your various toppings, and finish it off with greens. When you are ready to eat your salad, dump the jar out into a bowl – the greens will be on the bottom and the dressing will be on top!

    Need more inspiration to get started?

    Try these chef-inspired salad recipes, curated by the ADA experts!

    Image
    290-diabetic-grilled-steak-salad_090718_500x200.jpg

    Image
    RecId_608_Arugula, Pear, Walnut and Pecorino Salad_HealthyHome_022618_500x200.jpg


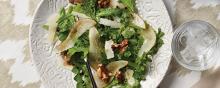
    Arugula, Pear, Walnut, & Pecorino Salad

    Image
    937-diabetic-chopped-mexican-salad-tex-mex-cookbook_080318_500x200.jpg

    Image
    286-diabetic-grilled-salmon-avocado-salad_091418_500x200.jpg


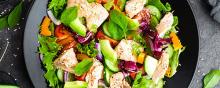
    Grilled Salmon and Avocado Salad

    Image
    415-diabetic-power-lunch-salad_diabetes-cookbook_081618_500x200.jpg

    Power Lunch Salad

    Image
    931-diabetic-powerhouse-kale-salad_designed-for-one_071118_500x200.jpg

    Image
    RecId_873_SwordfishSaladWithSalsaDressing_PerfectComfortCollection_022618_500x200.jpg

    Image
    725-diabetic-Grilled-Chicken-Salad-with-Candied-Pecans_SizzleSmoke_091418_500x200.jpg


    Want more meal prep ideas?

    Check out the other articles in this series:

    Image
    Meal Prep: 3 for 1 Chicken

    Meal Prep: 3 for 1 Chicken


    Image
    Meal Prep: Breakfast on the Go

    Meal Prep: Breakfast on the Go


    Image
    Meal Prep: Fall Harvest


    Image
    Meal Prep: 3-for-1 Beef

    Meal Prep: 3 for 1 Beef


  • Tasty Tips for Traveling

    Tasty Tips for Traveling

    Your bags are packed and you’re heading out for a well-deserved vacation. But what about meals and snacks? Whether you’re traveling by car, air or rail, when you’re managing your diabetes, a little planning can make your time on the go a lot less stressful and a lot more fun!

    With all of the details to keep track of when planning a trip, meals can end up being a last-minute challenge with limited healthy choices. As a result, it’s easy to get out of your routine, including those habits that help you manage your diabetes day to day. But with a few tips in mind, you can keep up with that healthy routine as if you were right at home.

    On the Road or By Plane

    As you travel to your vacation destination, your normal routine gets interrupted, and you may be bombarded with a number of snack stands and fast food restaurants tempting you with unhealthy options. Here are a few solutions to common problems you may encounter:

    Problem: A long ride ahead of you that interrupts your regular schedule.
    Solution: Think about exactly how long your trip will be. Will it conflict with the time you usually eat lunch? Dinner? Mid-day snacks? If so, plan on packing the right amount of food and snacks for those times. This way your meals are just about ready to go and your schedule stays on course.

    Problem: Overeating! You become so focused on the road, you don’t realize that you’ve already reached the bottom of your snack bag. Even if you have packed healthy options like unsalted mixed nuts, or fresh fruits, overeating some of these healthy foods can lead to higher blood sugar.
    Solution: Bring your single-serving containers. Portion snacks into single serving sizes and divide up your food based on the number of meals and snacks you will need while you’re traveling. Think of it as packing a lunch bag, rather than one large bag of snacks.

    Problem: When traveling by air, you might find yourself with a layover or two, and the airport’s many food temptations can be a challenge.
    Solution: Think about packing some foods that don’t need refrigeration. These can be your own bag of trail mix with unsalted nuts, cheese and crackers, or some uncut fresh fruit like an apple or pear. Even carrots and celery hold up pretty well. If you have to buy something at the airport, find healthier options by reading nutrition labels and watching your portion sizes.

    Maintaining healthy habits on vacation doesn’t have to take away from your experience

    Problem: The Transportation Security Administration (TSA) doesn’t allow some food or drinks past the security check points.
    Solution: Many people are confused about this rule. Actually, while TSA does not allow liquids to pass security, they do allow many different types of food as long as they are packed into appropriate containers. So once again, bring those single-serving containers. You can also bring an empty water bottle and fill it at a drinking fountain once you are through security. This will save you money on bottled water and reduce the temptation to buy a sugary drink.

    You’ve Reached Your Destination

    Now that you’ve reached your vacation spot, it’s time once again to think of how to stay on track with meal timing and healthy choices. Sampling local foods while traveling is a big part of the experience for most people. In planning your meals, think about which local dishes are a priority. What dishes are a “must-have” versus dishes that are simply “nice to have”? Make a list and prioritize your dishes, then stick to it.

    Like America, other countries are now increasing portion sizes at their restaurants while lowering prices, making it easy to overeat. When you can, try sharing meals with family or friends you’re traveling with. If you’re going solo, think about packing half of your dish for an extra meal the next day, or opt for something smaller like an appetizer, side, or salad.

    You can also buy fresh produce and other healthy snacks when you arrive. Live like a local! Check out a nearby grocery store or market and pick out some snacks to keep in your hotel or on hand as you explore. Find out what produce is in season in the area, and maybe even try something new.

    Maintaining healthy habits on vacation doesn’t have to take away from your experience. With a little planning, you can stay healthy, have fun, and return home with healthy habits intact.