Tag: foodie

  • Baked Chicken Empanadas

    Baked Chicken Empanadas

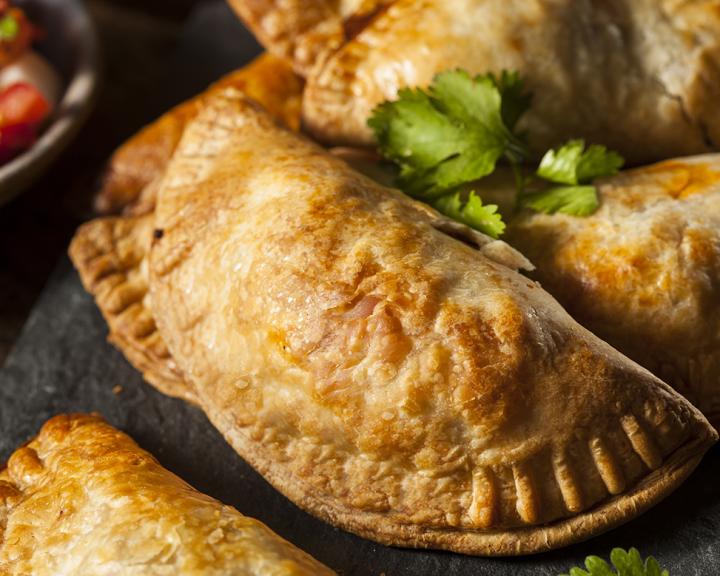
    How to Make Baked Chicken Empanadas

    Chicken empanadas are fun to make and a great no-fork-needed appetizer. Baking these tasty treats gives a crispy crust with less fat and the Manzanilla olives add a delicious nutty flavor.


    45 min prep time


    20 min cook time


    16servings


    1 empanada

    Print Recipe >

    Step-By-Step Instructions:

    1. Add the chicken breasts and chicken broth to a large sauce pan over high heat. Bring to boiling, then reduce heat and simmer for 15 to 20 minutes, until the chicken is cooked through. Remove the pan from the heat and let the chicken cool to the touch in the broth (about 20 minutes).

    2. Shred the chicken into small pieces and mix in 2 Tbsp. of the chicken broth from the pan; set aside.

    3. Add the oil to a sauté pan over medium heat. Add the onion, paprika, cumin, chili powder, and 1/2 cup of the chicken broth. Reduce the heat to low and cook for 10 to 15 minutes, until onions are soft and clear, and the liquid is evaporated. Stir in the chicken to yield 2 cups of filling.

    4. Preheat the oven to 400 degrees F. Coat a large baking sheet with cooking spray.

    5. Separate the whole wheat pizza dough into 16 golf-ball size pieces, and roll each one into a smooth ball.

    6. Using a rolling pin, roll each ball of dough into a 6-inch-diameter circle.

    7. Spoon 2 Tbsp. of the filling into the middle of the circle and press 1 olive into the middle of the filling. Lightly brush with water the bottom edge of the dough along one half of the circle. Fold the top half of the dough over the filling to form a semi-circle, and press edges firmly together. Crimp the edges with a fork to seal in the filling. Place the empanadas on a baking sheet.

    8. Lightly beat the egg with the 1 Tbsp. water and brush a thin layer of the mixture over the top surface of each empanada.

    9. Bake the empanadas for 20 minutes, until lightly browned.

    pinterestfacebooktwittermail

    Nutrition facts

    16 Servings


    • Serving Size

      1 empanada


    • Amount per serving


      Calories


      100

    • % Daily value*

    • Total Fat
      2.5g

      3%

      • Saturated Fat
        0g

        0%

    • Cholesterol
      20mg

      7%

    • Sodium
      300mg

      13%

    • Total Carbohydrate
      14g

      5%

      • Dietary Fiber
        0g

        0%
      • Total Sugars
        1g

    • Protein
      6g

    • Potassium
      123mg

      3%

    Ingredients

    chicken breasts (boneless, skinless)
    8 oz

    low sodium chicken broth (fat-free, low-sodium)
    4 cup

    vegetable oil
    1 tbsp

    medium yellow onion (finely diced)
    1

    paprika
    1 tbsp

    cumin
    1 tsp

    chili powder
    1 tsp

    nonstick cooking spray
    1

    premade whole wheat pizza dough (thawed if frozen)
    1 lbs

    green Spanish olives ((such as Manzanilla), pitted)
    16

    eggs
    1

    water
    1 tbsp

  • Asian Tuna Salad

    Asian Tuna Salad

    How to Make Asian Tuna Salad

    This Asian Tuna salad is a perfect for the foodie chefs out there looking for a healthy entree with an Asian zing!


    20 min prep time


    4servings


    1.5 cups salad with just under 4 oz. fish

    Print Recipe >

    Step-By-Step Instructions:

    1. Preheat an indoor or outdoor grill.
    2. In a small bowl, whisk together the soy sauce, Splenda Brown Sugar, hot sauce (optional) and black pepper. Set aside.
    3. Spray the indoor grill with cooking spray. Or, if using an outdoor grill ensure the grates are cleaned and lightly oiled.
    4. Brush tuna and asparagus with the soy sauce marinade. Place onto grill. Grill the tuna for 3 minutes on each side. Grill asparagus, turning often, until beginning to soften (about 6-8 minutes). Remove tuna and asparagus from grill, sprinkle with sesame seeds and set aside to cool. Tuna should be slightly pink in the center but not raw.
    5. Toss the lettuce, red bell pepper and cucumber in a salad bowl.
    6. In a small bowl whisk dressing ingredients. Pour over salad and toss gently to coat. Divide the salad equally among four plates.
    7. Once tuna and asparagus are cool to room temperature or slightly warmer, slice the tuna and divide equally among the four salads (just under 4 ounces of tuna per salad). Lay it gently on top of the salad.
    8. Cut the asparagus spears in half and lay them around the edge of the salad.
    pinterestfacebooktwittermail

    Nutrition facts

    4 Servings


    • Serving Size

      1.5 cups salad with just under 4 oz. fish


    • Amount per serving


      Calories


      265

    • % Daily value*

    • Total Fat
      6g

      8%

      • Saturated Fat
        0.7g

        4%

    • Cholesterol
      60mg

      20%

    • Sodium
      350mg

      15%

    • Total Carbohydrate
      18g

      7%

      • Dietary Fiber
        4g

        14%

    • Protein
      34g

    Ingredients

    light or reduced sodium soy sauce
    2 tbsp

    low-calorie brown sugar substitute
    1 1/2 tbsp

    Asian Hot Sauce (Siracha, optional)
    1 tsp

    black pepper
    1/4 tsp

    nonstick cooking spray
    1

    fresh albacore tuna
    1 lbs

    asparagus (trimmed)
    1 lbs

    sesame seeds
    1 tsp

    spring mix lettuce (washed and dried (or spun in a salad spinner))
    6 cup

    red bell pepper (julienned)
    1 large

    cucumber(s) (seeded and julienned)
    1 med

    rice wine vinegar
    1/4 cup

    low-calorie brown sugar substitute
    1 tbsp

    toasted sesame oil
    1 tbsp

    black pepper
    1/8 tsp

  • Spinach and Sweet Potato Curry (Saag Aloo)

    Spinach and Sweet Potato Curry (Saag Aloo)

    How to Make Spinach and Sweet Potato Curry (Saag Aloo)

    This recipe for a spiced Indian spinach dish replaces the regular potatoes with sweet potatoes for a delicious and healthful new take on curry.


    15 min prep time


    15 min cook time


    6servings


    3/4 cup

    Print Recipe >

    Step-By-Step Instructions:

    1. Add sweet potatoes and 1/2 cup water to a microwave-safe container or steamer with a lid. Microwave for 7-8 minutes or until sweet potatoes are just fork tender. Don’t overcook them.
    2. While the sweet potatoes are steaming, add olive oil to a large sauté pan over medium heat. Add the onions and sauté for 3-4 minutes or until onions turn clear. Add the garlic and sauté 2 more minutes.
    3. Add the salt, pepper, cumin, turmeric, ginger, chili powder and water or broth. Bring to a simmer.
    4. Add in the spinach and cook until wilted, about 5 minutes.
    5. Stir in the sweet potatoes to heat through.
    pinterestfacebooktwittermail

    Nutrition facts

    6 Servings


    • Serving Size

      3/4 cup


    • Amount per serving


      Calories


      80

    • % Daily value*

    • Total Fat
      3g

      4%

      • Saturated Fat
        0.4g

        2%
      • Trans Fats
        0g

    • Cholesterol
      0mg

      0%

    • Sodium
      240mg

      10%

    • Total Carbohydrate
      12g

      4%

      • Dietary Fiber
        3g

        11%
      • Total Sugars
        4g
      • Added Sugars
        0g

        0%

    • Protein
      2g

    • Potassium
      390mg

      8%

    Ingredients

    medium sweet potatoes (peeled and cut into 1-inch chunks)
    2 (about 12 oz total)

    olive oil
    1 tbsp

    medium onion (peeled and thinly sliced)
    1

    garlic (grated or minced)
    2 clove

    salt
    1/2 tsp

    black pepper
    1/2 tsp

    cumin (ground )
    1 tsp

    turmeric
    1 tsp

    ground ginger
    1 tsp

    chili powder
    1 tbsp

    water or vegetable broth
    1 cup

    baby spinach
    5 oz

  • Shrimp Paella with Cauliflower Rice

    Shrimp Paella with Cauliflower Rice

    How to Make Shrimp Paella with Cauliflower Rice

    This shrimp paella is full of flavor from sausage, bell peppers, turmeric and paprika. Using riced cauliflower makes this a lower carb alternative to a traditional Spanish paella.


    10 min prep time


    20 min cook time


    6servings


    1 cup

    Print Recipe >

    Step-By-Step Instructions:

    1. Add cooking spray to a large skillet over medium-high heat. Add sausage, onion, bell pepper and garlic. Sauté until onions are starting to caramelize, about 8 minutes.
    2. Stir in turmeric and paprika. Add the broth, cauliflower rice, salt and pepper. Bring to boil then reduce heat to low, cover and simmer about 5 minutes.
    3. Add the shrimp to the pan, then cover and cook until shrimp are just opaque in center, about 6 minutes.
    pinterestfacebooktwittermail

    Nutrition facts

    6 Servings


    • Serving Size

      1 cup


    • Amount per serving


      Calories


      130

    • % Daily value*

    • Total Fat
      2g

      3%

      • Saturated Fat
        0.6g

        3%
      • Trans Fats
        0g

    • Cholesterol
      80mg

      27%

    • Sodium
      410mg

      18%

    • Total Carbohydrate
      13g

      5%

      • Dietary Fiber
        4g

        14%
      • Total Sugars
        6g

    • Protein
      16g

    • Potassium
      740mg

      16%

    Ingredients

    Nonstick cooking spray
    1

    large onion (diced)
    1

    red bell pepper (seeded and diced)
    1

    fully cooked adouille or chorizo chicken sausage (diced)
    1 (3-oz) link

    garlic (minced)
    2 clove

    turmeric
    1/2 tsp

    paprika
    1/2 tsp

    low sodium chicken broth
    3 cup

    salt
    1/2 tsp

    fresh or frozen cauliflower rice
    6 cup

    black pepper (ground )
    1/2 tsp

    raw shrimp (peeled and deveined)
    12 oz

  • Roast Beef with Creamy Horseradish Sauce

    Roast Beef with Creamy Horseradish Sauce

    How to Make Roast Beef with Creamy Horseradish Sauce

    Lean meats like this roast beef can make a great holiday entrée that the whole family will love.


    10 min prep time


    1 hr 10 min cook time


    14servings


    3 ounces meat and 3 Tbsp. sauce

    Print Recipe >

    Step-By-Step Instructions:

    1. Preheat the oven to 400 degrees F. Combine the black pepper, salt, and garlic, and rub all over the roast. Place the meat in a large roasting pan. Roast the meat for about 20 minutes. 

    2. Reduce the heat to 325 degrees F and bake for about 50 additional minutes or until a meat thermometer inserted in the roast registers 140 degrees F for medium rare. Cook longer if desired. 

    3. Remove the roast from the oven. Cover loosely with foil and let stand for 15-20 minutes. Cut the meat across the grain into thin slices. 

    4. To make the horseradish sauce, combine the horseradish, sour cream, and mustard. Serve with sliced beef. 

    pinterestfacebooktwittermail

    Nutrition facts

    14 Servings


    • Serving Size

      3 ounces meat and 3 Tbsp. sauce


    • Amount per serving


      Calories


      170

    • % Daily value*

    • Total Fat
      5g

      6%

      • Saturated Fat
        2g

        10%
      • Trans Fats
        0g

    • Cholesterol
      60mg

      20%

    • Sodium
      470mg

      20%

    • Total Carbohydrate
      4g

      1%

      • Dietary Fiber
        0g

        0%
      • Total Sugars
        3g
      • Added Sugars
        0g

        0%

    • Protein
      22g

    • Potassium
      271mg

      6%

    Ingredients

    beef roast, bottom round, lean, ⅛” trim, boneless (all excess fat removed; leave at room temperature for 15 minutes before roasting)
    3 lbs

    black pepper
    1 1/2 tbsp

    Kosher Salt
    2 tsp

    garlic (finely minced)
    5 clove

    horseradish (peeled, grated fresh, or prepared horseradish)
    1/2 cup

    nonfat sour cream
    2 cup

    coarse Dijon mustard
    1/4 cup

  • General Tso’s Tofu with Broccoli

    General Tso’s Tofu with Broccoli

    How to Make General Tso’s Tofu with Broccoli

    Chinese food minus the takeout menu? It’s possible to produce satisfying results that keep sodium and calories in check. This recipe calls for tofu that’s patted dry and sprinkled with cornstarch before baking, so it gets brown and crispy without deep frying. Serve over brown rice or cauliflower rice for a low carb meal.


    35 min prep time


    30 min cook time


    4servings


    1 cup

    Print Recipe >

    Step-By-Step Instructions:

    1. Preheat oven to 350° F, and a coat baking sheet with cooking spray. Set aside.
    2. Pat tofu dry with a paper towel.
    3. Marinate the tofu: Combine 1 tsp soy sauce, 2 tsp rive vinegar, 1 tsp oil, half of the minced garlic and half of the grated ginger in a bowl. Add tofu and toss to coat. Marinate 30 minutes.
    4. Sprinkle 1 tbsp cornstarch over tofu and turn to coat evenly. Spread tofu on the baking sheet in a single layer. Bake 30 minutes, turning frequently, or until brown all sides.
    5. While the tofu is baking, whisk together broth, honey, remaining 1 tbsp soy sauce, remaining tbsp vinegar, sesame oil, remaining 2 tsp cornstarch, tomato paste and hot sauce in small bowl. Set aside.
    6. Add remaining 2 tsp vegetable oil to a large sauté pan or wok over medium-high heat. Add scallions and the rest of the garlic and ginger, and stir-fry 1 minute. Add sauce mixture and cook 2-3 minutes, or until thickened.
    7. Stir the baked tofu and broccoli into the sauce and serve.
    pinterestfacebooktwittermail

    Nutrition facts

    4 Servings


    • Serving Size

      1 cup


    • Amount per serving


      Calories


      210

    • % Daily value*

    • Total Fat
      11g

      14%

      • Saturated Fat
        1.3g

        7%
      • Trans Fats
        0g

    • Cholesterol
      0mg

      0%

    • Sodium
      280mg

      12%

    • Total Carbohydrate
      17g

      6%

      • Dietary Fiber
        3g

        11%
      • Total Sugars
        6g

    • Protein
      13g

    • Potassium
      360mg

      8%

    Ingredients

    nonstick cooking spray
    1

    extra firm tofu (drained and cut into 1-inch chunks)
    16 oz

    lower sodium soy sauce (divided use)
    1 tbsp plus 1 tsp

    rice vinegar (divided use)
    1 tbsp plus 2 tsp

    vegetable oil (divided use)
    3 tsp

    garlic (minced, divided use)
    2 clove

    grated ginger (divided use)
    1 tsp

    Cornstarch (divided use)
    1 tbsp plus 2 tsp

    low sodium vegetable broth
    1/2 cup

    honey or 2 packets artificial sweetener
    1 tbsp

    tomato paste
    1 1/2 tsp

    sesame oil
    2 tsp

    Asian-style hot sauce (such as sambal oelek)
    1/2 tsp

    green onion (scallion) (sliced thinly)
    2

    broccoli (steamed)
    2 cup

  • Top 20 Recipes of 2018

    Top 20 Recipes of 2018

    As we move into the new year and thoughts turn to healthy resolutions and diabetes meal planning, the Diabetes Food Hub team looked back at the first year of the site and reviewed the most popular recipes as determined by, you, our visitors. Favorites ranged from a low-carb chicken and mushroom superstar to breakfast frittatas just begging for a personal spin. Altogether, they make a fantastic round up of meals designed to help you be the best you in 2019 and beyond. Click on the slideshow below to see the top crowd pleasers of 2018.

    The Top 20 Diabetes Food Hub Recipes of 2018

  • 7 Tips for Boosting Flavor Without Salt

    7 Tips for Boosting Flavor Without Salt

    If you think that eating nutritious food with less salt means sacrificing taste, think again! Healthy, home-cooked meals, made with quality ingredients, are packed with vibrant flavors. Whether you’re new to cooking or you’re an experienced chef looking to reduce the salt in your meals, these easy tips will help you make healthy meals even more delicious.

    1. Add acids: Citrus fruits, such as lemons and limes, and vinegars play an important role in healthy cooking. Acids act a little like salt in that they help bring out the natural brightness of foods and work to meld flavors together. Try making a quick salad dressing with lemon juice and zest or red wine vinegar with a smidge of oil—or toss veggies and grains with citrus or vinegar to brighten them up. With this added pop of flavor, you’ll think it’s summer all year long!

    2. Spice everything nice: Spices are a great way to add flavor and character to a dish without adding calories, fat, and salt. Spices can add a unique flavor profile to any dish—a simple chicken breast becomes Tex-Mex chicken when you add cumin and chili powder, Jamaican chicken with a little cayenne, cinnamon, and allspice, or Morrocan chicken with some ginger and coriander. 

    Check out this article on DIY spice blends to learn how to create your own multi-use spice mixes!

    3. Cooking with spices: While herbs can be used fresh or dried, spices tend to be dried and jarred, enabling you to build a diverse collection over time. While dried herbs and spices don’t “expire”, per se, they start to lose their flavor after about 6 months. Be sure to date your spice jars and replace them every 6–12 months for maximum flavor. 

    4. Adding flavor on a budget: Jarred herbs and spices can be pricey! Check the international foods aisle for cheaper (and smaller) packages of some common spices. Or find a local store that sells herbs and spices in bulk—they are typically MUCH cheaper, and you can buy just what you need!

    5. Herb it up: Nothings brings a little extra life and flavor to a meal or dish like some fresh herbs (not to mention some powerful nutritional benefits from vitamins, minerals, and antioxidants!), without adding any extra fat, calories, or salt. Next time you harvest or buy fresh herbs (such as basil, cilantro, rosemary, or thyme), give them a good chop and mix them with a little oil. Add some of the herb infused oil to veggies or meats before grilling and store the rest in ice-cube trays in the freezer so you have ready-to-use marinade or seasoning oil on hand all winter long! 

    Try this recipe for Everyday Herb Oil!

    Dried herbs are more potent than fresh herbs. If you are subbing dried herbs for fresh in a recipe, use 1 teaspoon for every tablespoon of fresh herb (and vice versa).

    6. Cooking with herbs: You can usually use either dried or fresh herbs in a recipe. Dried herbs are more potent than fresh—use 1 teaspoon of dried herb for every tablespoon of fresh (and vice versa). If you are cooking with dried herbs, add them to the dish earlier in the cooking process so they have time to release their flavor. For fresh herbs, add toward the end of cooking process. 

    7. Maximize your herb use: Here are some ideas for sneaking fresh herbs into everydays meals, snacks and even beverages:
    Herbed salad greens: toss sprigs of parsley, basil, dill, or rosemary into a salad to add some extra pizzazz.
    Herbed ice cubes: when freezing ice cubes, add mint or basil leaves to freshen an ordinary glass of water or iced tea.
    Fresh herb pizza: Whether you make your pizza from scratch or buy it, there’s always room to add a few fresh leaves of basil, rosemary, or oregano to the top before you stick it in the oven.
    Fresh herbs and tea: Add a few leaves of sage or spearmint in with your favorite varieties of tea to spice them up a little!

    Find more tips for creating fresh, flavorful, and nourishing meals in my cookbook, Whole Cooking and Nutrition!

  • Slideshow: 10 Low-Carb Fruit Recipes

    Slideshow: 10 Low-Carb Fruit Recipes

    As the end of summer approaches, most fruit varieties reach their peak. This means that prices at the grocery store or farmers market go down, while the fresh flavor goes up. There’s not a better time to stock up and take advantage of recipes that lean on fruit to add complex flavors or a touch of sweetness. And while it’s always wise to keep an eye on the carb content, the fiber- and vitamin-rich profile of most fruits mean you can indulge a little while keeping carb counts diabetes friendly.

     For more fruit-based and diabetes-friendly recipes, go here.

  • Planning for a Picnic

    Planning for a Picnic

    Warm weather is a great time to move the meal outdoors. But as you pack your basket and plan for a healthy, diabetes-friendly meal in the open air, there are some tips and tricks you can use to keep your meal savory, safe, and successful. Whether your family is planning a beach trip, picnic, or reunion, food is usually involved. Before you hit the road for your next outing, remember these tips to keep your food fresh while also keeping you and your loved ones healthy and safe.

    Food Safety 

    Be sure to plan, portion, and pack your meal with food safety in mind for a worry-free trip.

    • Pack smart: Put the popular items, like drinks, on top when you are packing the food. You don’t want to pull out the pasta salad every time someone wants a of water. Better yet, pack drinks and food in separate coolers so the food can stay cold until you are ready to eat.
    • Stay out of the Danger Zone: Bacteria can grow quickly when food isn’t stored at the right temperature. Keep cold food at or below 40°F using ice or cool packs and keep hot food at or above 140°F using things like slow cookers and warming plates. 
    • Keep it cool: Place bags and coolers inside the car and not in the trunk, which can heat up like an oven. You don’t want the Fruit Salad with Honey Yogurt going bad before you make it to your destination.
    • Watch the clock: When it’s finally time to enjoy your meal, keep an eye on the clock. Food can spoil if it sits out longer than two hours. On very hot days, don’t leave food out for more than one hour. Keep your food safe by serving it up and keeping the rest of the food in the cooler.

    Check out Focus on Food Safety for more food safety tips!

    Keeping it Healthy

    Picnics, cookouts, BBQs, potlucks—these outdoor feasts are not usually known for their healthy food options. It’s still possible to eat well and have fun with a few simple tips:

    • Make it a meal: It’s tempting to pack up all your favorite foods when planning something fun, but remember: it’s still a meal! Try to bring a variety of foods including fruits, non-starchy vegetables, and plenty of water. 
    • Watch your portions: It’s easy to overeat at cookouts, picnics, and other celebrations where platters of food are readily available for grazing. Keep your portions similar to what you would eat at home, and be sure to use a plate so you know exaclty how much you are eating. 
    • Want not, waste not: If you think there may be extra food, be prepared with extra containers and plenty of ice and cooler space for proper storage.

    Meal Makeovers: Picnic Edition

    There are many traditional picnic dishes that you can bring or cook outdoors. There are also many options to ensure that your picnic is flavorful and healthy. Try out some of these meal makeovers of traditional picnic dishes:

    Beef burgers

    A staple at most cookouts, burgers made of beef are often high in saturated fat. Try using ground chicken or turkey, or try a veggie burger.

    Try instead:

    Creamy side salads

    Potato salad, pasta salad, coleslaw—these classic picnic side dishes are usually coated with creamy mayonnaise, adding lots of fat and calories. Try side salads with lighter dressings.

    Try instead:

    Dips

    Dips are a popular side dish, but they are often cream based, which can add more calories and fat. Try a bean or veggie based dip for something lighter. Sub raw veggies for chips for an even lighter snack.

    Try instead: