Category: Recipe

  • Panzanella Salad

    Panzanella Salad

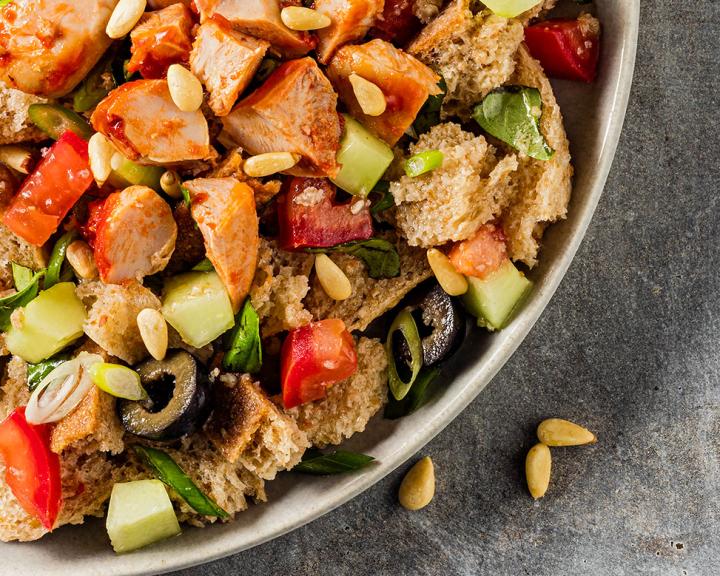
    How to Make Panzanella Salad

    Panzanella is a traditional Italian salad made with stale bread. Fresh tomatoes, cucumbers, basil, olives, and chicken are added for a refreshing summer meal, with everything you need in one bowl. You could use a rotisserie chicken from the store, or leftover chicken from another recipe.

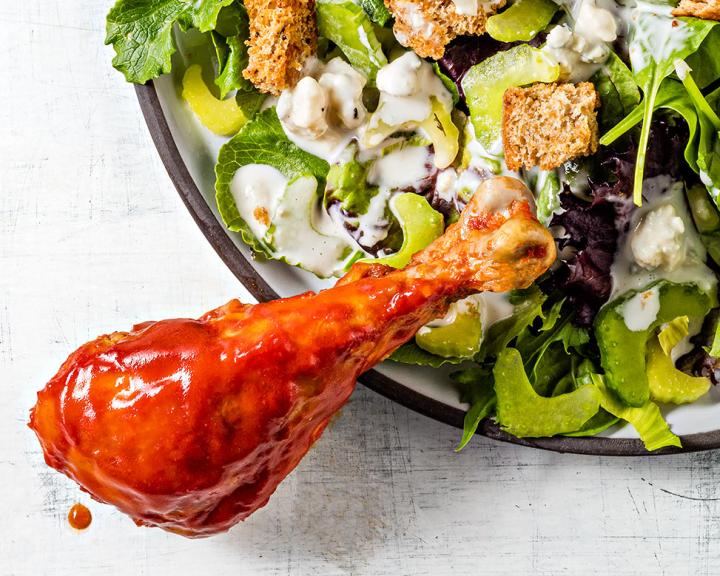
    Double Up: For a little heat, make a double batch of buffalo chicken from this recipe for Buffalo Chicken Legs with Blue Cheese Salad and use the leftovers for this panzanella salad.


    20 min prep time


    4servings


    about 4 cups

    Print Recipe >

    Step-By-Step Instructions:

    1. Soak the bread in a small bowl of water until just soft (no more than a few seconds). Squeeze out all of the water and break into small pieces.

    2. Place the bread pieces in a large bowl with the scallions, tomatoes, basil, cucumber, and olives. Add 4 Tbsp of the salad dressing and mix well. Divide among 4 dinner plates.

    3. Add the chicken pieces to each plated salad. Sprinkle with pine nuts. Drizzle the remaining 2 Tbsp of dressing over the salads.

    pinterestfacebooktwittermail

    Nutrition facts

    4 Servings


    • Serving Size

      about 4 cups


    • Amount per serving


      Calories


      520

    • % Daily value*

    • Total Fat
      18g

      23%

      • Saturated Fat
        3.1g

        16%
      • Trans Fats
        0g

    • Cholesterol
      140mg

      47%

    • Sodium
      410mg

      18%

    • Total Carbohydrate
      46g

      17%

      • Dietary Fiber
        7g

        25%
      • Total Sugars
        24g

    • Protein
      43g

    • Potassium
      1275mg

      27%

    Ingredients

    whole wheat bread (1-2 days old)
    6 large slices

    scallions (sliced)
    8

    medium tomatoes (cut into cubes)
    4

    fresh basil leaves (torn into bite-size pieces)
    2 packed cups

    medium cucumber (peeled and cut into cubes)
    1

    pitted black olives (halved)
    10

    light Italian salad dressing (divided)
    6 tbsp

    cooked chicken (cut into cubes)
    4 cup

    pine nuts
    1/2 cup

  • Buffalo Chicken Legs with Blue Cheese Salad

    Buffalo Chicken Legs with Blue Cheese Salad

    How to Make Buffalo Chicken Legs with Blue Cheese Salad

    A tangy, cool salad topped with blue cheese dressing balances the heat of buffalo drumsticks. You can add more or less cayenne pepper, depending on how hot you like. Try making your own dressing with this Light Blue Cheese Dressing recipe.

    Double Up: Double the buffalo chicken in this recipe and use the leftover chicken in this Panzanella Salad.

    Find this recipe and weekly meal plans in our book, The 12-Week Diabetes Cookbook by Linda Gassenheimer. To order directly from the American Diabetes Association, click here.


    10 min prep time


    20 min cook time


    4servings


    2 1/2 cups salad with 2-3 drumsticks

    Print Recipe >

    Step-By-Step Instructions:

    1. In a medium bowl, mix the cayenne pepper (add an additional 1/2 tsp for extra spiciness), honey, vinegar, tomato paste, and garlic to form a smooth sauce. Set aside.
    2. Heat the oil in a large nonstick skillet over medium-high heat. Add the chicken in one layer and brown for 5 minutes. Turn and brown 5 more minutes.
    3. Reduce the heat to low and add the sauce to the skillet. Stir to coat the chicken. Cover the skillet and cook for 5 minutes. A meat thermometer inserted into the chicken should read 170° F when it’s fully cooked.
    4. Divide the salad greens among 4 dinner plates. Add the celery and croutons, then drizzle with blue cheese dressing. Divide the chicken among the 4 plates, and top with any remaining buffalo sauce.
    pinterestfacebooktwittermail

    Nutrition facts

    4 Servings


    • Serving Size

      2 1/2 cups salad with 2-3 drumsticks


    • Amount per serving


      Calories


      460

    • % Daily value*

    • Total Fat
      18g

      23%

      • Saturated Fat
        3.5g

        18%
      • Trans Fats
        0g

    • Cholesterol
      140mg

      47%

    • Sodium
      550mg

      24%

    • Total Carbohydrate
      35g

      13%

      • Dietary Fiber
        6g

        21%
      • Total Sugars
        16g

    • Protein
      40g

    • Potassium
      1020mg

      22%

    Ingredients

    cayenne pepper
    1/2 tsp

    honey
    3 tbsp

    white vinegar
    1/4 cup

    tomato paste
    1/4 cup

    garlic (crushed)
    4 clove

    canola oil
    2 tbsp

    skinless chicken drumsticks with bone
    3 lbs

    washed, ready-to-eat mixed salad greens
    8 cup

    sliced celery
    2 cup

    whole-wheat croutons
    2 cup

    light blue cheese dressing
    1/2 cup

  • Instant Pot Almond-Toffee Topped Pears

    Instant Pot Almond-Toffee Topped Pears

    How to Make Instant Pot Almond-Toffee Topped Pears

    Toast, poach, and simmer—everything you need to do to make this tasty dessert you can do in the Instant Pot! Sugar-free candies are used to create a rich toffee sauce to top these cinnamon poached pears. It may look fancy, but this dessert comes together in under 20 minutes.

    Find this recipe and more in The Instant Pot Diabetes Cookbook

    Find more diabetes-friendly Instant Pot recipes here.


    15 min prep time


    11 min cook time


    4servings


    1/2 pear

    Print Recipe >

    Step-By-Step Instructions:

    1. Press the Sauté button on the multicooker. When the pot is hot, add the almonds and cook for 4 minutes, stirring occasionally. Set aside to cool, then coarsely chop.
    2. In a small bowl, add the chopped almonds, crushed candies, and salt. Set aside.
    3. Place the water, juice, and cinnamon stick in the multicooker pot. Place the steamer basket in the pot and arrange the pears on top of it.
    4. Seal the lid, close the valve, and press the Cancel button. Select Manual and cook for 2 minutes. (If you prefer a very tender pear, cook an additional minute.) Use a quick pressure release.
    5. When the valve drops, carefully remove the lid. Remove the steamer basket and pears. Place the pears, cut side up, in four dessert bowls. Remove and discard the cinnamon stick.
    6. Press the Cancel button, then press the Sauté button. Bring the liquid in the pot to a boil. Boil for 3 minutes, or until the liquid is reduced to ¼ cup. Stir in the butter, vanilla extract, and almond-candy mixture. Cook for 30 seconds, or until the toffee has melted, stirring constantly.
    7. Working quickly, spoon about 4 tsp of the toffee sauce into the center of each pear half.
    pinterestfacebooktwittermail

    Nutrition facts

    4 Servings


    • Serving Size

      1/2 pear


    • Amount per serving


      Calories


      130

    • % Daily value*

    • Total Fat
      5g

      6%

      • Saturated Fat
        0.9g

        5%
      • Trans Fats
        0g

    • Cholesterol
      5mg

      2%

    • Sodium
      80mg

      3%

    • Total Carbohydrate
      22g

      8%

      • Dietary Fiber
        4g

        14%
      • Total Sugars
        11g

    • Protein
      2g

    • Potassium
      170mg

      4%

    Ingredients

    slivered almonds
    1/4 cup

    sugar-free caramel-flavored hard candies (such as Werther’s) (crushed)
    8

    salt
    1 pinch

    water
    3/4 cup

    apple juice
    1/4 cup

    cinnamon stick
    1

    firm pears (peeled, halved lengthwise, and cored)
    2

    light butter with canola oil
    1 tsp

    vanilla extract
    1/2 tsp

  • Instant Pot Chicken Curry Salad

    Instant Pot Chicken Curry Salad

    How to Make Instant Pot Chicken Curry Salad

    Steaming chicken breast in an Instant Pot creates moist, tender chicken that you can use in any dish. In this recipe, the chicken tops a vibrant salad of greens, edamame, and asparagus (which are also steamed in the Instant Pot) mixed with a curry-yogurt dressing. This recipe is perfect for meal prepping—you can prepare everything over the weekend and pack it up in individual containers for grab-and-go lunches all week.

    Find more diabetes-friendly Instant Pot recipes here.


    12 min prep time


    23 min cook time


    4servings


    1/2 cup chicken with 1 1/2 cups greens

    Print Recipe >

    Step-By-Step Instructions:

    1. Sprinkle the chicken with the cumin and black pepper. Place the water in the multicooker pot. Arrange the chicken in the steamer basket.
    2. Seal the lid and close the valve. Select Manual and cook for 6 minutes. Use a natural pressure release for 5 minutes, followed by a quick pressure release.
    3. When the pressure cooker valve drops, carefully remove the lid. Remove the chicken and place it on a cutting board. Let sit for 5 minutes before slicing or chopping, according to preference.
    4. In a medium bowl, whisk together the yogurt, mayonnaise, sugar, curry, and salt. Set aside.
    5. Place the asparagus and edamame in the steamer basket. Seal the lid, close the valve, and press the Cancel button. Select Manual and cook for 1 minute. Use a quick pressure release.
    6. When the valve drops, carefully remove the lid and transfer the asparagus mixture to a colander. Run under cold water to stop the cooking process; drain well.
    7. Place equal amounts of the kale mix on each of 4 dinner plates. Top with the asparagus mixture.
    8. Add the chicken and the onion to the yogurt dressing, and toss until well coated. Spoon equal amounts of the curried chicken on top of each plate of veggies. (Alternatively, place the chicken on the veggies, drizzle with dressing, and top with the onion.) Sprinkle with cilantro.
    pinterestfacebooktwittermail

    Nutrition facts

    4 Servings


    • Serving Size

      1/2 cup chicken with 1 1/2 cups greens


    • Amount per serving


      Calories


      240

    • % Daily value*

    • Total Fat
      8g

      10%

      • Saturated Fat
        1.4g

        7%
      • Trans Fats
        0g

    • Cholesterol
      50mg

      17%

    • Sodium
      470mg

      20%

    • Total Carbohydrate
      17g

      6%

      • Dietary Fiber
        5g

        18%
      • Total Sugars
        8g

    • Protein
      26g

    • Potassium
      660mg

      14%

    Ingredients

    boneless, skinless chicken breasts
    12 oz

    ground cumin
    1 tsp

    black pepper
    1/4 tsp

    water
    2 cup

    2% plain Greek yogurt
    1/4 cup

    light mayonnaise
    1/4 cup

    sugar
    1 tbsp

    curry powder
    1 1/2 tsp

    salt
    1/2 tsp

    asparagus cut into 1-inch pieces
    2 cup

    fresh or frozen shelled edamame
    1 cup

    baby kale mix
    4 cup

    chopped red onion
    1/2 cup

    chopped cilantro or green onion
    1/4 cup

  • Instant Pot Vegetarian Thai Mushroom Soup

    Instant Pot Vegetarian Thai Mushroom Soup

    How to Make Instant Pot Vegetarian Thai Mushroom Soup

    Instead of ordering takeout, make a healthier version of this classic Thai soup at home in your Instant Pot! This vegan soup gets it’s rich creaminess from coconut milk. It’s also loaded with vegetables to make a hearty soup perfect for a light lunch or dinner. Best of all, the Instant Pot speeds up the cooking time, so it’s ready in less than 30 minutes, but tastes like it’s been cooking all day!

    Find more diabetes-friendly Instant Pot recipes here.


    10 min prep time


    16 mintues cook time


    4servings


    1 1/2 cups

    Print Recipe >

    Step-By-Step Instructions:

    1. Combine the mushrooms, frozen vegetables, chickpeas, tomatoes, water, sriracha, and cumin in the multicooker pot.
    2. Seal the lid and close the valve. Select Manual and cook for 8 minutes. Use a quick pressure release.
    3. When the valve drops, carefully remove the lid and stir in the remaining ingredients. Let sit for 5 minutes to allow the flavors to blend. Serve warm.
    pinterestfacebooktwittermail

    Nutrition facts

    4 Servings


    • Serving Size

      1 1/2 cups


    • Amount per serving


      Calories


      240

    • % Daily value*

    • Total Fat
      7g

      9%

      • Saturated Fat
        4.8g

        24%
      • Trans Fats
        0g

    • Cholesterol
      0mg

      0%

    • Sodium
      440mg

      19%

    • Total Carbohydrate
      35g

      13%

      • Dietary Fiber
        7g

        25%
      • Total Sugars
        13g

    • Protein
      12g

    • Potassium
      930mg

      20%

    Ingredients

    sliced mushrooms, preferably cremini (baby bella)
    8 oz

    frozen pepper-and-onion blend
    2 cup

    no-salt-added chickpeas (rinsed and drained)
    1 (15-oz) can

    no-salt-added diced tomatoes
    1 (14.5-oz) can

    water
    1/2 cup

    sriracha
    1 tbsp

    ground cumin
    1/2 tsp

    lite coconut milk
    1 1/2 cup

    chopped fresh cilantro
    1/2 cup

    sugar
    1 tbsp

    grated fresh ginger
    1 tbsp

    salt
    1/2 tsp

  • Air Fryer Sweet Potato Nachos

    Air Fryer Sweet Potato Nachos

    How to Make Air Fryer Sweet Potato Nachos

    The air fryer makes it easy to make crispy homemade sweet potato chips that are low in fat. Topping these veggie-rich nachos with frozen chopped vegetables makes it quick and easy to prepare this dish that can serve as an appetizer for a crowd, or a vegetarian entree.


    12 min prep time


    22 min cook time


    4servings


    1 cup

    Print Recipe >

    Step-By-Step Instructions:

    1. Place the sweet potato slices evenly in the air fryer basket. Spray with nonstick cooking spray for 1 second. Spoon the frozen vegetables evenly over the potatoes. Place the jalapeño over the vegetables, skin side up. Spray with nonstick cooking spray for 1 second.
    2. Set the temperature to 375° F and air fry for 20 minutes, or until the potatoes are cooked. They should be tender but crisp, not soft. Remove the jalapeño pepper and place it in a bowl; cover loosely with a kitchen towel and let stand for 5 minutes.
    3. Sprinkle the cheese evenly over the vegetables. Air fry for 2 minutes, or until the cheese is melted.
    4. Using the tip of a sharp knife, remove the browned or charred skin from the jalapeño pepper. Finely chop the pepper.
    5. Using a spatula, lift the potatoes and vegetables out of the air fryer basket and arrange in an even layer on a serving platter. Sprinkle the chopped jalapeño over the vegetables. Top with the salsa, radishes, tomatoes, and lettuce. Add a dollop of sour cream and sprinkle of cilantro. Serve immediately.
    pinterestfacebooktwittermail

    Nutrition facts

    4 Servings


    • Serving Size

      1 cup


    • Amount per serving


      Calories


      100

    • % Daily value*

    • Total Fat
      2.5g

      3%

      • Saturated Fat
        1g

        5%
      • Trans Fats
        0g

    • Cholesterol
      5mg

      2%

    • Sodium
      180mg

      8%

    • Total Carbohydrate
      17g

      6%

      • Dietary Fiber
        3g

        11%
      • Total Sugars
        6g

    • Protein
      4g

    • Potassium
      450mg

      10%

    Ingredients

    medium sweet potato (sliced into 1/8-inch thick chips)
    1

    nonstick cooking spray
    1

    frozen pepper-and-onion blend (partially thawed and drained)
    1 1/2 cup

    jalapeño pepper (split lengthwise and seeded)
    1

    reduced-fat shredded cheddar or Mexican-style cheese
    1/4 cup

    salsa
    1/4 cup

    julienned or thinly sliced radishes
    2/3 cup

    cherry tomatoes (cut into fourths)
    4

    shredded romaine lettuce
    1/2 cup

    light sour cream
    2 tbsp

    minced fresh cilantro
    1 tbsp

  • Air Fryer Coconut Shrimp

    Air Fryer Coconut Shrimp

    How to Make Air Fryer Coconut Shrimp

    Classic coconut shrimp gets a healthy makeover in the air fryer! Enjoy these crispy shrimp as a low-carb appetizer or entree. Tip: Do not crowd the shrimp in the air fryer. If they do not all fit comfortably in one layer in the air fryer basket, cook the shrimp in batches.

    Click here for more air fryer recipes!


    12 min prep time


    8 min cook time


    4servings


    4 oz (about 6 shrimp)

    Print Recipe >

    Step-By-Step Instructions:

    1. Pat the shrimp dry using paper towels. Place the egg whites and water in a shallow bowl, whisking to combine.
    2. Combine the panko bread crumbs, coconut, cumin, turmeric, coriander, and salt in another shallow bowl.
    3. Dip the shrimp in the egg mixture, allowing the excess to drip back into the bowl, and then coat in the panko mixture. Place the coated shrimp on a wire rack. Repeat with all shrimp.
    4. Place the shrimp in a single layer in the air fryer basket. Spray the shrimp with nonstick cooking spray for 2 seconds. Set the temperature to 400º F and air fry for 4 minutes. Turn the shrimp over. Air fry for 2 to 4 minutes, or until the shrimp are golden brown. Serve warm.
    pinterestfacebooktwittermail

    Nutrition facts

    4 Servings


    • Serving Size

      4 oz (about 6 shrimp)


    • Amount per serving


      Calories


      180

    • % Daily value*

    • Total Fat
      4.5g

      6%

      • Saturated Fat
        3g

        15%
      • Trans Fats
        0g

    • Cholesterol
      190mg

      63%

    • Sodium
      230mg

      10%

    • Total Carbohydrate
      9g

      3%

      • Dietary Fiber
        2g

        7%
      • Total Sugars
        1g

    • Protein
      28g

    • Potassium
      350mg

      7%

    Ingredients

    large raw shrimp (peeled and deveined)
    1 lb (20-30 shrimp

    egg whites (beaten)
    2

    water
    1 tbsp

    whole-wheat panko bread crumbs
    1/2 cup

    unsweetened coconut flakes
    1/4 cup

    ground cumin
    1/2 tsp

    turmeric
    1/2 tsp

    ground coriander
    1/2 tsp

    salt
    1/8 tsp

    nonstick cooking spray
    1

  • Air Fryer Spicy Green Beans

    Air Fryer Spicy Green Beans

    How to Make Air Fryer Spicy Green Beans

    Spice up your green beans with this air fried dish that can serve as a low-carb appetizer, snack, or side dish. Crispy panko and spicy chili paste add flavor and crunch. Cooking in the air fryer gives you the satisfying crunch of fried food, without all the added fat of deep frying.

    Click here for more air fryer recipes!


    10 min prep time


    10 min cook time


    4servings


    1/2 cup

    Print Recipe >

    Step-By-Step Instructions:

    1. Place the green beans in a medium bowl and toss with the olive oil, chili garlic paste, panko bread crumbs, and salt.
    2. Place the green beans in the air fryer basket. Set the temperature to 400° F and air fry for 4 minutes. Shake the air fryer basket. Air fry for an additional 5 to 7 minutes. Serve warm.
    pinterestfacebooktwittermail

    Nutrition facts

    4 Servings


    • Serving Size

      1/2 cup


    • Amount per serving


      Calories


      60

    • % Daily value*

    • Total Fat
      3.5g

      4%

      • Saturated Fat
        0.5g

        3%
      • Trans Fats
        0g

    • Cholesterol
      0mg

      0%

    • Sodium
      160mg

      7%

    • Total Carbohydrate
      7g

      3%

      • Dietary Fiber
        2g

        7%
      • Total Sugars
        1g

    • Protein
      2g

    • Potassium
      115mg

      2%

    Ingredients

    fresh green beans (trimmed)
    12 oz

    olive oil
    1 tbsp

    Thai-style chili garlic paste
    1 tsp

    whole-wheat panko bread crumbs
    1 tbsp

    salt
    1/4 tsp

  • Instant Pot Asian Spaghetti Squash

    Instant Pot Asian Spaghetti Squash

    How to Make Instant Pot Asian Spaghetti Squash

    Spaghetti squash is a great low-carb alternative to grain-based noodles, especially in Asian dishes where it’s light texture is similar to glass or rice noodles. Ginger, lime, and edamame create a light and refreshing flavor in this dish that can be enjoyed hot or cold as leftovers the next day.

    Spaghetti squash can take a long time to cook in the oven, but the Instant Pot cooks the squash in a fraction of the time. Prepare the vegetables while the squash cooks, and this recipe can go from pantry to plate in just about 30 minutes!

    Find more diabetes-friendly Instant Pot recipes here.


    20 min prep time


    17 min cook time


    6servings


    About 1 1/2 cups

    Print Recipe >

    Step-By-Step Instructions:

    1. Pierce the squash over the entire surface with the tip of a sharp knife. Place in the microwave and set on high for 2 minutes. Using 2 dish towels or pot holders, carefully remove the squash from the microwave (it will be hot). Cut the squash in half crosswise, not lengthwise. Scrape out the seeds and connecting strands with a spoon.
    2. Place the water and a trivet in the Instant Pot. Place the 2 squash halves on the trivet. Seal the lid, close the valve, and set the Manual/Pressure Cook button to 7 minutes.
    3. Use a quick pressure release. Meanwhile, combine the soy sauce, juice of 1 of the limes, sugar, ginger, and crushed pepper flakes in a small bowl. Whisk until well blended and set aside.
    4. When the valve drops, carefully remove the lid. Remove the squash halves and place on a cutting board. Remove the trivet.
    5. Press the Cancel button and set to Sauté. Then press the Adjust button to “More” or “High.” Add the edamame to the water, bring to a boil, and boil for 2 minutes. Drain well.
    6. To create long spaghetti squash strands, run a fork around the outer edges of the squash to release the strands, rather than “raking through” the strands.
    7. Place the squash in a large serving bowl or divide among 6 individual bowls. Top the squash evenly with the edamame, carrots, and green onion, spoon the soy sauce mixture evenly over all, and sprinkle with the nuts and cilantro. Do not stir. Cut the remaining lime into 6 wedges and serve with the squash to squeeze over all.
    pinterestfacebooktwittermail

    Nutrition facts

    6 Servings


    • Serving Size

      About 1 1/2 cups


    • Amount per serving


      Calories


      180

    • % Daily value*

    • Total Fat
      8g

      10%

      • Saturated Fat
        0.7g

        4%
      • Trans Fats
        0g

    • Cholesterol
      0mg

      0%

    • Sodium
      320mg

      14%

    • Total Carbohydrate
      21g

      8%

      • Dietary Fiber
        6g

        21%
      • Total Sugars
        9g

    • Protein
      10g

    • Potassium
      820mg

      17%

    Ingredients

    spaghetti squash
    1 (about 3 lbs)

    water
    1 cup

    lower sodium soy sauce
    3 tbsp

    limes
    2

    sugar
    4 tsp

    grated fresh ginger
    1 tbsp

    crushed red pepper flakes
    1/8 tsp

    frozen shelled edamame
    12 oz

    matchstick carrots
    1 cup

    chopped green onion
    1/2 cup

    unsalted peanuts or slivered almonds (chopped)
    2 oz

    chopped fresh cilantro
    1/2 cup

  • Instant Pot Lentils and Poached Eggs

    Instant Pot Lentils and Poached Eggs

    How to Make Instant Pot Lentils and Poached Eggs

    Zesty lentils pair beautifully with a creamy poached egg in this dish that is great anytime of day! Enjoy it in the morning for a high-fiber, high-protein breakfast that will leave you full until lunchtime. For an even quicker and easier meal, make the lentils ahead of time. You can poach the eggs in the Instant Pot in the time it takes to reheat the lentils in the microwave!

    Find more diabetes-friendly Instant Pot recipes here.


    13 min prep time


    19 min cook time


    4servings


    3/4 cup lentil mixture with 1 egg

    Print Recipe >

    Step-By-Step Instructions:

    1. Place the lentils, bay leaves, and 2 cups of the water in the Instant Pot. Seal the lid, close the valve, and set the Manual/Pressure Cook button to 7 minutes.
    2. Meanwhile, in a small bowl, whisk together the oil, parsley, lemon zest and juice, and 1/4 tsp of the salt. Set aside.
    3. Coat 4 (6-oz) ramekins with cooking spray and crack 1 egg into each ramekin. Set aside.
    4. Use a quick pressure release. When the valve drops, carefully remove the lid and drain the lentils, (discarding the lentil water and 2 bay leaves). Return the lentils to the Instant Pot with the spinach and 1/4 tsp of the salt. Toss until the spinach is just wilted and divide it between 4 soup bowls. Cover to keep warm.
    5. Add 1 cup of water to the pot, add a trivet and 3 ramekins. Stack the 4th ramekin on top of the other ramekins. Seal the lid, close the valve, press the Cancel button, and reset the Manual/Pressure Cook button to 1 minute.
    6. Use a natural pressure release for 1 minute, followed by a quick pressure release. When the valve drops, carefully remove the lid. Remove the ramekins and drain off any excess water that may have accumulated while cooking. Carefully run a knife around outer edges of each egg to release from the ramekin easily.
    7. Spoon equal amounts of the oil mixture on top of each serving of lentils and top with the eggs. Sprinkle with black pepper.
    pinterestfacebooktwittermail

    Nutrition facts

    4 Servings


    • Serving Size

      3/4 cup lentil mixture with 1 egg


    • Amount per serving


      Calories


      280

    • % Daily value*

    • Total Fat
      15g

      19%

      • Saturated Fat
        3g

        15%
      • Trans Fats
        0g

    • Cholesterol
      185mg

      62%

    • Sodium
      390mg

      17%

    • Total Carbohydrate
      22g

      8%

      • Dietary Fiber
        9g

        32%
      • Total Sugars
        2g

    • Protein
      16g

    • Potassium
      590mg

      13%

    Ingredients

    dried green or brown lentils (rinsed and drained)
    3/4 cup

    bay leaves
    2

    water (divided)
    3 cup

    olive oil
    3 tbsp

    grated zest and juice of 1 lemon
    1

    finely chopped fresh parsley
    1 tbsp

    salt (divided)
    1/2 tsp

    nonstick cooking spray
    1

    eggs
    4

    baby spinach
    4 cup

    black pepper
    1/4 tsp